
Introduction
This manual provides detailed instructions for the assembly, operation, and maintenance of your Domi Outdoor Living 10'x12' Hardtop Gazebo. Designed with a durable wooden-coated aluminum frame and a galvanized steel double roof, this gazebo offers 120 square feet of covered space, ideal for outdoor gatherings, relaxation, or as a shelter. It includes a double-track system with both insect netting and privacy curtains for versatile use.

Figure 1: The Domi Outdoor Living 10'x12' Hardtop Gazebo provides a spacious outdoor living area.
Safety Information
- Professional Assembly Recommended: Due to the size and complexity of this structure, professional assembly is highly recommended. If self-assembling, ensure at least two competent adults are available.
- Secure Anchoring: Always anchor the gazebo securely to a stable surface (e.g., concrete patio, wooden deck) to prevent wind uplift. Pre-drilled holes are provided in the base for this purpose.
- Weather Conditions: While designed for durability, extreme weather conditions such as severe winds, heavy snow, or hail may require additional precautions or temporary disassembly. Consider purchasing a winter cover for protection in harsh climates.
- Clearance: Ensure adequate clearance around the gazebo for safe use and to prevent damage to surrounding structures or vegetation.
- Electrical Safety: When installing lights or fans using the ceiling hooks, ensure all electrical connections are safe and comply with local electrical codes.
Parts List
Before beginning assembly, carefully unpack all components and verify against the detailed parts list provided in your product packaging. Ensure all parts are present and undamaged. Contact customer support immediately if any parts are missing or defective.
Assembly Instructions
Follow these steps for the assembly of your gazebo. It is highly recommended to watch the full assembly video before starting.
Video 1: Full Assembly Guide for Domi Outdoor Living Double Roof Hardtop Gazebo.
This video provides a comprehensive walkthrough of the gazebo assembly process, from connecting beams to installing roof panels.
Step 1: Prepare and Connect Beams
Connect two beam sections into one longer beam using the union bar and screws (1#). Repeat for all necessary beams. Ensure all connections are secure but do not fully tighten until instructed.
Step 2: Attach Sidewall Tracks and Connect Poles
Attach the sidewall tracks to the finished beams using screws (1#). Then, use screws (2# & 3#) to connect the poles and beams together, forming the main frame of the gazebo. Replicate this process for all sides.

Figure 2: The sturdy 4.72"x4.72" aluminum stand poles provide enhanced stability.
Step 3: Set Up the Roof Frame
Carefully set up the roof frame components. This step may require multiple people and ladders for stability. Affix middle beams using jointer covers and screws (9# and 8#). Finish connecting beams using corner covers and screws (9#).
Step 4: Attach Roof Bars
Attach the roof bars to the inside roof connectors using screws (1#). Ensure all connections are firm.
Step 5: Affix Solidifying Bars
Affix the solidifying bars to the roof bars using iron angles and screws (1#). Then, affix the frame with corner solidifying bars using screws (1#) to enhance structural integrity.
Step 6: Install Roof Panels
Carefully push the roof panels into the upper roof frame anti-clockwise. Attach finishing bars to the upper roof with finish ends using screws (1#). Ensure panels are properly seated to prevent leaks.

Figure 3: The ventilated double-layer roof promotes air circulation.
Step 7: Affix Roof Panels with Spacers
Affix the roof panels using screws and spacers to ensure a tight and secure fit. This step is crucial for weather resistance.

Figure 4: The unique drainage system directs rainwater efficiently.
Operating Instructions
Curtains and Netting
The gazebo features a double-track system with double-sided zippers for easy operation. The inner track holds the insect netting, which provides ventilation while keeping bugs out. The outer track holds the privacy curtains, offering shade, privacy, and protection from wind or light rain.

Figure 5: Double track system allows for flexible use of netting and curtains.
Ceiling Hooks
Equipped with two U-hooks on the roof, the gazebo allows for hanging lights or fans (max capacity 25 lbs) to enhance comfort and ambiance, addressing dark or hot conditions.
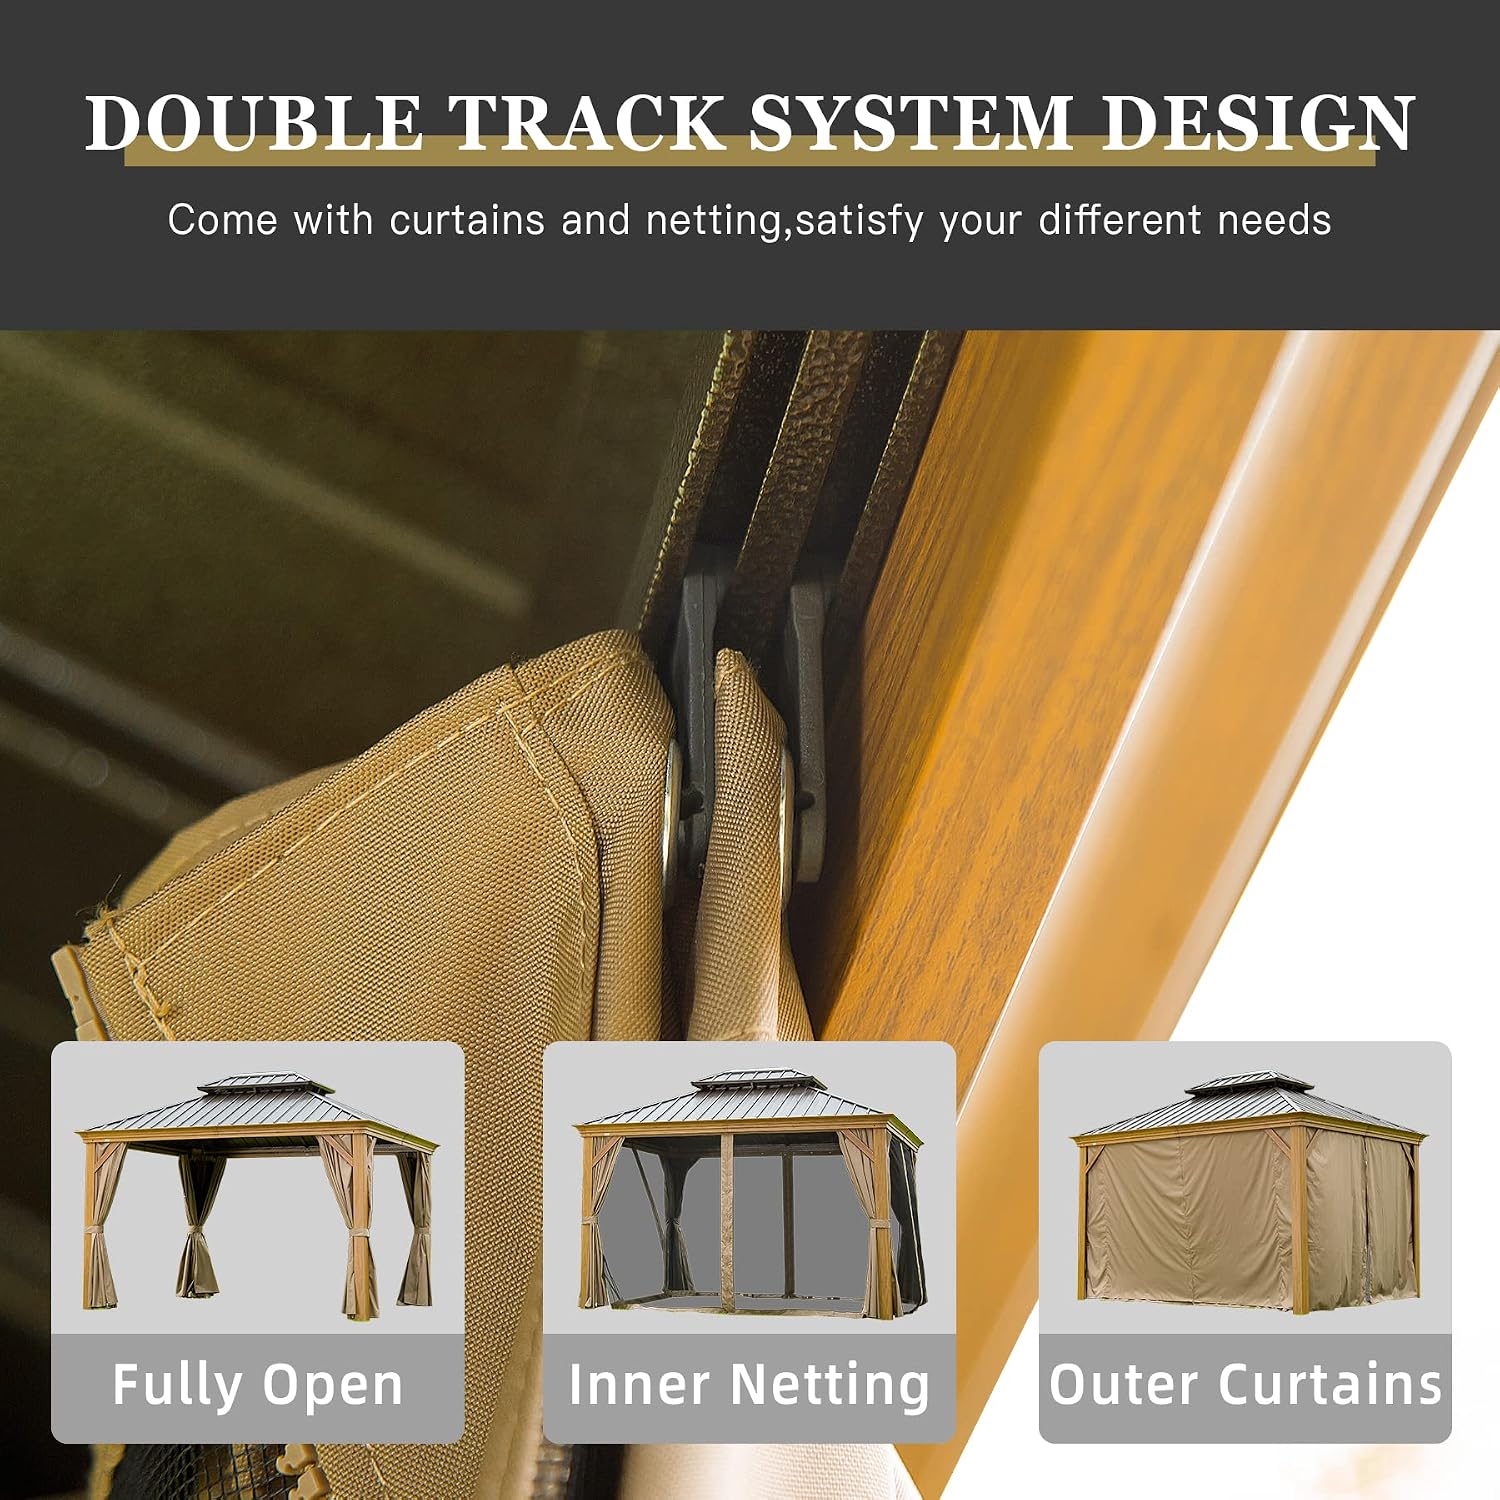
Figure 6: Ceiling hooks provide convenience for lighting and air circulation.
Video 2: Transform Your Poolside Oasis with Domi Wood Grain Gazebo.
This video showcases the gazebo's aesthetic appeal and functionality in a poolside setting, highlighting its use for relaxation and entertainment.
Video 3: Cavus 10'x12' Wood-Looking Hardtop Gazebo.
A visual overview of the 10'x12' wood-looking hardtop gazebo, demonstrating its features and appearance in an outdoor environment.
Video 4: Night Scene Cavus 10' X12' Outdoor Hardtop Gazebo.
This video illustrates the gazebo's appearance at night, often enhanced with decorative lighting, showcasing its suitability for evening use.
Video 5: Calaro 12'x16' Outdoor Hardtop Gazebo.
A brief look at a larger 12'x16' outdoor hardtop gazebo, demonstrating similar design and features to the 10'x12' model.
Maintenance
- Cleaning: Regularly clean the metal roof and frame with mild soap and water. The curtains and netting can be spot cleaned or gently washed as per fabric care instructions.
- Drainage System: Periodically check the drainage system to ensure it is free from debris and functioning correctly. The unique design allows rainwater to flow from the eaves to the poles and then to the ground, minimizing accumulation.
- Seasonal Care: For prolonged durability, especially in areas with heavy snow or extreme weather, consider purchasing a winter cover (search B0DCMQHP7Z for the 10'x12' size) to protect the gazebo during off-season months.
- Fastener Check: Periodically inspect all screws and fasteners to ensure they remain tight. Re-tighten as necessary, but avoid over-tightening during initial assembly to allow for proper alignment.
Troubleshooting
- Roof Panel Alignment: If roof panels are difficult to align, ensure all initial screws connecting beams and poles are not fully tightened. Loosen them slightly to allow for adjustment, then tighten once all panels are in place.
- Dented Panels: In case of minor dents on roof panels, especially those not highly visible, they may still be functional. For significant damage, contact customer support for replacement parts.
- Water Leaks: Apply the provided high-quality silicone caulk-sealer to any areas where daylight is visible through the roof panels or where panels meet cross members to prevent leaks.
- Size Discrepancy: Verify the actual dimensions against the product specifications. Minor variations may occur, but significant differences should be reported to customer support.
Specifications
| Feature | Detail |
|---|---|
| Brand | domi outdoor living |
| Material | Wood, Aluminum, Metal |
| Style | Unique |
| Item Weight | 299 Pounds |
| Frame Material | Metal, Aluminum, Wood, Alloy Steel |
| Water Resistance Level | Waterproof |
| Shape | Rectangular |
| Ultraviolet Light Protection | True |
| Assembly Required | Yes |
| Color | Wood Looking |
| Manufacturer | domi outdoor living |
| UPC | 788703161661 |
| Floor Area | 120 Square Feet |
| Product Dimensions | 144 x 120 x 115.2 inches |

Figure 7: Detailed dimensions of the 10'x12' gazebo.
Warranty and Support
For warranty information, technical support, or to order replacement parts, please refer to the contact details provided in your product packaging or visit the official Domi Outdoor Living website. Customer support is available to assist with any inquiries regarding your gazebo.