1. Introduction
Thank you for choosing the Mxmoonfree 300N Digital Force Gauge. This portable device is designed for precise measurement of push and pull forces, offering high accuracy and multiple measurement units. It is widely used in various fields including industrial testing, laboratory research, and educational demonstrations. Please read this manual thoroughly before operation to ensure correct usage and optimal performance.

Image: The Mxmoonfree 300N Digital Force Gauge, a compact and portable device for force measurement.
2. What's in the Box
Upon opening the package, please verify that all items listed below are present and in good condition:
- Digital Force Gauge (Main Unit)
- Various Accessories Kit (hooks, flat head, cone head, chisel head, extension rod)
- Storage Case
- 2 x AAA Batteries
- User Manual (this document)
- Service Card
- Calibration Certificate

Image: A visual representation of all items included in the product package, neatly arranged in the storage case.
3. Specifications
| Feature | Description |
|---|---|
| Max. Load Value | 300 N / 30 kg / 65 Lb / 7100 Oz |
| Min. Load Value | 0.1 N / 0.01 kg / 1 Oz |
| Accuracy | ± 1% |
| Measurement Units | N, Lb, Kg, Oz |
| Measurement Modes | Real-time, Peak, First Peak |
| Power | 2 x AAA Batteries |
| Automatic Shut-off | Adjustable (0-15 minutes), default 10 minutes |
| Material | Acrylonitrile Butadiene Styrene (ABS) |
| Dimensions (L x W x H) | 6 x 12.4 x 3.1 cm |
| Mounting Hole Distance | 41 x 73 mm (for M4 screws) |

Image: Diagram showing the physical dimensions of the force gauge, including length, width, and mounting hole distances.
4. Setup
4.1. Battery Installation
- Locate the battery compartment on the back of the device.
- Slide open the battery cover.
- Insert two AAA batteries, ensuring correct polarity (+/-).
- Close the battery cover securely.

Image: A view of the back of the force gauge with the battery compartment open, showing the correct insertion of two AAA batteries.
4.2. Attaching Accessories
Select the appropriate accessory (e.g., hook, flat head) for your specific testing requirement. Screw it firmly onto the threaded shaft at the top or bottom of the force gauge.
5. Operating Instructions
5.1. Power On/Off
Press the POWER button (red button in the center) to turn the device on or off.
5.2. Unit Conversion
The force gauge supports four measurement units: Newtons (N), Pounds (Lb), Kilograms (Kg), and Ounces (Oz). To switch between units, press the UNIT button (green button on the right).

Image: The force gauge display showing different measurement units (N, Kg, Oz, Lb) and how to cycle through them using the UNIT button.
5.3. Measurement Modes
The device features three measurement modes: Real-time, Peak, and First Peak. Press the PEAK button (blue button on the left) to cycle through these modes.
- Real-time Mode: The display shows the current force being applied. The value changes dynamically with the load.
- Peak Mode: The display holds the maximum force value recorded during the measurement. This is useful for destructive testing or capturing peak loads.
- First Peak Mode: The display shows the first peak force value measured within a period of time. This is indicated by 'P' and 'T' on the screen.

Image: A hand holding the force gauge, demonstrating real-time force measurement as a spring is compressed.

Image: A hand holding the force gauge with a hook attachment, showing the 'P' indicator for Peak mode and a stable maximum force reading.

Image: A hand using the force gauge to test the insertion force of a plug into an outlet, displaying 'P' and 'T' for First Peak mode.
5.4. Zeroing the Display
Before taking a measurement, ensure the display reads 0.0. If not, press the ZERO button (green button on the right, above UNIT) to reset the reading.
5.5. Performing a Test
Attach the appropriate accessory. Apply force to the object being tested. The display will show the force value according to the selected measurement mode.
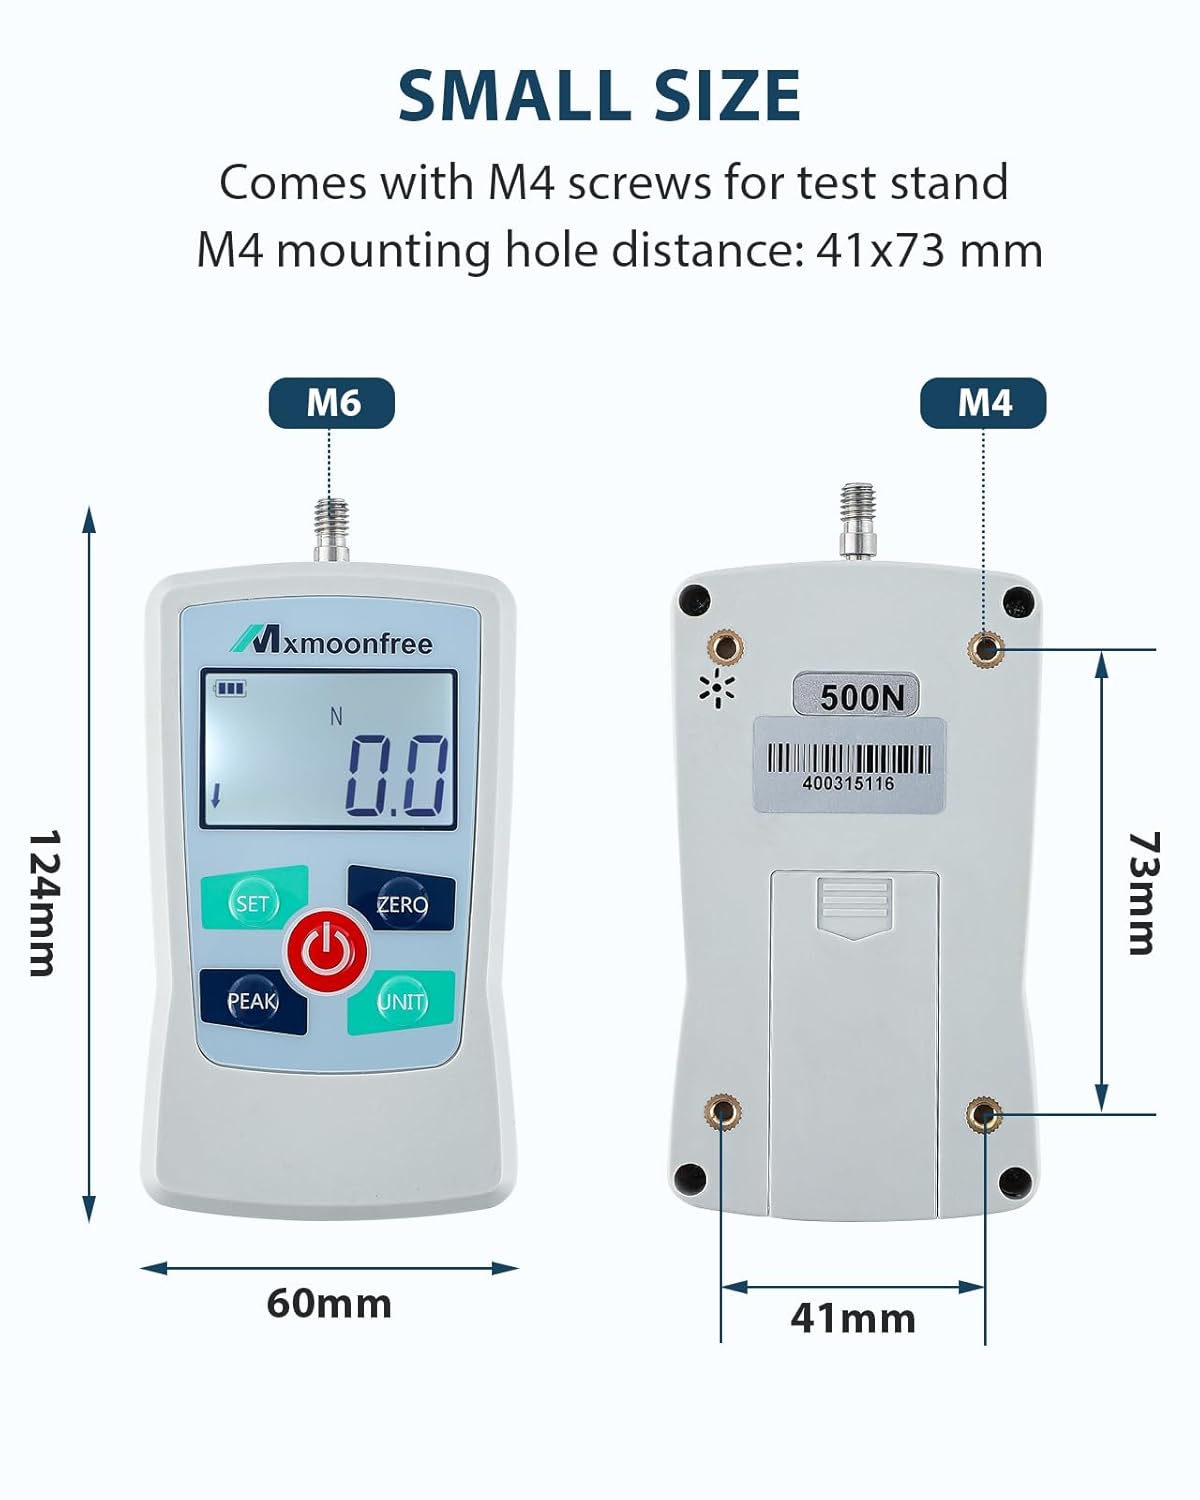
Image: Two examples of force testing: one showing a push test with a weight, and another showing a pull test using the hook attachment.
5.6. Automatic Shut-off
The device features an adjustable automatic shut-off time (0-15 minutes) to conserve battery life. The default setting is 10 minutes. If no operation is performed within the set time, the device will power off automatically.
6. Maintenance
- Keep the device clean and dry. Wipe with a soft, dry cloth. Do not use abrasive cleaners or solvents.
- Store the force gauge and its accessories in the provided storage case when not in use to prevent damage.
- Avoid exposing the device to extreme temperatures, humidity, or direct sunlight.
- If the device will not be used for an extended period, remove the batteries to prevent leakage.
- Do not attempt to disassemble or repair the device yourself. Contact customer support for assistance.
7. Troubleshooting
| Problem | Possible Cause | Solution |
|---|---|---|
| Device does not power on | Low or dead batteries; Incorrect battery installation | Replace batteries; Check battery polarity |
| Inaccurate readings | Device not zeroed; Overload; Environmental interference | Press ZERO button; Do not exceed max load; Move away from strong electromagnetic fields |
| Display is dim or flickering | Low battery power | Replace batteries |
| Buttons unresponsive | Device frozen; Software error | Remove and reinsert batteries to reset; Contact support if issue persists |
8. Video Demonstration
Watch this video for a quick overview of the Mxmoonfree Digital Force Gauge's features, including unit conversion and various testing applications.
Video: A short demonstration showcasing the Mxmoonfree Digital Force Gauge, its unit switching capabilities, and examples of destructive and pressure tests.
9. Warranty and Support
Mxmoonfree products come with a standard warranty. Please refer to the included Service Card for detailed warranty information and terms. For technical support, troubleshooting assistance, or warranty claims, please contact Mxmoonfree customer service through the contact information provided on your Service Card or the official Mxmoonfree website.
We are committed to ensuring your satisfaction and providing reliable support for your Mxmoonfree product.