1. Important Safety Information
Please read this entire manual before assembling or operating the ONETWOFIT Indoor Cycling Bike. Keep this manual for future reference. Failure to follow these instructions may result in injury or damage to the product.
- Consult a physician before starting any exercise program.
- Ensure all parts are securely tightened before each use.
- Keep children and pets away from the equipment during operation.
- Place the bike on a flat, stable surface.
- Wear appropriate exercise attire and footwear.
- The maximum user weight capacity is 300 pounds (136 kg).
- Stop exercising immediately if you feel faint, dizzy, or experience pain.
2. Product Overview
The ONETWOFIT Indoor Cycling Bike OT319 is designed for home cardio training. It features a robust construction and adjustable components to suit various users.
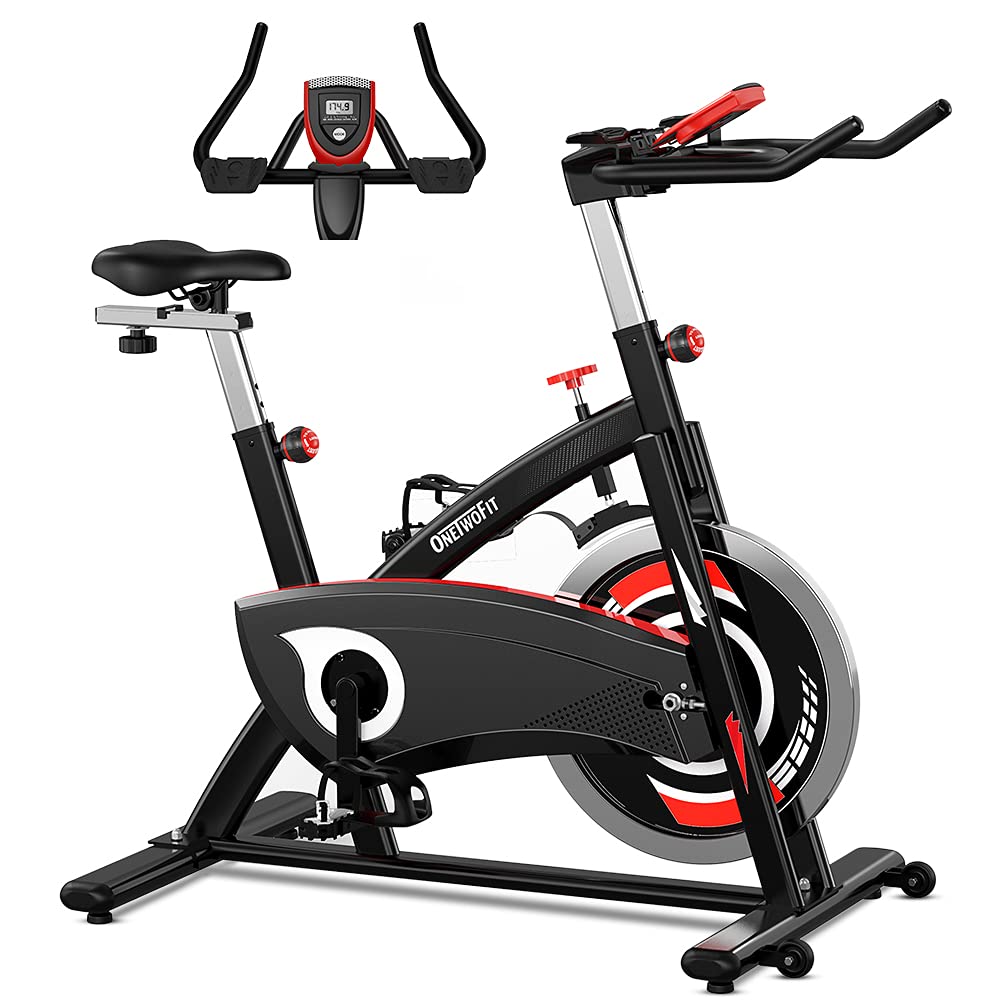
Figure 2.1: Overview of the ONETWOFIT Indoor Cycling Bike OT319.
Key Features:
- Heavy Flywheel: Equipped with a 44-pound (20 kg) chromed flywheel for a stable and consistent cycling experience.
- Silent Belt Drive: Ensures smooth and quiet operation.
- Adjustable Components: Seat and handlebars offer multiple vertical adjustment levels for personalized fit.
- LCD Monitor: Tracks essential workout data including time, speed, distance, calories, and odometer.
- Adjustable Resistance: A friction resistance system allows for varied intensity levels.
- Safety Pedals: Cage pedals prevent feet from slipping during exercise.
- Transport Wheels: Integrated wheels for easy relocation of the bike.

Figure 2.2: Detail of the 44-pound chromed flywheel.

Figure 2.3: Illustration of the silent belt drive system and wool brake pads.
3. Assembly Instructions
The ONETWOFIT Indoor Cycling Bike is designed for straightforward assembly. It is recommended to have assistance due to the weight of some components, particularly the flywheel.
General Assembly Steps:
- Unpack Components: Carefully remove all parts from the packaging and lay them out. Verify all components are present against the parts list (refer to included manual for detailed list).
- Attach Stabilizers: Secure the front and rear stabilizer bars to the main frame using the provided bolts and tools.
- Install Pedals: Attach the left and right pedals to their respective crank arms. Note that pedals are typically marked 'L' for left and 'R' for right. Ensure they are tightened securely to prevent wobbling during use.
- Mount Seat Post and Seat: Insert the seat post into the frame and secure it at the desired height. Attach the seat to the seat post.
- Install Handlebar Post and Handlebars: Insert the handlebar post into the frame and secure it. Attach the handlebars to the post.
- Connect Monitor: Connect the sensor wires from the main frame to the LCD monitor and mount the monitor onto the handlebar assembly.
- Final Check: Before first use, inspect all bolts and connections to ensure they are tight and secure.

Figure 3.1: Illustrates the adjustable components and overall dimensions for assembly planning.
4. Operating Instructions
4.1 Adjusting Seat and Handlebars
Proper adjustment of the seat and handlebars is crucial for comfort and effective exercise.
- Seat Adjustment: Loosen the adjustment knob below the seat post. Raise or lower the seat to a height where your leg has a slight bend at the knee when the pedal is at its lowest point. Tighten the knob securely. The seat also offers horizontal adjustment.
- Handlebar Adjustment: Loosen the adjustment knob on the handlebar post. Adjust the handlebars to a comfortable height that allows for a slight bend in your elbows and a relaxed upper body posture. Tighten the knob securely.

Figure 4.1: Seat adjustment mechanism.
Figure 4.2: Handlebar adjustment mechanism.
4.2 Using the LCD Monitor
The integrated LCD monitor displays your workout data. Insert batteries (not included) into the monitor before first use.
- MODE Button: Press to cycle through display functions: SCAN, TIME, SPEED, DISTANCE, CALORIES, ODOMETER.
- SCAN: Automatically cycles through all functions every few seconds.
- TIME: Displays the duration of your current workout.
- SPEED: Shows your current cycling speed.
- DISTANCE: Displays the distance covered during your current workout.
- CALORIES: Estimates the calories burned during your workout.
- ODOMETER: Displays the total accumulated distance.
- RESET: Press and hold the MODE button for a few seconds to reset all values (except Odometer).

Figure 4.3: LCD monitor interface and anti-friction hand pads.
4.3 Adjusting Resistance
The resistance knob controls the intensity of your workout.
- Increase Resistance: Turn the knob clockwise to increase the resistance, making pedaling more challenging.
- Decrease Resistance: Turn the knob counter-clockwise to decrease the resistance, making pedaling easier.
- Emergency Stop: Press down firmly on the resistance knob to engage the emergency brake and quickly stop the flywheel.

Figure 4.4: Resistance adjustment knob and emergency stop function.

Figure 4.5: Illustrates proper riding posture and muscle engagement during exercise.
5. Maintenance
Regular maintenance ensures the longevity and safe operation of your indoor cycling bike.
- Cleaning: Wipe down the bike with a damp cloth after each use to remove sweat and dust. Avoid abrasive cleaners.
- Check Connections: Periodically check all bolts, nuts, and screws to ensure they are tight. Tighten any loose fasteners.
- Lubrication: Apply a small amount of silicone-based lubricant to moving parts, such as the seat post and handlebar post, if they become difficult to adjust. Do not lubricate the belt drive or flywheel brake pad.
- Storage: Store the bike in a dry, cool place away from direct sunlight and moisture.
6. Troubleshooting
This section addresses common issues you might encounter with your cycling bike.
| Problem | Possible Cause | Solution |
|---|---|---|
| Wobbly Handlebars/Seat | Loose adjustment knobs or bolts. | Ensure all adjustment knobs and mounting bolts for the handlebars and seat are fully tightened. |
| Pedals Detaching/Loose | Pedals not tightened correctly during assembly; stripped crank arm thread. | Re-tighten pedals firmly. Ensure left pedal is threaded counter-clockwise and right pedal clockwise. If the crank arm thread is stripped, contact customer support for replacement parts. |
| LCD Monitor Not Displaying | Dead batteries; loose connection. | Replace batteries in the monitor. Check that the sensor wires are securely connected to the monitor. |
| Unusual Noise During Operation | Loose components; friction from moving parts. | Check all bolts and nuts for tightness. Ensure the bike is on a level surface. If noise persists, contact customer support. |
7. Specifications
Detailed technical specifications for the ONETWOFIT Indoor Cycling Bike OT319.
| Feature | Detail |
|---|---|
| Model Number | OT319 |
| Brand | ONETWOFIT |
| Color | Black |
| Material | Alloy Steel, Aluminium |
| Frame Material | Steel |
| Drive System | Belt |
| Resistance Mechanism | Friction |
| Flywheel Weight | 44 Pounds (approx. 20 kg) |
| Item Weight | 98 Pounds (approx. 44.45 kg) |
| Maximum Weight Capacity | 300 Pounds (approx. 136 kg) |
| Product Dimensions (L x W x H) | 107.95 x 53.09 x 111.51 cm (42.5 x 20.9 x 43.9 inches) |
| Display Type | LED |
| Monitor Functions | Distance, Speed, Time, Calories, Odometer |
| Power Source | Pedal-powered (non-electric for bike operation) |
| Special Features | Adjustable Seat, Adjustable Handlebar, Anti-friction Hand Pads, Cage Pedals, Transport Wheels |

Figure 7.1: Illustration of the double triangle frame design for stability.
8. Warranty and Support
For warranty information, technical support, or to order replacement parts, please contact ONETWOFIT customer service. Refer to your purchase documentation for specific warranty terms and contact details.
Manufacturer: ONETWOFIT
ASIN: B08YJFFB76