1. Introduction
This manual provides essential information for the safe and efficient operation of your KESSER K-KI12000 Split Air Conditioner. Please read all instructions carefully before installation and use. Retain this manual for future reference.
1.1 Safety Information
Always observe the following safety precautions to reduce the risk of electric shock, fire, or injury:
- Installation and maintenance must be performed by qualified personnel.
- Ensure the power supply matches the unit's specifications.
- Do not insert objects into the air outlet or inlet.
- Do not operate the unit with wet hands.
- Keep children away from the unit.
- If unusual sounds, smells, or smoke occur, immediately turn off the unit and disconnect power.
2. Product Components
The KESSER K-KI12000 Split Air Conditioner kit includes the following main components and accessories:
- Indoor Unit (Evaporator)
- Outdoor Unit (Condenser)
- Remote Control with LCD display
- Copper Refrigerant Lines (3 meters)
- Electrical Connection Cable (3.5 meters, 5-wire)
- Wall Mounting Bracket for Outdoor Unit
- Mounting Hardware
- Sealing Compound for wall penetration
- Insulation Tape
- Drainage Hose
- Optional WiFi Module (may be sold separately)

3. Setup and Installation
Installation of a split air conditioner requires specialized knowledge and tools. It is strongly recommended that installation be performed by a certified HVAC technician to ensure proper function, safety, and compliance with local regulations, especially concerning refrigerant handling.
3.1 Pre-Installation Checks
- Verify that the installation location for both indoor and outdoor units allows for proper airflow and drainage.
- Ensure the wall is strong enough to support the weight of the indoor unit and the outdoor unit bracket.
- Confirm that the electrical supply meets the unit's requirements (220 Volts, 2600 Watts).
3.2 Installation Steps (Overview for Qualified Technicians)
- Mounting the Indoor Unit Bracket: Securely attach the indoor unit mounting plate to the wall, ensuring it is level and at the correct height.
- Drilling the Wall Hole: Drill a hole (approximately 50-55mm diameter) through the wall for the refrigerant lines, drainage hose, and electrical cables. Ensure a slight downward slope towards the outside for proper condensate drainage.
- Connecting Indoor Unit: Connect the copper refrigerant lines, drainage hose, and electrical wiring to the indoor unit. Carefully route these through the wall hole.
- Mounting the Outdoor Unit: Install the outdoor unit on a stable surface or using the provided wall bracket. Ensure adequate clearance for airflow. Place rubber dampeners under the outdoor unit to reduce vibration and noise.
- Connecting Outdoor Unit: Connect the refrigerant lines and electrical cables from the indoor unit to the outdoor unit. The outdoor unit typically supplies power to the indoor unit.
- Vacuuming the Lines: This critical step involves evacuating air and moisture from the refrigerant lines using a vacuum pump. This must be done by a qualified technician.
- Refrigerant Release: Once the lines are vacuumed, open the valves on the outdoor unit to release the pre-charged R32 refrigerant into the system.
- Leak Check: Perform a leak check on all connections.
- Power Connection: Connect the outdoor unit to the main power supply.


4. Operating Instructions
Your KESSER K-KI12000 air conditioner offers multiple modes and functions for optimal climate control.
4.1 Remote Control Functions
The LCD remote control allows you to manage all functions of the air conditioner. Ensure batteries are correctly inserted.

- Power Button: Turns the unit On/Off.
- Mode Button: Cycles through operating modes: Cool, Heat, Dry, Fan, Auto.
- TEMP Buttons (Up/Down): Adjusts the desired temperature.
- FAN Button: Selects fan speed (Low, Medium, High, Auto).
- TURBO Button: Activates maximum cooling or heating for rapid temperature change.
- SWING Button: Controls the vertical airflow direction.
- MUTE Button: Silences operational beeps.
- ECO Button: Activates energy-saving mode.
- TIMER Button: Sets a timer for automatic On/Off operation.
- SLEEP Button: Activates sleep mode for quiet operation and gradual temperature adjustment during sleep.
- FEEL Button: Activates 'I Feel' function, which senses the temperature at the remote control's location for more precise comfort.
- DISPLAY Button: Toggles the display on the indoor unit.
4.2 Operating Modes
- Cool Mode: Provides cooling. Temperature range typically 16°C to 31°C.
- Heat Mode: Provides heating.
- Dry Mode (Dehumidification): Reduces humidity in the room.
- Fan Mode: Circulates air without cooling or heating.
- Auto Mode: The unit automatically selects the operating mode (Cool, Heat, or Fan) based on the room temperature and the set temperature.


4.3 WiFi / App Control
With the optional USB WiFi module, you can control your air conditioner using a smartphone or tablet (iOS or Android) via a dedicated application. This allows for remote control of temperature and other functions, enhancing convenience and potentially reducing energy consumption.
- Install the appropriate application on your mobile device.
- Follow the in-app instructions to connect the air conditioner to your home WiFi network.
- Once connected, you can adjust settings, set schedules, and monitor the unit from anywhere.
5. Maintenance
Regular maintenance ensures optimal performance and longevity of your air conditioner.
5.1 Air Filter Cleaning
The air filters should be cleaned regularly, typically every two weeks, or more frequently depending on usage and air quality.
- Turn off the air conditioner and disconnect it from the power supply.
- Open the front panel of the indoor unit.
- Carefully remove the air filters.
- Clean the filters with a vacuum cleaner or wash them with lukewarm water and a mild detergent.
- Rinse thoroughly and allow them to dry completely in a shaded area before reinserting.
- Close the front panel.

5.2 Outdoor Unit Cleaning
Periodically check the outdoor unit for debris, leaves, or dirt that may obstruct airflow. Carefully clean the coils with a soft brush or vacuum cleaner. Ensure the area around the outdoor unit remains clear.
5.3 Professional Servicing
It is recommended to have your air conditioner professionally serviced at least once a year to check refrigerant levels, electrical connections, and overall system health.
6. Troubleshooting
Before contacting customer support, refer to the following common issues and solutions:
| Problem | Possible Cause | Solution |
|---|---|---|
| Unit does not start | No power; Remote control batteries low; Timer function active. | Check power supply; Replace batteries; Deactivate timer. |
| Insufficient cooling/heating | Dirty air filters; Blocked outdoor unit; Doors/windows open; Incorrect mode/temperature setting. | Clean filters; Clear obstructions; Close openings; Adjust settings. |
| Unusual noise | Loose parts; Unit not level; Obstruction in fan. | Check for loose parts; Ensure stable installation; Remove obstructions. If noise persists, contact technician. |
| Water leakage from indoor unit | Clogged drainage hose; Incorrect installation angle. | Clear drainage hose; Consult technician for installation check. |
| WiFi connection issues | WiFi module not installed; Incorrect app settings; Router issues. | Ensure WiFi module is installed; Reconfigure app settings; Restart router. |
If the problem persists after attempting these solutions, please contact a qualified service technician.
7. Specifications
Technical data for the KESSER K-KI12000 Split Air Conditioner:
- Brand: KESSER
- Model Number: K-KI12000 (also referenced as 22049_mfn)
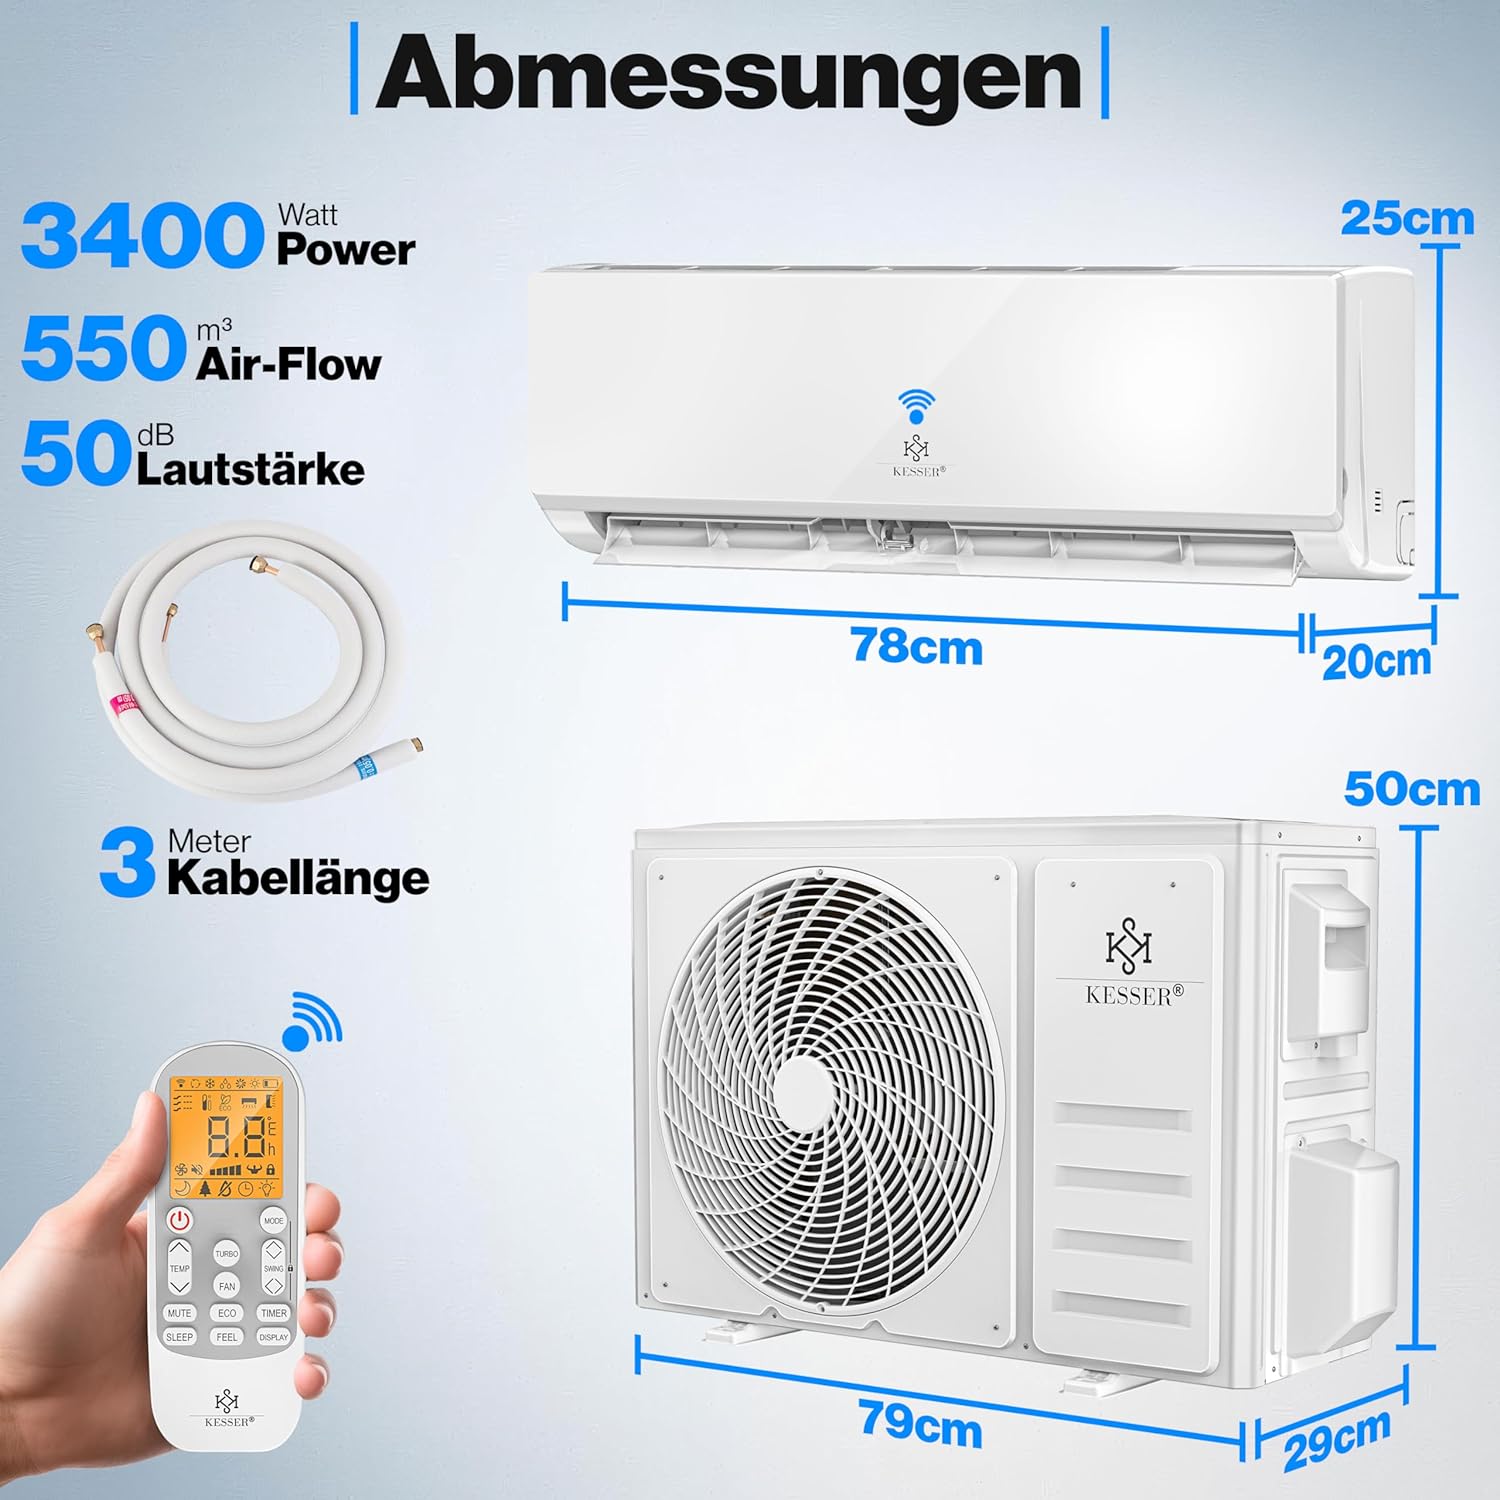
- Product Dimensions (Indoor Unit L x W x H): 78 x 20 x 25 cm
- Product Dimensions (Outdoor Unit L x W x H): 79 x 29 x 50 cm
- Power (Cooling/Heating): 3400 Watts (12,000 BTU/h)
- Voltage: 220 Volts
- Refrigerant Type: R32
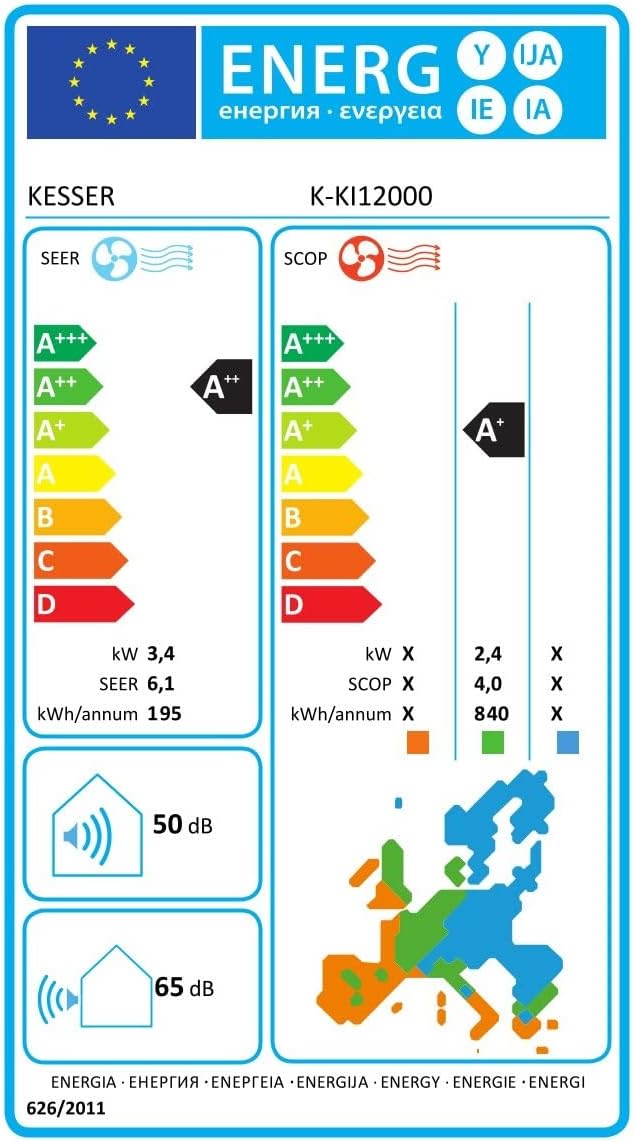
- Sound Level (Indoor Unit): 50 Decibels
- Sound Level (Outdoor Unit): 65 Decibels
- Energy Efficiency Class (Cooling): A++ (SEER 6.1, Annual Energy Consumption 195 kWh/year)
- Energy Efficiency Class (Heating): A+ (SCOP 4.0, Annual Energy Consumption 840 kWh/year)
- Special Features: Dehumidifier, WiFi/App Function (optional module), Golden Fin coating.

8. Warranty and Support
For warranty information and customer support, please refer to the documentation provided at the time of purchase or contact your retailer. Warranty terms may vary by region and retailer.
It is advisable to keep your purchase receipt as proof of purchase for any warranty claims.


