
1. Introduction
This manual provides essential instructions for the safe and effective assembly, operation, and maintenance of your Field King 190328 Professional No Leak Pump Backpack Sprayer. Please read all instructions carefully before use to ensure proper function and longevity of the product.
2. Safety Information
WARNING: Always wear appropriate personal protective equipment (PPE) such as gloves, eye protection, and respiratory protection when handling chemicals and operating the sprayer.
- Read and follow all chemical manufacturer's instructions and safety warnings.
- Do not spray flammable liquids.
- Do not use the sprayer with hot liquids.
- Ensure all connections are secure before pressurizing.
- Keep out of reach of children and pets.
- Never leave a pressurized sprayer unattended.
- Release pressure before cleaning, storing, or performing maintenance.
3. Components Overview
Familiarize yourself with the main components of your Field King backpack sprayer:
3.1 Internal No Leak Pump and Agitator

The exclusive internal No Leak Pump design keeps liquids contained, preventing leaks onto your back. Integrated paddles continuously mix liquids, powders, and water-soluble solutions for consistent spraying.
3.2 Spray Wand

The durable spray wand connects to the shut-off handle and features a nozzle for directed application.
3.3 Premium Shut-Off Handle with Filter

Designed for comfort, the shut-off handle includes a lockable trigger to reduce hand fatigue during extended use. An inline filter helps prevent clogging.
3.4 Nozzle Assortment
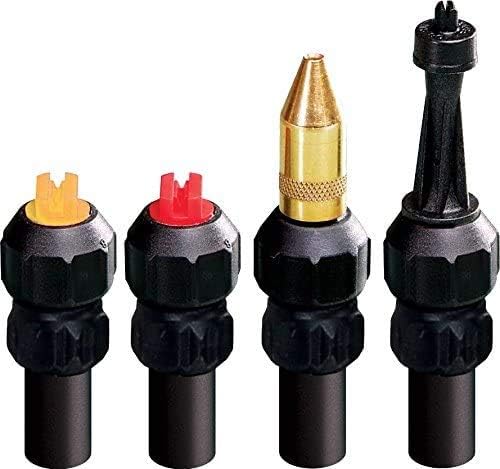
The sprayer includes multiple nozzles for various applications: a brass adjustable nozzle (stream to cone), a wide flat fan nozzle (red, 0.25 GPM, 70°), a narrow flat fan nozzle (yellow, 0.15 GPM, 30°), and a foaming nozzle. It also accepts TeeJet nozzles.
3.5 Padded Straps and Waist Belt

Adjustable padded straps, a waist belt, and a chest cinch strap provide comfort and stability during operation.
4. Setup and Assembly
- Attach the Hose: Securely connect the hose to the sprayer tank outlet and the shut-off handle inlet. Ensure all connections are hand-tightened to prevent leaks.
- Connect the Wand: Attach the spray wand to the shut-off handle.
- Select and Attach Nozzle: Choose the appropriate nozzle for your application and securely attach it to the end of the spray wand.
- Adjust Straps: Adjust the padded shoulder straps, waist belt, and chest cinch strap for a comfortable and secure fit before filling the tank.
5. Operating Instructions
- Prepare Solution: Mix your desired liquid, powder, or water-soluble solution according to the chemical manufacturer's instructions.
- Fill Tank: Remove the tank lid and carefully pour the prepared solution into the 4-gallon tank. Do not overfill. Replace the lid securely.
- Pressurize Sprayer: Place the sprayer on your back. Operate the pump handle to build pressure inside the tank. The internal pump will agitate the solution as you pump.
- Spray: Point the nozzle towards the target area. Squeeze the trigger on the shut-off handle to begin spraying. For continuous spraying, engage the lockable trigger.
- Adjust Pressure (Optional): The sprayer is capable of spraying up to 150 PSI. An included pressure regulator can be used to maintain a continuous 25 PSI, which is ideal for herbicides and weed killers. Consult the regulator's instructions for installation and use.
- Adjust Nozzle: Rotate the brass adjustable nozzle to change spray patterns from a fine mist to a solid stream. Replace with other included nozzles for specific spray patterns (e.g., flat fan for broad coverage, foaming for adherence).
- Release Pressure: After use, or before opening the tank, always release any remaining pressure by holding the trigger open until no more liquid or air is expelled.
6. Maintenance
- Clean After Each Use: Thoroughly rinse the tank, hose, shut-off handle, and wand with clean water after each use. Pump clean water through the system to flush out any chemical residue.
- Clean Filter: Regularly remove and clean the inline filter in the shut-off handle to prevent clogging.
- Inspect Seals: Periodically inspect the Viton seals for wear or damage. The Viton seals can be changed quickly without tools. Refer to the manufacturer's website or full manual for detailed instructions on seal replacement.
- Storage: Store the sprayer in a clean, dry, and frost-free area, away from direct sunlight and out of reach of children. Ensure all pressure is released before storage.
7. Troubleshooting
| Problem | Possible Cause | Solution |
|---|---|---|
| No spray or weak spray | Low pressure; Clogged nozzle or filter; Loose connections | Pump more to build pressure; Clean nozzle and inline filter; Tighten all hose and wand connections. |
| Leaking from connections | Loose connections; Damaged O-rings/seals | Tighten connections; Inspect and replace O-rings/seals if damaged. |
| Pump handle difficult to operate | Debris in pump; Worn pump seals | Clean pump mechanism; Inspect and replace pump seals. |
| Solution not mixing | Insufficient pumping; Agitator paddles obstructed | Pump more frequently during operation; Check for obstructions around agitator paddles. |
8. Specifications
- Model: Field King 190328
- Tank Volume: 4 Gallons
- Pump Type: Internal No Leak Pump (Piston/Diaphragm equivalent)
- Seals: Viton (tool-free replacement)
- Maximum Pressure: Up to 150 PSI
- Included Pressure Regulator: Maintains 25 PSI
- Nozzles Included: Brass adjustable, Wide Flat Fan (Red, 0.25 GPM, 70°), Narrow Flat Fan (Yellow, 0.15 GPM, 30°), Foaming nozzle. Accepts TeeJet nozzles.
- Material: Brass (nozzle), Durable plastics
- Comfort Features: Padded straps, waist belt, chest cinch strap, comfort grip shut-off with lockable trigger.
9. Warranty Information
Specific warranty details for the Field King 190328 Backpack Sprayer are typically provided with the product packaging or available on the official Field King website. Please refer to these resources for comprehensive warranty terms and conditions.
10. Customer Support
For further assistance, replacement parts, or detailed troubleshooting not covered in this manual, please visit the official Field King website or contact their customer support directly. Contact information is usually found on the product packaging or the manufacturer's website.


