1. Introduction
This manual provides detailed instructions for the installation, operation, and maintenance of your Rekluse Radius CX Clutch System, model RMS-7901012. The Radius CX combines the best of Rekluse's automatic clutch technology with their TorqDrive manual clutch components, offering improved power transfer, durability, and an automatic clutch experience with full manual lever override.
Please read this manual thoroughly before attempting installation or operation to ensure proper function and safety.

Figure 1: Overview of the Rekluse Radius CX Clutch System components. This image displays various parts including the clutch cover, pressure plate, friction plates, steel plates, springs, and the automatic clutch assembly.
2. Safety Information
Always prioritize safety when working with motorcycle components. Failure to follow these safety guidelines may result in injury or damage to the product or motorcycle.
- Ensure the motorcycle is stable and secure on a stand before beginning any work.
- Allow the engine and exhaust system to cool completely before handling components.
- Wear appropriate personal protective equipment (PPE), including gloves and eye protection.
- Refer to your motorcycle's service manual for specific torque specifications and procedures not covered here.
- Keep all clutch components clean and free from contaminants.
- If you are unsure about any step, consult a qualified mechanic or Rekluse technical support.
3. Package Contents
Verify that all components are present and undamaged before beginning installation. Your Rekluse Radius CX Clutch System package should include:
- Radius CX Automatic Clutch Assembly
- TorqDrive Friction Plates
- Steel Drive Plates
- Clutch Springs
- Clutch Cover Gasket (if applicable)
- Installation Hardware (bolts, washers, etc.)
- Rekluse Clutch Cover (specific models)
4. Setup and Installation
Installation of the Rekluse Radius CX Clutch requires mechanical aptitude. If you are not comfortable performing this procedure, seek professional assistance.
4.1 Preparation
- Drain the engine oil.
- Remove the stock clutch cover and gasket.
- Remove the stock clutch components (pressure plate, springs, friction and steel plates, inner hub, and clutch basket). Inspect the clutch basket for wear or notching.
4.2 Installing Basket Sleeves (if included)
If your kit includes basket sleeves, install them onto the clutch basket tangs. These sleeves are designed to extend clutch basket life and prevent notching.

Figure 2: Illustration of basket sleeves installed on clutch basket tangs. The sleeves provide a wear surface to prevent damage to the clutch basket itself.
4.3 Installing the Radius CX Core
- Install the Rekluse inner hub and pressure plate assembly according to the specific instructions provided with your kit.
- Carefully install the TorqDrive friction plates and steel plates, alternating them as specified. The TorqDrive system utilizes more friction plates for increased torque capacity.
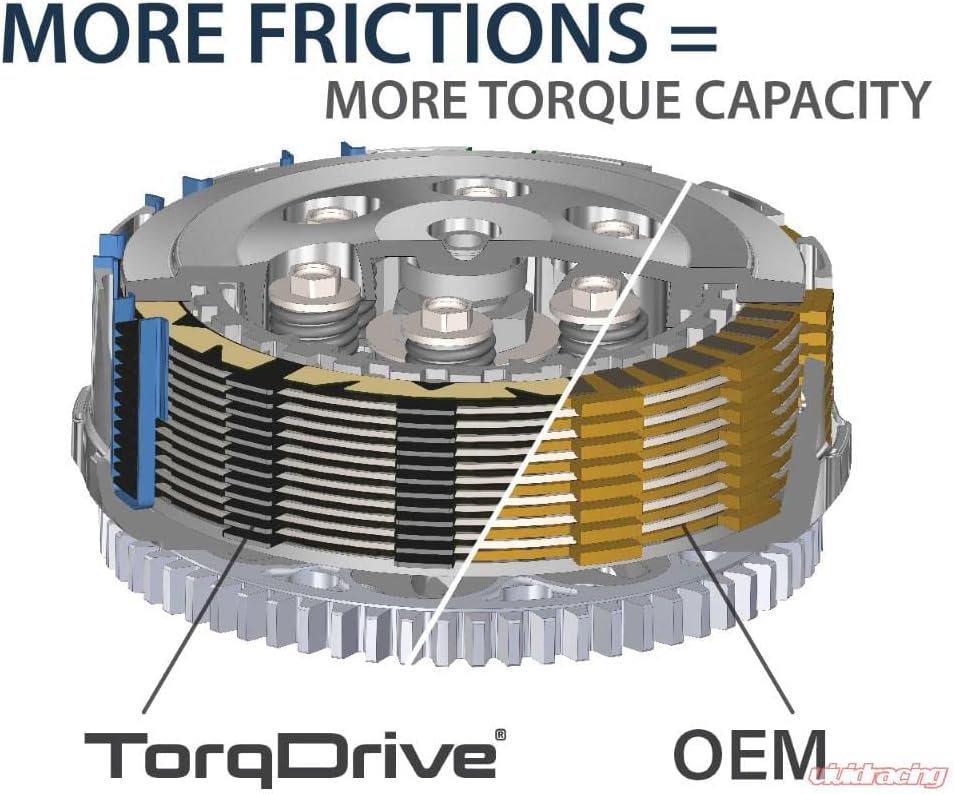
Figure 3: Comparison illustrating the higher number of friction plates in a TorqDrive system versus a standard OEM clutch, leading to increased torque capacity.
4.4 Adjusting the Ring Adjuster
The Ring Adjuster is a critical component for setting the engagement point of the automatic clutch. Follow the specific instructions in your kit for initial adjustment. This typically involves setting the gap between the pressure plate and the friction plates.

Figure 4: Cross-section diagram of the Radius CX clutch showing the Ring Adjuster and Locking Pin, which are used to fine-tune the automatic clutch engagement.
4.5 Final Assembly
- Install the clutch springs and pressure plate bolts, tightening them to the specified torque.
- Install the new clutch cover gasket and the Rekluse clutch cover. Tighten cover bolts to factory specifications.
- Refill the engine with the recommended oil type and quantity.
- Adjust the clutch cable free play at the lever according to your motorcycle's service manual.
5. Operating Instructions
The Rekluse Radius CX Clutch provides an automatic clutch experience while retaining full manual lever functionality.
- Automatic Function: The clutch will automatically engage and disengage based on engine RPM, allowing you to start and stop without using the clutch lever. This prevents stalling and provides a smoother ride.
- Manual Override: The clutch lever remains fully functional. You can use it for shifting, feathering, or any other manual clutch operation as needed.

Figure 5: A hand demonstrating the use of a motorcycle clutch lever, emphasizing that the lever remains fully functional with the Radius CX system.
5.1 Break-in Procedure
After installation, perform a short break-in period as recommended by Rekluse to ensure optimal clutch performance and longevity. This typically involves several heat cycles and gentle riding before aggressive use.
6. Maintenance
Regular maintenance is crucial for the longevity and performance of your Rekluse Radius CX Clutch.
- Oil Changes: Follow your motorcycle manufacturer's recommendations for oil change intervals. Use high-quality motorcycle-specific oil.
- Clutch Adjustment: Periodically check and adjust clutch cable free play. The automatic function does not eliminate the need for proper cable adjustment for manual override.
- Component Inspection: During oil changes or other maintenance, inspect clutch components for wear, especially friction plates, steel plates, and the clutch basket. Replace worn components as necessary.
- Ring Adjuster Check: Verify the Ring Adjuster setting periodically, especially if you notice changes in automatic clutch engagement.
7. Troubleshooting
This section addresses common issues you might encounter with your Radius CX Clutch.
| Problem | Possible Cause | Solution |
|---|---|---|
| Clutch slipping | Worn friction plates, incorrect oil, improper Ring Adjuster setting. | Inspect and replace friction plates. Ensure correct oil type. Adjust Ring Adjuster. |
| Clutch dragging/not fully disengaging | Incorrect clutch cable adjustment, Ring Adjuster set too tight, warped steel plates. | Adjust clutch cable free play. Re-adjust Ring Adjuster. Inspect and replace warped plates. |
| Excessive noise from clutch | Loose components, worn clutch basket, contaminated oil. | Inspect all fasteners. Check clutch basket for wear. Change oil. |
8. Specifications
- Model Number: RMS-7901012
- Product Dimensions: 6.1 x 8.75 x 3 inches
- Item Weight: 4.75 pounds
- ASIN: B08YFH5R5B
- Compatibility: Refer to Rekluse product fitment guide for specific motorcycle models.
9. Warranty Information
Rekluse products are manufactured to high standards. For specific warranty terms and conditions, please refer to the official Rekluse website or contact their customer service. Keep your proof of purchase for any warranty claims.
10. Support
For technical assistance, installation questions, or troubleshooting not covered in this manual, please contact Rekluse customer support:
- Website: www.rekluse.com
- Contact Information: Refer to the "Contact Us" section on the official Rekluse website for phone numbers and email addresses.