1. Introduction
This manual provides essential information for the safe and effective operation of your Kiprim 3x360° Green Laser Level, model LV3D. Please read this manual thoroughly before using the device and retain it for future reference. This laser level is designed for various construction and DIY tasks requiring precise horizontal and vertical alignment.

Image: Kiprim 3x360° Green Laser Level LV3D main unit.
2. Safety Instructions
Always adhere to the following safety guidelines to prevent injury and damage to the device.
- Laser Radiation: This product emits laser radiation. Do not stare directly into the laser beam. Avoid direct eye exposure.
- Laser Class: This device is a Class II laser product.
- Children: Keep the device out of reach of children.
- Operating Environment: Use the device in a well-lit area. Avoid using it in explosive atmospheres or in the presence of flammable liquids or gases.
- Maintenance: Do not attempt to modify or disassemble the laser level. Repairs should only be performed by authorized service personnel.
- Battery Safety: Ensure correct battery polarity when inserting. Do not mix old and new batteries or different types of batteries. Dispose of batteries responsibly.
3. Product Overview
3.1 Components
- Kiprim 3x360° Green Laser Level Unit
- Remote Controller
- Magnetic Rotating Stand
- Portable Bag
- Power Adapter
3.2 Device Features
The Kiprim LV3D offers:
- Three 360° green laser lines (one horizontal, two vertical) for comprehensive coverage.
- Self-leveling function within ±3° for quick and accurate setup.
- Manual mode for projecting lines at any angle.
- Adjustable brightness and thickness of laser lines.
- Remote control for convenient operation.
- Multiple mounting options including magnetic stand and 1/4" tripod thread.
3.3 Parts Diagram
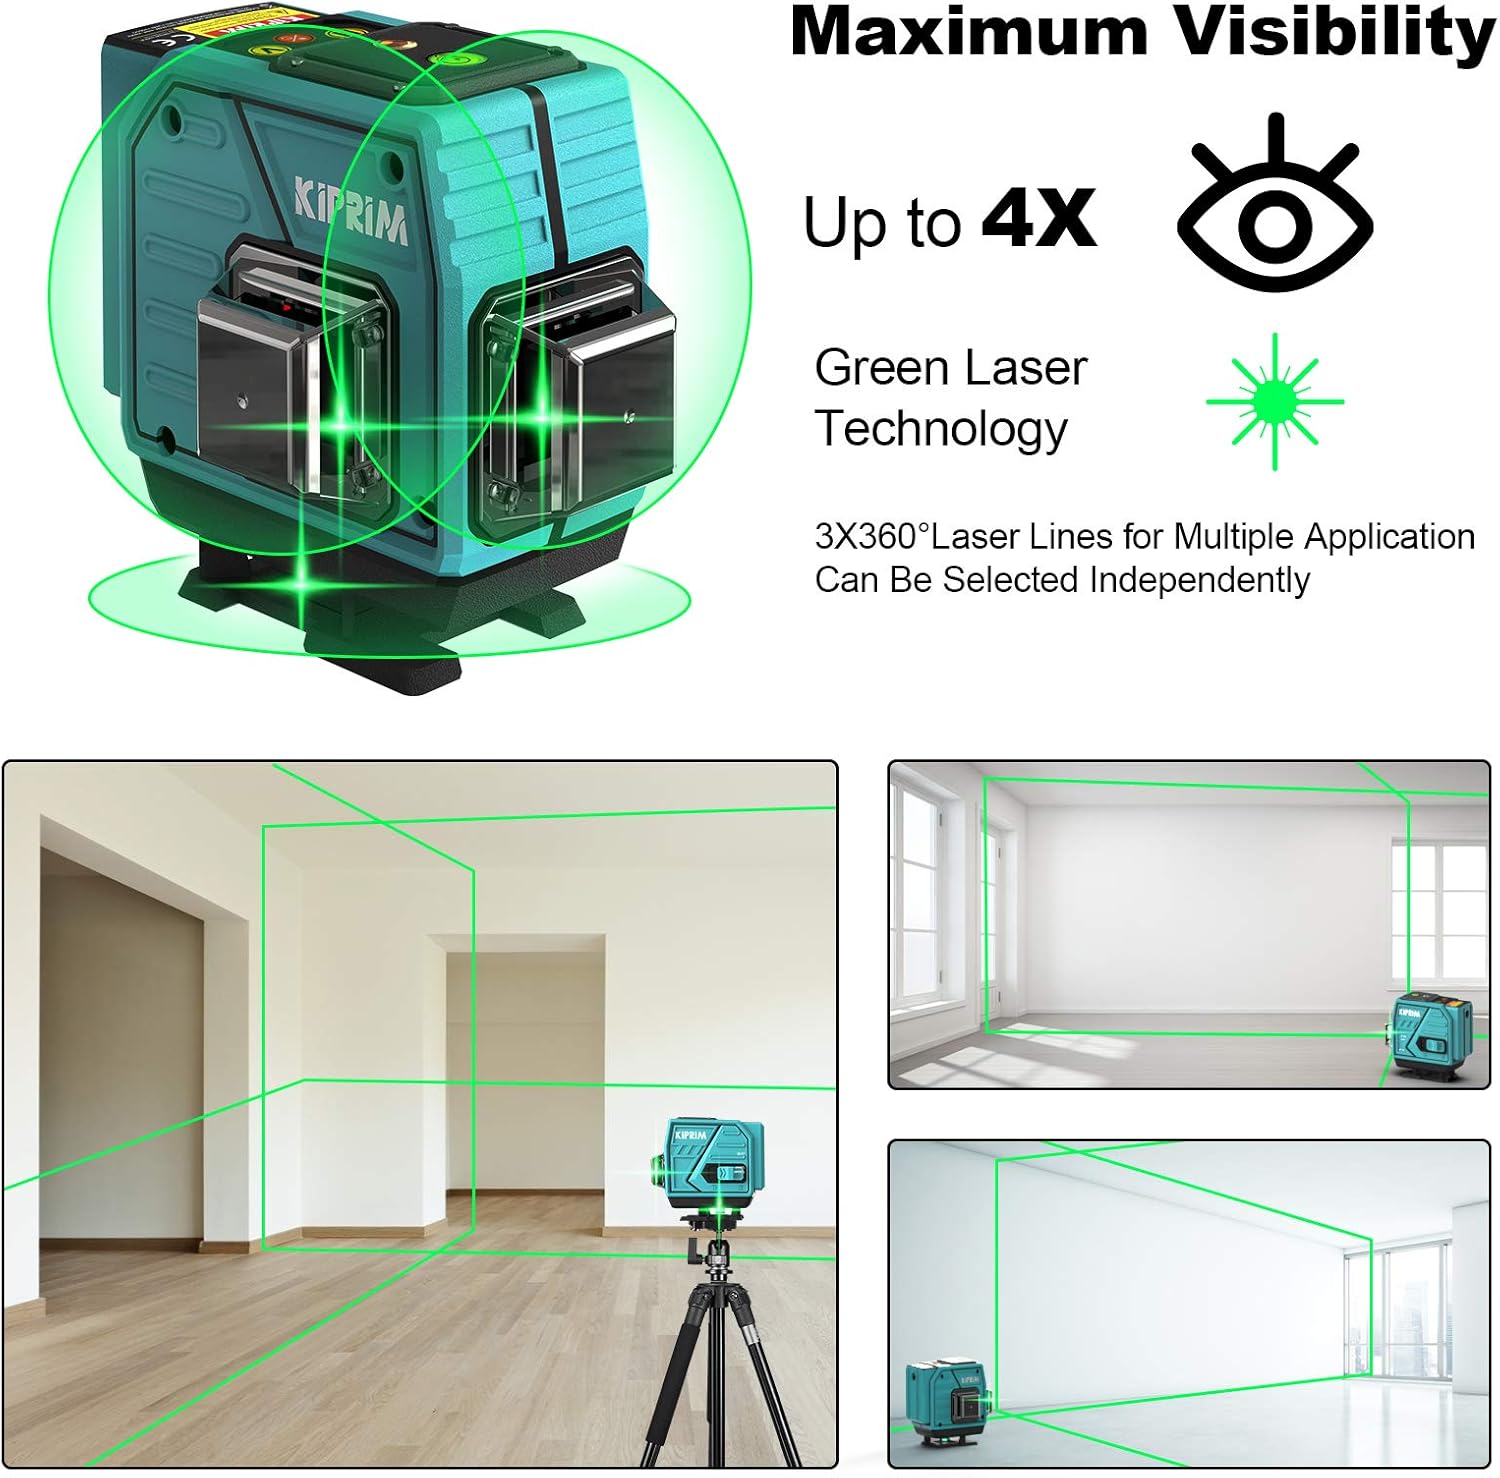
Image: Key components of the Kiprim LV3D laser level, including the 1/4 threaded mount, horizontal bubble, battery compartment, and lock switch.
4. Setup
4.1 Powering the Device
- Main Unit: The laser level unit is powered by a rechargeable battery. Connect the provided power adapter to the unit and a power source to charge the battery. Ensure the unit is fully charged before first use.
- Remote Controller: The remote controller requires 2 AAA batteries (not included). Open the battery compartment on the back of the remote and insert the batteries, observing correct polarity.
4.2 Mounting Options
The Kiprim LV3D offers versatile mounting for various applications:

Image: The Kiprim LV3D laser level demonstrating multiple fixing methods: mounted to the wall, on an adjustable lifting platform, on a 360° fine turning tripod, and supporting a standard 1/4" tripod.
- Magnetic Rotating Stand: Attach the laser level to the magnetic stand. The strong magnets allow it to be fixed to metal surfaces. The stand also provides fine-tuning rotation.
- Tripod Mounting: The unit features a 1/4" threaded mount on its base, compatible with most standard tripods (tripod not included).
- Wall Mount: Utilize the included wall mount bracket for secure attachment to vertical surfaces.
- Adjustable Lifting Platform: For precise height adjustments, place the laser level on an adjustable lifting platform (if available).
5. Operating Instructions
5.1 Power On/Off and Mode Selection
- Power On: Slide the lock switch to the unlocked position to power on the device. The laser level will automatically enter Self-Leveling Mode.
- Power Off: Slide the lock switch to the locked position to power off the device.
- Self-Leveling Mode: When the lock switch is in the unlocked position, the device will self-level. If the device is tilted beyond ±3°, an audible alarm will sound, and the laser lines will flash, indicating it is out of level. Adjust the device's position until it is within the self-leveling range.
- Manual Mode (Lock Mode): To project lines at an angle, slide the lock switch to the locked position. Then, press and hold the power button on the unit (or the corresponding button on the remote) to activate Manual Mode. The laser lines will be fixed, allowing for angled projections without self-leveling.

Image: The Kiprim LV3D laser level in Self-Leveling Mode (top) for horizontal and vertical alignment, and Manual Mode (bottom) for projecting lines at custom angles.

Image: The Kiprim LV3D laser level indicating an alarm when the slope exceeds 3 degrees, requiring adjustment for self-leveling.
5.2 Laser Line Selection
Press the 'H' button on the unit or remote to cycle through horizontal laser lines. Press the 'V' button to cycle through vertical laser lines. You can activate one, two, or all three 360° lines simultaneously.
5.3 Adjusting Brightness and Thickness
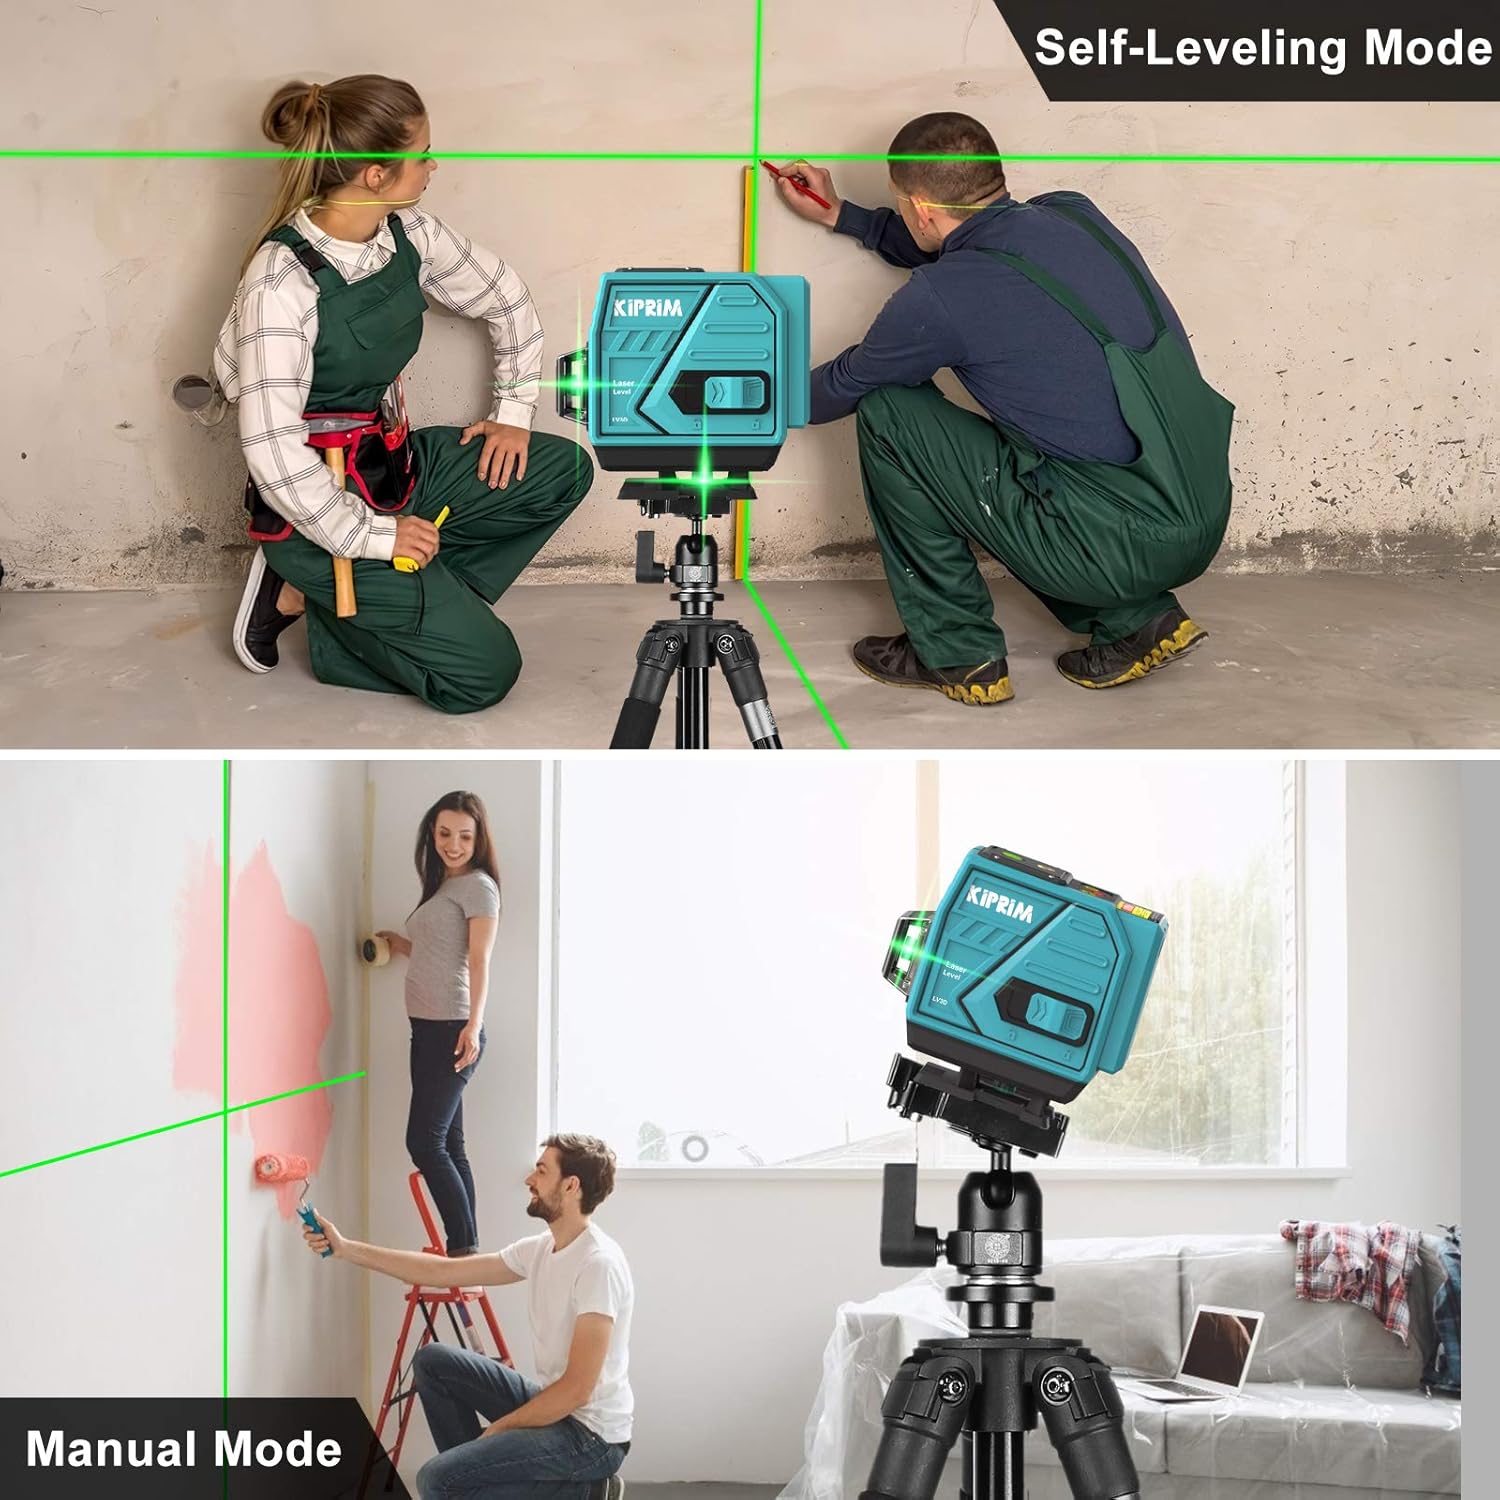
Image: The Kiprim LV3D laser level demonstrating how to adjust the brightness and thickness of the laser lines. Holding 'H/+' increases brightness and thickness, while holding 'V/-' reduces them.
- Increase Brightness/Thickness: In operating mode, press and hold the 'H/+' button on the unit or remote for a few seconds to increase the brightness and thickness of the laser lines.
- Decrease Brightness/Thickness: Press and hold the 'V/-' button on the unit or remote for a few seconds to decrease the brightness and thickness of the laser lines.
5.4 Using the Remote Controller
The remote controller allows for convenient operation from a distance. It can be used to:
- Turn horizontal and vertical laser lines on/off independently.
- Adjust laser line brightness and thickness.
- Switch between Self-Leveling and Manual modes (by holding the appropriate button).
6. Maintenance
- Cleaning: Use a soft, damp cloth to clean the device. Do not use abrasive cleaners or solvents. Keep the laser apertures clean and free of dust.
- Storage: Store the laser level in its portable bag in a dry, dust-free environment when not in use. If storing for extended periods, remove the batteries from the remote controller.
- Calibration: The device is factory calibrated. If you suspect a calibration issue, contact customer support. Do not attempt to recalibrate it yourself.
7. Troubleshooting
- Laser lines are flashing and alarm is sounding: The device is out of its self-leveling range (±3°). Adjust the position of the laser level until it is on a more level surface.
- No laser lines: Ensure the device is powered on and the lock switch is in the unlocked position for self-leveling mode, or in the locked position with manual mode activated. Check battery charge.
- Laser lines are dim: Adjust the brightness using the 'H/+' button. Ensure the working environment is not excessively bright, which can make laser lines appear dimmer.
- Remote controller not working: Check if the AAA batteries are correctly inserted and have sufficient charge. Ensure there are no obstructions between the remote and the laser level.
8. Specifications
| Model | LV3D |
| Laser Color | Green |
| Laser Configuration | 3 x 360° (1 Horizontal, 2 Vertical) |
| Self-Leveling Range | ±3° |
| Operation Mode | Automatic (Self-Leveling), Manual (Lock Mode) |
| Power Source (Main Unit) | Rechargeable Battery (via USB-C adapter) |
| Power Source (Remote) | 2 x AAA Batteries (not included) |
| Weight | 350 Grams |
| Dimensions (Approximate) | Compact cube design (specific dimensions for device not provided, package dimensions: 33.79 x 25.5 x 0.1 cm) |
| UPC | 782942415516 |
9. Warranty and Support
Kiprim products are manufactured to high-quality standards. For warranty information, technical support, or service inquiries, please refer to the contact information provided with your purchase or visit the official Kiprim website. Please have your model number (LV3D) and purchase date available when contacting support.

