Introduction
Thank you for choosing the WestForce Electric Pressure Washer. This manual provides essential information for the safe and efficient operation, maintenance, and troubleshooting of your new pressure washer. Please read this manual thoroughly before first use and keep it for future reference.
This powerful electric pressure washer is designed for various cleaning tasks around your home, including vehicles, patios, driveways, and outdoor furniture. Its robust motor and versatile nozzle system ensure effective cleaning performance.

Image: Front view of the WestForce Electric Pressure Washer, showcasing its compact design and integrated hose reel.
Important Safety Instructions
When using this product, basic precautions should always be followed, including the following:
- Read all instructions before using the appliance.
- To reduce the risk of injury, close supervision is necessary when the appliance is used near children.
- Know how to stop the appliance and bleed pressures quickly. Be thoroughly familiar with the controls.
- Stay alert and watch what you are doing. Do not operate the appliance when fatigued or under the influence of alcohol or drugs.
- Do not direct discharge stream at persons.
- Do not use the pressure washer if the power cord or other important parts are damaged.
- Always wear appropriate eye protection and protective clothing when operating the pressure washer.
- The appliance is equipped with a UL listed GFCI plug for electrical safety.
- Ensure the water supply is clean and free of debris to prevent damage to the pump.
Product Components
Familiarize yourself with the parts of your WestForce Electric Pressure Washer:
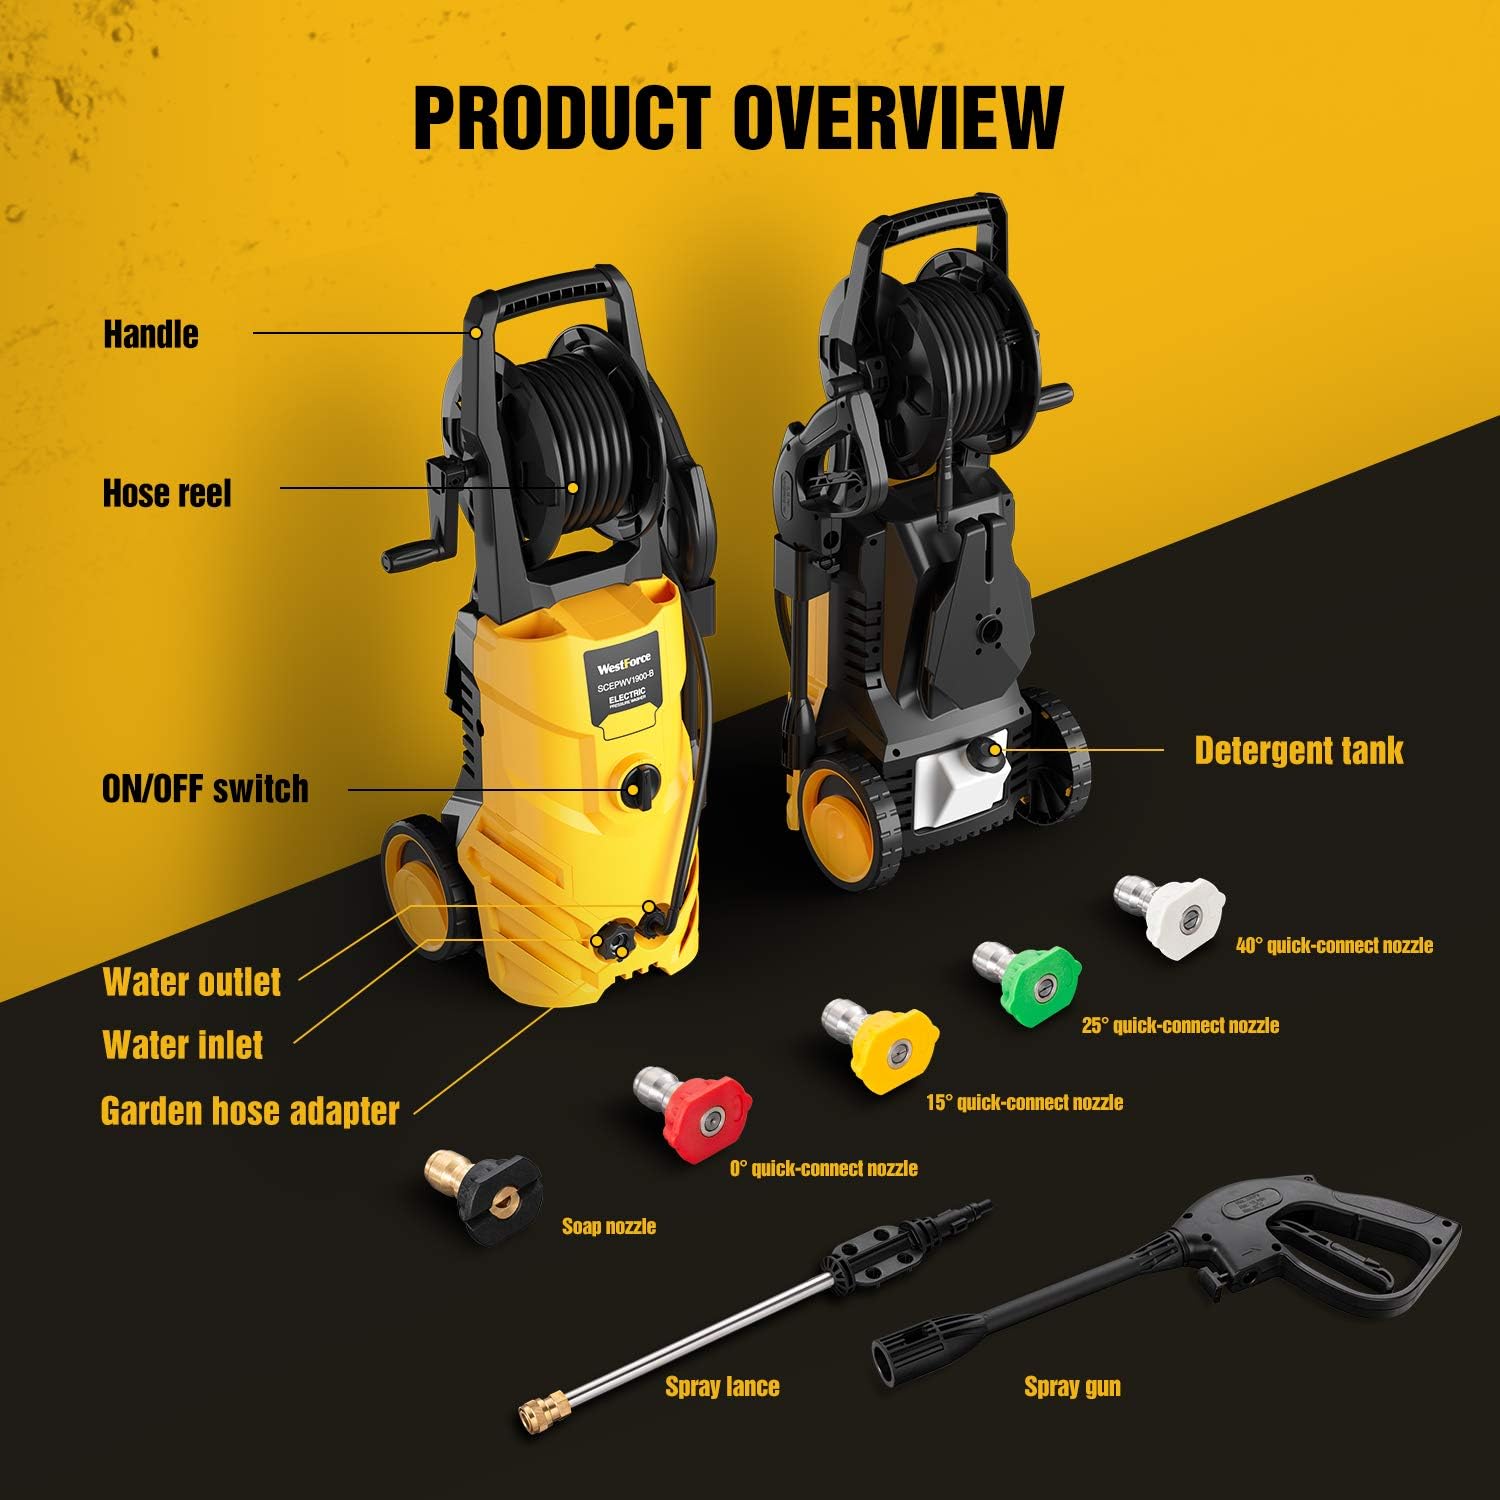
Image: Labeled diagram showing the main components including the handle, hose reel, ON/OFF switch, water outlet, water inlet, garden hose adapter, 0° quick-connect nozzle, 15° quick-connect nozzle, 25° quick-connect nozzle, 40° quick-connect nozzle, soap nozzle, spray lance, spray gun, and detergent tank.
- Main Unit: Houses the motor, pump, and electrical components.
- High-Pressure Hose: Connects the pump to the spray gun.
- Spray Gun: Handheld device for directing the water stream.
- Spray Lance: Extension for the spray gun, where nozzles attach.
- Quick-Connect Nozzles: Interchangeable nozzles for various spray patterns (0°, 15°, 25°, 40°).
- Soap Nozzle: For applying detergent.
- Detergent Tank: Integrated tank for soap or cleaning solutions.
- Hose Reel: For convenient storage of the high-pressure hose.
- Wheels: For easy mobility.
Setup and Assembly
Follow these steps to assemble and prepare your pressure washer for use:
- Attach the Handle: Secure the handle to the main unit using the provided screws.
- Connect the High-Pressure Hose:
- Pull out the high-pressure hose from the hose reel.
- Connect one end of the high-pressure hose to the water outlet on the pressure washer.
- Connect the other end of the high-pressure hose to the spray gun.
- Assemble the Spray Gun and Lance:
- Align the spray lance with the spray gun and push it in until it clicks securely.
- Select the desired quick-connect nozzle and insert it into the end of the spray lance, pulling back the collar to secure it.
- Connect Water Supply:
- Attach a standard garden hose (not included) to the water inlet of the pressure washer using the garden hose adapter.
- Ensure all connections are tight to prevent leaks.
- Turn on the water supply completely.
- Power Connection: Plug the UL listed GFCI plug into a grounded electrical outlet. Press the reset button on the GFCI plug if necessary.

Image: Visual guide demonstrating the connection of the spray lance to the gun, the high-pressure hose to the gun, the garden hose to the unit, and the high-pressure hose to the unit's outlet.

Image: Illustration of dual water intake methods, showing connection to a faucet and drawing water from a bucket or pool.
Operating Instructions
Before starting, ensure all connections are secure and the water supply is fully open.
- Purge Air from System: Before turning on the power, squeeze the trigger on the spray gun to allow water to flow through the system and purge any air. Continue until a steady stream of water emerges.
- Start the Pressure Washer: Turn the ON/OFF switch to the "ON" position. The motor will start.
- Begin Cleaning: Squeeze the trigger on the spray gun to start the high-pressure water flow. Release the trigger to activate the Total Stop System (TSS), which automatically turns off the pump to save energy and prolong pump life.
- Using Nozzles:
- 0° (Red): For spot cleaning or hard-to-reach areas. Use with extreme caution due to high pressure.
- 15° (Yellow): For tough jobs on durable surfaces.
- 25° (Green): For all-purpose cleaning.
- 40° (White): For painted and/or delicate surfaces, or gentle cleaning.
- Soap Nozzle (Black): For applying detergent.
- Applying Detergent:
- Fill the integrated detergent tank with a proper amount of pressure washer safe soap or detergent.
- Attach the black soap nozzle to the spray lance.
- The pressure washer will automatically mix the detergent with water at a low pressure setting.
- Apply detergent to the surface, allowing it to soak for a few minutes before rinsing.
- Shutting Down:
- Turn the ON/OFF switch to the "OFF" position.
- Turn off the water supply.
- Squeeze the spray gun trigger to release any remaining pressure in the system.
- Unplug the power cord.

Image: Visual representation of the five quick-connect nozzles (0°, 15°, 25°, 40°, and Soap) and their respective spray patterns.

Image: Close-up view of the integrated detergent tank, located at the base of the pressure washer.
Video: Demonstrates the setup and various cleaning applications of the WestForce Electric Pressure Washer, including hose connection, nozzle changes, and soap application.
Video: Shows the pressure washer in action, highlighting its power and effectiveness on various surfaces like patios and vehicles, and demonstrating nozzle changes.
Maintenance and Storage
Proper maintenance ensures the longevity and optimal performance of your pressure washer.
- After Each Use:
- Disconnect the water supply and power.
- Squeeze the trigger to release residual pressure.
- Drain all water from the pump, hose, and spray gun to prevent freezing damage.
- Clean the exterior of the unit with a damp cloth.
- Rinse the detergent tank thoroughly if used.
- Nozzle Cleaning: If a nozzle becomes clogged, use the included nozzle cleaning tool (or a small paper clip) to clear the obstruction.
- Water Inlet Filter: Regularly check and clean the water inlet filter to prevent debris from entering the pump.
- Storage:
- Store the pressure washer in a dry, frost-free area.
- Wind the high-pressure hose neatly onto the hose reel.
- Store the spray gun and nozzles in their designated holders on the unit.
- Ensure the power cord is neatly wrapped around the cord rack.

Image: Features highlighting easy transportation and simple storage, showing the hose reel, detergent tank holder, and durable wheels.

Image: Close-up view of the 360° rotating hose reel, designed for convenient hose management.
Troubleshooting Guide
Refer to this table for common issues and their solutions.
| Problem | Possible Cause | Solution |
|---|---|---|
| Motor does not start. |
|
|
| Low pressure. |
|
|
| Water leaks. |
|
|
| Motor stops during operation. |
|
|
Product Specifications
| Feature | Specification |
|---|---|
| Brand | WestForce |
| Model | SCEPWV1900-B |
| Power Source | Corded Electric |
| Motor Power | 1800 W / 14.5 Amp |
| Maximum Pressure | 3350 PSI |
| Maximum Flow Rate | 1.85 GPM |
| Hose Length | 20 Feet |
| Power Cord Length | 33 Feet |
| Detergent Tank Capacity | 25 oz (approx. 740 ml) |
| Water Protection Rating | IPX5 |
| Safety Certification | UL Listed GFCI Plug |
| Item Weight | 25.2 pounds |
| Package Dimensions | 23.7 x 17 x 13 inches |
Warranty and Support
WestForce products are manufactured to high-quality standards. This product comes with a 24-month warranty from the date of purchase, covering defects in materials and workmanship under normal use.
The warranty does not cover damage caused by misuse, abuse, neglect, unauthorized repairs, or normal wear and tear. For warranty claims or technical support, please contact WestForce customer service.
Please retain your proof of purchase for warranty validation.
For further assistance, please visit the official WestForce website or contact their customer support team.