Introduction
Thank you for choosing the Yoocaa 12-Pod Hydroponic Growing System. This indoor gardening system allows you to grow herbs, vegetables, and fruits without soil, providing fresh produce year-round. This manual will guide you through the setup, operation, maintenance, and troubleshooting of your new hydroponic garden.
Package Contents
Please ensure all components are present before assembly:
- LED Light Panel
- Extended Rod (Adjustable Height Post)
- Water Tank (3.5 Liters capacity)
- Water Filling Hole Cover
- Plastic Domes (x12)
- Plastic Baskets (x12)
- Grow Sponges (x24)
- A&B Solid Nutrient (x2 bottles)
- Identification Cards (x12)
- Power Adapter (x1)
- Water Tank Covers (x6)
- Supporting Rods (x12)

Image: Overview of the Yoocaa Hydroponic System components, including the LED light panel, water tank, and accessories.
Setup Instructions
- Assemble the System: Connect the LED light panel to the extended rod, and then insert the rod into the water tank base. Ensure all connections are secure.
- Add Water: Fill the water tank with approximately 3 liters of clean water. Use the water level indicator to monitor the maximum fill line.
- Add Nutrient Solution: Add 15ml of Nutrient A and 15ml of Nutrient B to the water tank. Stir gently to mix. Refer to the 'Nutrient Solution Guide' in the Maintenance section for detailed dosage based on water volume.
- Prepare Seed Pods: Place a grow sponge into each plastic basket. Insert 2-3 seeds into the center of each grow sponge.
- Place Pods: Insert the prepared plastic baskets into the designated holes on the water tank cover. Cover each pod with a plastic dome to create a humid environment for germination.
- Power On: Connect the power adapter to the system and plug it into an electrical outlet. Press the 'Power' button on the control panel.

Image: Step-by-step guide for setting up the Yoocaa Hydroponic System, including adding water, nutrients, seeds, and placing pods.
Operating Instructions
Control Panel Functions
The control panel on the LED light panel allows you to manage the system's functions:
- Power Button: Turns the system on/off.
- Veg Mode: Activates the light spectrum optimized for vegetative growth (leaves).
- Flower Mode: Activates the light spectrum optimized for flowering and fruiting.
- Pump Button: Controls the water circulation pump. Press to cycle between 30 minutes ON / 30 minutes OFF.
LED Grow Lights
The system features 80 full-spectrum LED lights (36W) designed to maximize photosynthesis. The lights operate on an automatic 16-hour ON / 8-hour OFF cycle.
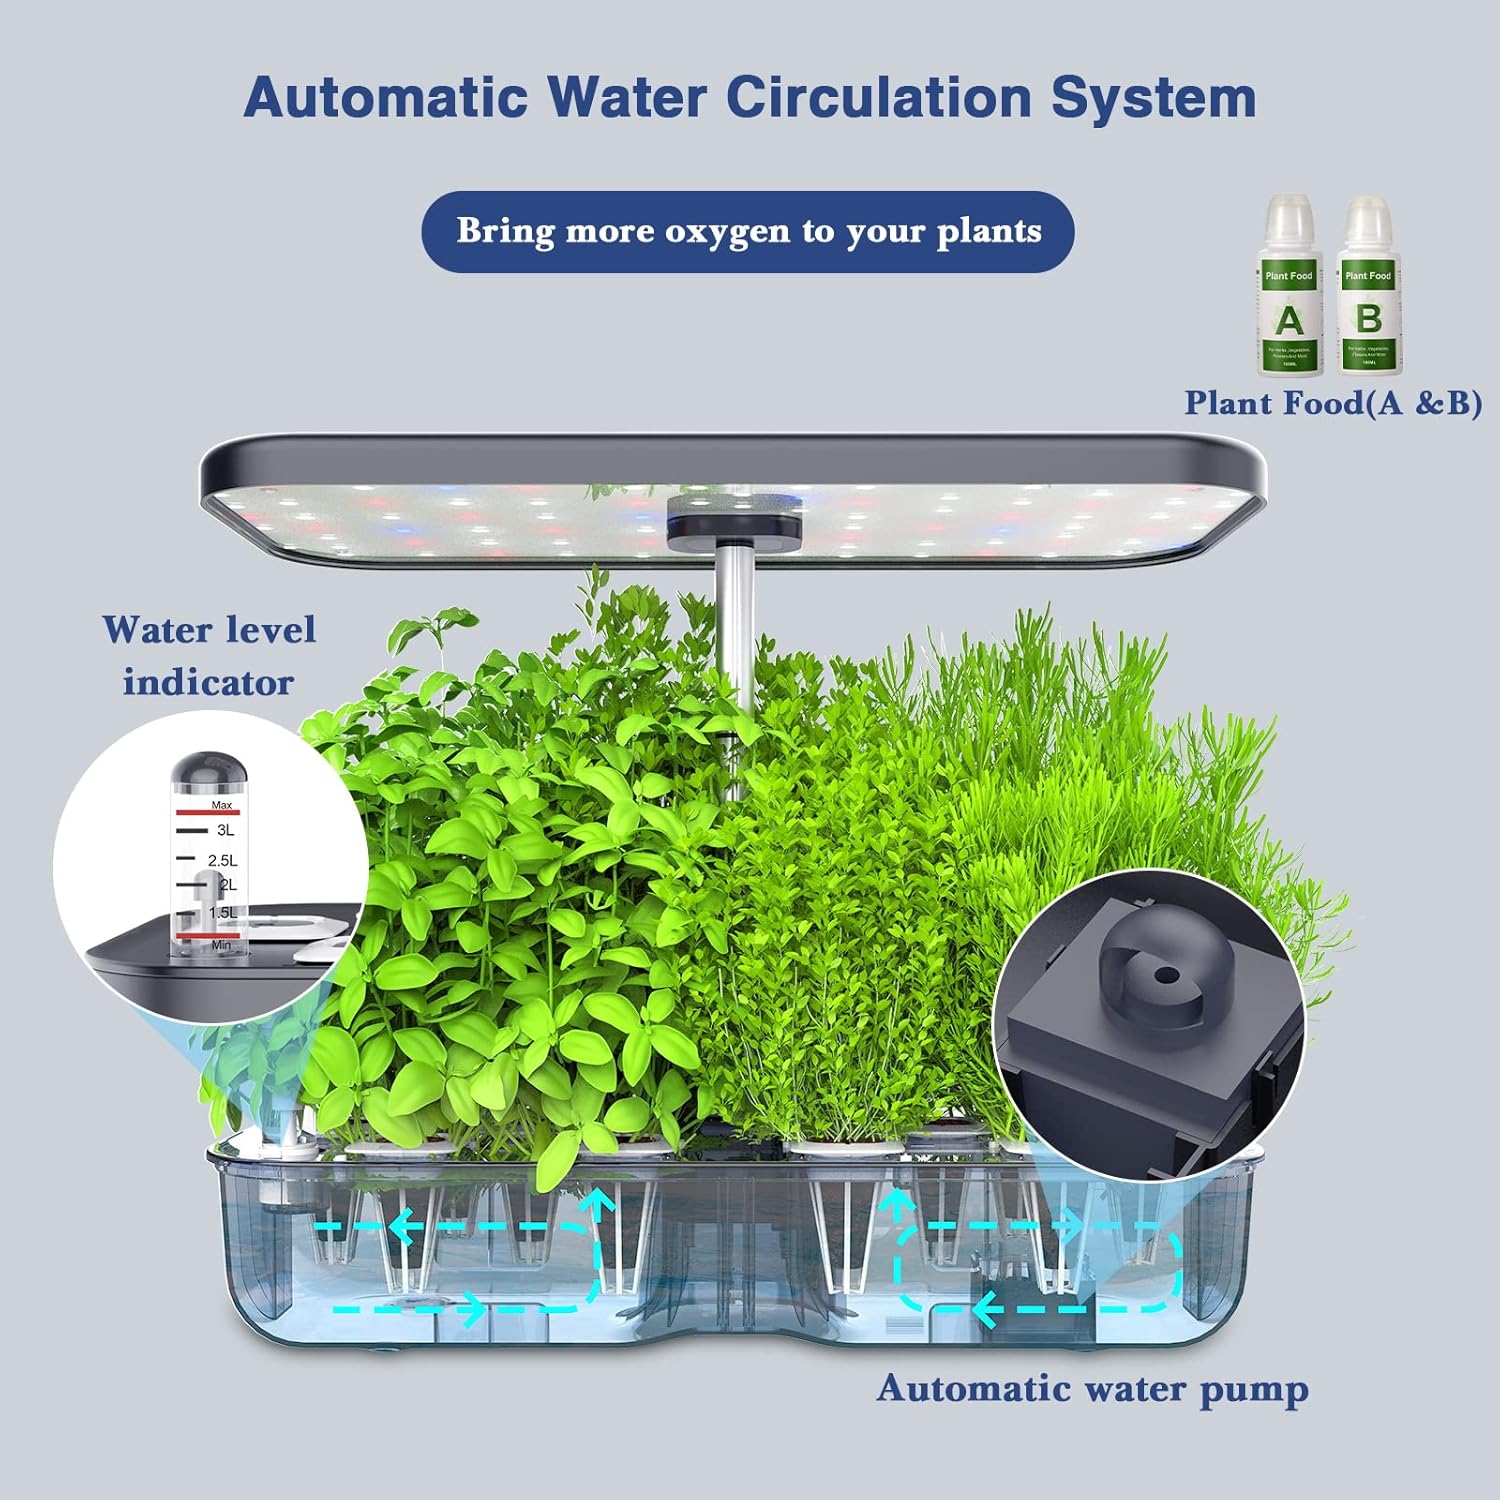
Image: Illustration of the two LED light modes: Flowers & Fruits Mode (Red, Blue, Far-red, White Light) and Vegetables Mode (Red, Far-red, White Light).

Image: Diagram showing the automatic 16 hours ON / 8 hours OFF light cycle.
Adjustable Lamp Post
The LED light panel's height is adjustable up to 49.3 cm (19.4 inches). As your plants grow, raise the light panel to maintain an optimal distance from the plant canopy. This prevents burning and ensures even light distribution.

Image: The adjustable lamp post showing height variations from 7.1 inches (18cm) to 19.4 inches (49.3cm) as plants grow.
Automatic Water Circulation System
The integrated water circulation system increases oxygen levels in the water, promoting healthier root development. The pump operates on a 30-minute ON / 30-minute OFF cycle, ensuring consistent water flow and nutrient delivery.

Image: Diagram illustrating the automatic water circulation system, water level indicator, and the internal water pump.
Maintenance
Water and Nutrient Management
Regularly check the water level using the indicator. Refill with fresh water as needed. The nutrient solution should be replenished every 2-3 weeks, or when the water level drops significantly. It is recommended to completely change the water and nutrient solution every 3-4 weeks to prevent nutrient imbalance and algae growth.
Nutrient Solution Guide
Add nutrients every time you add water. The following table provides recommended dosages:
| Water Volume | Nutrient A | Nutrient B |
|---|---|---|
| 1 Liter | 5ml | 5ml |
| 2 Liters | 10ml | 10ml |
| 3 Liters | 15ml | 15ml |
| 4 Liters | 20ml | 20ml |
| 5 Liters | 25ml | 25ml |
These dosages contain all necessary nutrients for plant growth.
Cleaning the System
To prevent algae and bacterial growth, periodically clean the water tank and components. Disconnect power, empty the tank, and wash with mild soap and water. Rinse thoroughly before refilling. Ensure the pump intake is clear of debris.
Transplanting Plants
Once plants have established strong root systems in the grow sponges, they can be transplanted to soil pots or an outdoor garden. Gently remove the plastic basket and sponge, ensuring minimal disturbance to the roots.

Image: Demonstrates how to easily transplant a plant from the hydroponic system, showing the root system in the grow sponge ready for transfer to soil.
Troubleshooting
- Plants are not growing or appear unhealthy:
- Check water level and nutrient concentration. Ensure correct nutrient dosage.
- Verify the LED lights are operating on the correct cycle (16 hours ON / 8 hours OFF).
- Adjust the light panel height to maintain optimal distance from plants.
- Ensure the water pump is circulating water correctly. Clean if clogged.
- Algae growth in the water tank:
- Algae is often caused by excessive light exposure to the water or nutrient imbalance.
- Ensure the water tank covers are properly in place to block light.
- Perform a full water change and clean the tank thoroughly. Reduce nutrient concentration slightly if persistent.
- Pump is not working or making unusual noise:
- Check if the pump is properly connected and submerged in water.
- Disconnect power and inspect the pump for any blockages or debris. Clean the impeller if necessary.
- If the pump fails after extended use, contact customer support for a replacement.
- Mold on grow sponges:
- Mold can occur in high humidity environments. Ensure good air circulation around the pods.
- Remove plastic domes once seeds have germinated and seedlings emerge.
- Gently remove any visible mold from the sponge surface.
Specifications
| Feature | Detail |
|---|---|
| Brand | Yoocaa |
| Model Number | YO-SPD12-001 |
| Color | Grey |
| Product Dimensions (L x W x H) | 39.62 x 8.38 x 60.96 cm (15.6 x 3.3 x 24 inches) |
| Water Tank Capacity | 3 Liters |
| Material | Plastic |
| Special Feature | Self-watering |
| Item Weight | 1.95 Kilograms |
| Number of Plant Pods | 12 |
| LED Grow Lights | 36W, 80 LEDs, Full-Spectrum |
| Adjustable Height | Up to 49.3 cm (19.4 inches) |
| Input Voltage | 110V-240V AC / 50-60Hz |
| Output Voltage | 24V DC |

Image: Product packaging displaying key specifications and manufacturer information.
Warranty and Support
Yoocaa provides a one-year warranty for this hydroponic growing system. If you encounter any quality issues or are not satisfied with your purchase, please contact our customer support team. We are committed to resolving any problems to ensure your satisfaction.
Contact Information
For support, please contact:
- EU Representative: eVatmaster Consulting GmbH, Bettinastr. 30, 60325 Frankfurt am Main, Germany. Email: contact@evatmaster.com
- UK Representative: EVATOST CONSULTING LTD, Office 101 32 Threadneedle Street, London, United Kingdom, EC2R 8AY. Email: contact@evatost.com