1. Introduction
The Saramonic Blink500 Pro B3 is an ultracompact and easy-to-use dual-channel 2.4GHz wireless microphone system designed for iOS devices. It provides a high-quality audio solution for video recording, live streaming, podcasting, vlogging, and interviews. This system includes one MFi certified Lightning receiver (RXDI) and one transmitter (TX).

Image 1.1: Saramonic Blink500 Pro B3 system with transmitter, receiver, charging case, and accessories.
2. Package Contents
Verify that all items are present in your package:
- 1 x Blink500 Pro TX Transmitter
- 1 x Blink500 Pro RXDI Receiver (MFi Certified Lightning Connector)
- 1 x Blink500 Pro B3 Charging Case
- 1 x SR-M1 Omnidirectional Lavalier Microphone
- 1 x Fur Windshield for Built-in Microphone
- 1 x USB-C Charging Cable
- 1 x Micro USB Charging Cable
- 1 x Storage Pouch
3. Product Overview
3.1. Blink500 Pro TX Transmitter

Image 3.1: Detailed view of the Blink500 Pro TX Transmitter with labeled components.
- OLED Display: Shows battery level, pairing status, audio level, and other settings.
- +/SET Button: Used to navigate menus and confirm selections.
- - Button: Used to navigate menus and adjust settings.
- Micro USB Charging Port (DC 5V): For charging the transmitter.
- Built-in Microphone: Internal omnidirectional microphone.
- MIC/LINE IN Jack: 3.5mm input for external lavalier microphone or line-level audio.
- Antenna: Internal 2.4GHz antenna.
- Power/Mute Button: Long press to power on/off, short press to mute/unmute.
3.2. Blink500 Pro RXDI Receiver

Image 3.2: Detailed view of the Blink500 Pro RXDI Receiver with labeled components.
- MFi Certified Apple Lightning Connector: Connects directly to iOS devices.
- Pairing Indicator: LED light indicating pairing status.
- M/S Switch: Selects between Mono and Stereo output modes.
- 3.5mm Headphone Output: For real-time audio monitoring.
4. Setup Guide
- Charge the Devices: Before first use, fully charge the transmitter (TX) and receiver (RXDI) using the provided charging case or USB cables. Refer to Section 6 for detailed charging instructions.
- Connect the Receiver: Plug the Blink500 Pro RXDI receiver directly into the Lightning port of your iPhone or other compatible iOS device. Ensure your device's camera application is open before connecting the receiver for proper functionality.
- Power On the Transmitter: Long press the Power/Mute button on the TX transmitter to turn it on. The OLED display will illuminate.
- Pairing: The TX and RXDI units should automatically pair when powered on. If manual pairing is required, place both units in the charging case and press the pairing button on the case.
- Select Microphone Input (TX):
- To use the built-in microphone, ensure no external microphone is plugged into the MIC/LINE IN jack.
- To use the external lavalier microphone, plug the SR-M1 lavalier microphone into the MIC/LINE IN jack on the TX transmitter. Attach the fur windshield if recording outdoors to reduce wind noise.

Image 4.1: The Blink500 Pro RXDI receiver connected to an iPhone, ready for use.
5. Operating Instructions
5.1. Power On/Off
Long press the Power/Mute button on the TX transmitter to turn it on or off.
5.2. Mute Function
While the TX transmitter is on, short press the Power/Mute button to mute or unmute the microphone. The OLED display will indicate the mute status.
5.3. Audio Monitoring
Connect headphones to the 3.5mm headphone output on the RXDI receiver to monitor the audio in real-time. This allows you to verify audio quality and levels during recording.

Image 5.1: The RXDI receiver with headphones connected for real-time audio monitoring.
5.4. Mono/Stereo Output
The RXDI receiver features an M/S switch to select between Mono and Stereo output modes:
- Mono Mode (M): The audio from the transmitter will be mixed to both the left and right channels.
- Stereo Mode (S): If using multiple transmitters (not applicable for B3, which has one TX), the audio output would be separated to the left and right channels. For the B3 system with one TX, Mono mode is typically used.

Image 5.2: Close-up of the RXDI receiver highlighting the M/S switch.
5.5. Multiple Input Modes (TX)
The transmitter supports both its built-in microphone and an external lavalier microphone:
- Built-in Microphone: For quick and convenient audio capture, simply clip the TX unit to clothing.
- External Lavalier Microphone: For discreet placement and potentially clearer audio, connect the supplied SR-M1 lavalier microphone to the MIC/LINE IN jack.
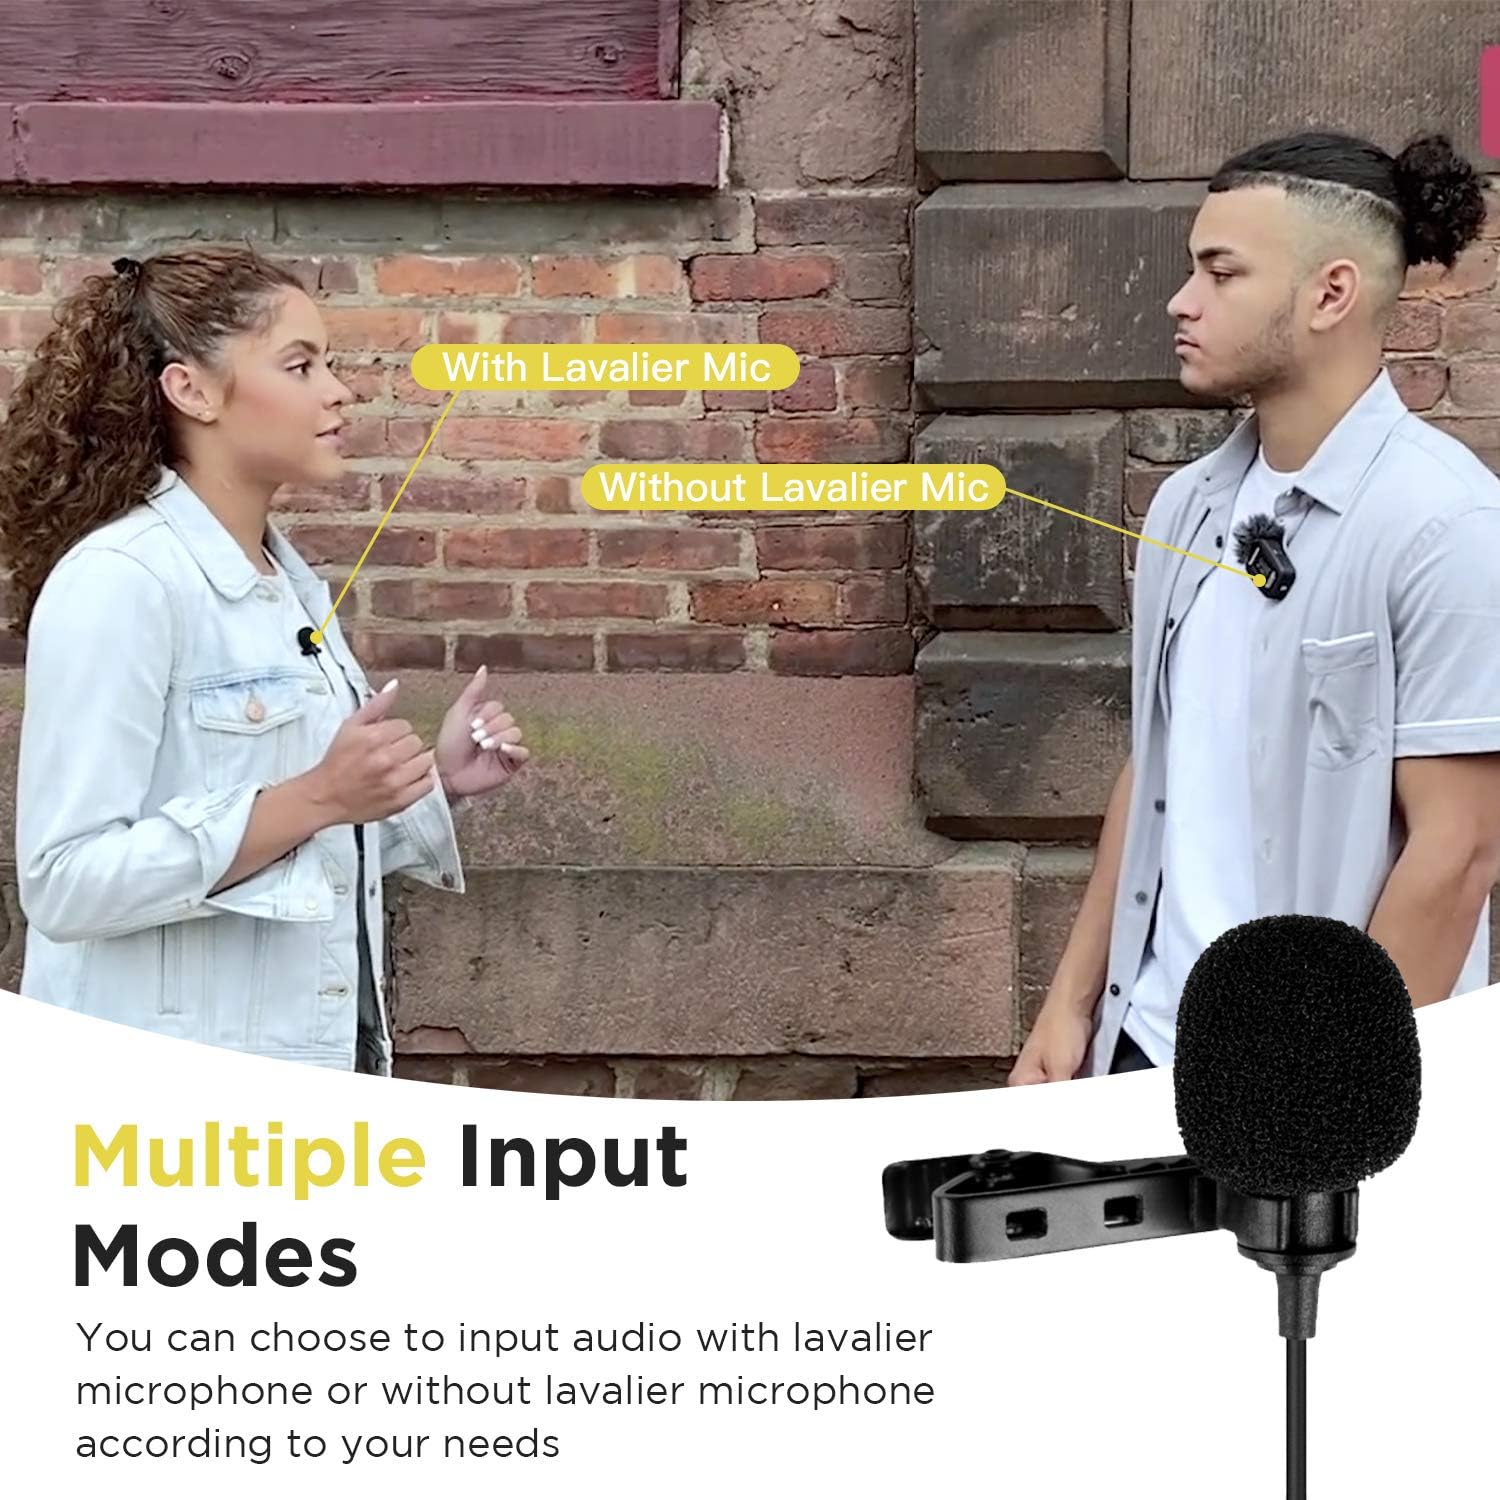
Image 5.3: Demonstrates the flexibility of using either the built-in microphone or an external lavalier microphone.
6. Charging
The Blink500 Pro B3 system includes a portable charging case that provides extended battery life and convenient charging.

Image 6.1: The Blink500 Pro B3 charging case, showing charging indicators and the pair button.
- Charging the Transmitter (TX) and Receiver (RXDI): Place the TX and RXDI units into their respective slots in the charging case. The TX Charging Indicator will show a solid red light while charging and turn off when fully charged.
- Charging the Charging Case: Connect the supplied USB-C cable to the USB-C port on the charging case and to a USB-A charger or power bank (DC 5V). The Power Capacity Indicator LEDs will show the charging status of the case.
- Battery Life: The wireless transmitters and receiver offer approximately 8 hours of run time on a single charge. The charging case provides additional charges for extended use.
7. Maintenance
- Keep the devices dry. Do not expose them to moisture.
- Clean the devices with a soft, dry cloth. Avoid using harsh chemicals or abrasive materials.
- Store the system in the provided charging case or storage pouch when not in use to protect it from dust and damage.
- Avoid extreme temperatures.
8. Troubleshooting
- No Audio Output:
- Ensure both the transmitter (TX) and receiver (RXDI) are powered on and fully charged.
- Verify that the TX and RXDI are successfully paired. If not, attempt manual pairing using the charging case.
- Check if the transmitter is muted. Short press the Power/Mute button on the TX to unmute.
- Confirm that the RXDI receiver is securely connected to your iOS device's Lightning port.
- Ensure your recording application (e.g., Camera app) is open and active before connecting the RXDI.
- Poor Audio Quality/Interference:
- Ensure the transmitter and receiver are within the recommended operating range (up to 100 meters in open areas).
- Avoid obstacles between the transmitter and receiver that may block the signal.
- Check for other 2.4GHz devices in the vicinity that might cause interference.
- If using the external lavalier microphone, ensure it is securely plugged into the TX's MIC/LINE IN jack.
- Use the fur windshield on the lavalier microphone or built-in microphone if recording in windy conditions.
- Receiver Not Turning On:
- Ensure the receiver is fully charged.
- Try disconnecting and reconnecting the receiver to your iOS device.
9. Specifications
| Feature | Specification |
|---|---|
| Item Weight | 0.029 ounces (TX/RXDI units) |
| Impedance | 2200 Ohm |
| Microphone Form Factor | Lavalier (external) / Built-in (TX) |
| Power Source | Battery Powered (Lithium Ion) |
| Number of Channels | 2 (Dual-Channel System) |
| Frequency Response | 18 KHz |
| Signal-to-Noise Ratio | 78 dB |
| Connectivity Technology | Lightning, 3.5mm |
| Compatible Devices | Smartphone, Tablet, iOS Lightning Devices |
| Polar Pattern | Omnidirectional |
| Audio Sensitivity | 39 Decibels |
10. Warranty and Support
The Saramonic Blink500 Pro B3 system comes with a One Year Saramonic Microphone Warranty. For detailed warranty information and technical support, please refer to the official Saramonic website or the full user manual.
A comprehensive user manual in PDF format can be found here: Saramonic Blink500 Pro User Manual (PDF)


