Introduction
This manual provides detailed instructions for the installation, operation, and maintenance of your WAC Lighting Lotos 6in LED Round Adjustable Recessed Light. Please read these instructions thoroughly before beginning installation and retain them for future reference.
The Lotos LED Recessed Kit offers high-quality light output and efficiency. Its design allows for installation in shallow ceiling depths, making it suitable for various applications. The 5-CCT selectable feature allows for adjustment of color temperature to suit different environments.
Safety Information
WARNING: Risk of electric shock. Disconnect power at the fuse box or circuit breaker before installation or servicing.
- All electrical connections must be in accordance with local and National Electrical Code (NEC) standards. Consult a qualified electrician if you are unfamiliar with proper electrical wiring connections.
- Ensure the supply voltage is compatible with the fixture (120V-277V).
- Do not install in locations where the operating temperature exceeds the fixture's rated temperature.
- This product is suitable for Dry, Damp, and Wet Locations.
- The fixture is IC-Rated for contact with insulation and Airtight.
- Do not modify the fixture or use non-approved components.
- Wear safety glasses and gloves during installation.
Package Contents
Verify that all components are present before beginning installation:
- LED Light and Trim
- LED Driver and Cable
- Mounting Hardware Pack
- Instruction Manual (this document)
Setup and Installation
The Lotos 6in LED Recessed Light is designed for easy installation in both remodel and new construction applications. An optional frame-in kit (part # RER-FRAME) is sold separately for pre-wiring in new construction.
Required Tools (Not Included):
- Measuring Tape
- Drywall Saw or Hole Saw
- Wire Strippers
- Screwdriver
Installation Steps:
- Turn Off Power: Before starting, ensure the power to the installation area is turned off at the circuit breaker or fuse box.
- Determine Cutout Size: For the 6in fixture, a 5in cutout is required. Ensure ceiling thickness is between 0.5in and 1.5in.
- Create Ceiling Opening: Use a drywall saw or hole saw to create the specified cutout in the ceiling.
- Connect Wiring to Driver Box:
The driver box includes 5 knockouts for electrical connections. Open the appropriate knockout and connect the building's electrical supply wires to the driver box. Connect the live (black) wire to the black wire of the driver, the neutral (white) wire to the white wire of the driver, and the ground (green/bare copper) wire to the green wire of the driver. Secure connections with wire nuts (not included) or appropriate connectors. Ensure all connections are tight and secure.
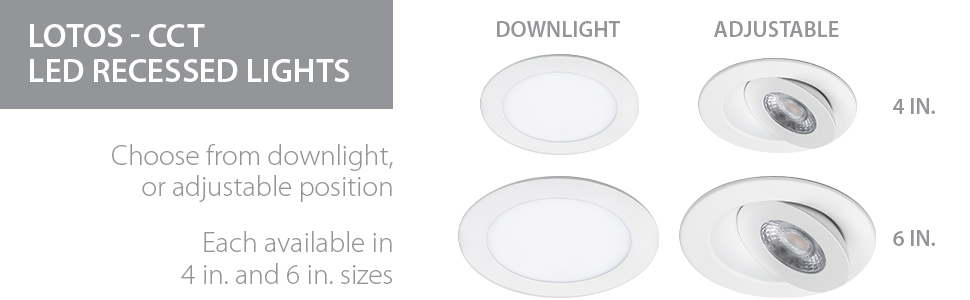
Image: Illustration of the driver box and its wiring connections.
- Connect Light Engine to Driver Box: Connect the male-to-female quick connect locking cable from the LED light engine to the driver box. Ensure the connection is secure.
- Insert Driver Box: Place the driver box through the cutout opening into the ceiling plenum. The shallow design requires less than 2 inches of plenum space.
- Install LED Light Fixture:
Push the LED light fixture into the ceiling opening. The retention clips on the sides of the fixture will spring up and hold the light engine securely in place against the ceiling.

Image: Front view of the Lotos recessed light fixture, showing its design and spring clips.
- Adjust Light Angle (Adjustable Models): For adjustable models, the gimbal allows for 360-degree pivot on a hinge, enabling adjustment from 0-90 degrees perpendicular to the ceiling. Adjust the light direction as needed.
- Restore Power: Once installation is complete, restore power at the circuit breaker and test the light.
Note: The overall height of the fixture with the driver is less than 1.25 inches, designed to fit in tight spaces.

Image: Side profile of the Lotos recessed light, highlighting its slim design.
Operating Instructions
5-CCT Selectable Color Temperature
Your Lotos LED Recessed Light features an on-board 5-CCT selectable switch, allowing you to choose from five different color temperatures:
- 2700K (Warm White)
- 3000K (Warm White)
- 3500K (Neutral White)
- 4000K (Cool White)
- 5000K (Natural White)
To change the color temperature, locate the switch on the driver box. Slide the switch to your desired CCT setting before or after installation. It is recommended to set the desired CCT before final installation into the ceiling for easier access.

Image: Close-up of the driver box with the 5-CCT selectable switch clearly visible, indicating different color temperature options.
Dimming
This fixture is designed for smooth and continuous dimming with compatible electronic low voltage (ELV) or TRIAC dimmers. It dims down to 10% with ELV dimmers and 5% with TRIAC dimmers. Ensure your dimmer switch is compatible with LED lighting and the fixture's voltage requirements.
Maintenance
The WAC Lighting Lotos LED Recessed Light requires minimal maintenance. The integrated LED module has a rated life of 50,000 hours, meaning no bulb replacement is necessary.
- Cleaning: To clean the fixture, ensure power is off. Use a soft, dry, or slightly damp cloth. Do not use abrasive cleaners or solvents, as they may damage the finish or electrical components.
- Inspection: Periodically inspect the fixture for any signs of damage or loose connections. If any issues are found, disconnect power and consult a qualified electrician.
Troubleshooting
| Problem | Possible Cause | Solution |
|---|---|---|
| Light does not turn on. |
|
|
| Light flickers or dims improperly. |
|
|
| Incorrect color temperature. | CCT switch set incorrectly. | Adjust the 5-CCT selectable switch on the driver box to the desired setting. |
If troubleshooting steps do not resolve the issue, contact WAC Lighting customer support or a qualified electrician.
Specifications
| Brand | WAC Lighting |
| Model Number | R6ERAR-W9CS-WT-6 |
| Item Type Name | Lotos 6in LED 5-CCT Round Adjustable Recessed Kit |
| Power | 15 Watts |
| Lumens | 1,350 Lumens |
| CRI | 90 |
| Rated Hours | 50,000 hours |
| Color Temperature | 5-CCT Selectable (2700K, 3000K, 3500K, 4000K, 5000K) |
| Voltage | 120V-277V Universal |
| Dimming | Smooth and continuous with ELV or TRIAC dimmers (dims to 10% ELV, 5% TRIAC) |
| Construction | Die-cast aluminum with 20-gauge steel driver box |
| Certifications | ETL & cETL UL #1598 listed, IC-Rated, Airtight, CEC Title 24 Compliant, Energy Star 2.0 Certified, Title 24 JA8-2016 |
| Dimensions (L x W x H) | 6.12"L x 6.12"W x 1.63"H |
| Item Weight | 1.14 Pounds |
| Cutout Size | 5 inches (for 6in fixture) |

Image: Technical diagram illustrating the dimensions of the Lotos 6in LED Recessed Light and its remote driver box.
Warranty and Support
This WAC Lighting Lotos LED Recessed Light comes with a 5-year manufacturer's warranty. For warranty claims or technical support, please contact WAC Lighting customer service.
For further assistance, visit the official WAC Lighting website or contact their support channels. Keep your purchase receipt for warranty validation.