Introduction
This manual provides essential instructions for the safe operation, setup, maintenance, and troubleshooting of your Dayton 6-inch Bench Grinder. Please read this manual thoroughly before operating the tool to ensure proper use and to prevent injury or damage.
Important Safety Instructions
Always follow basic safety precautions to reduce the risk of fire, electric shock, and personal injury when using this power tool.
- Eye Protection: Always wear ANSI-approved safety goggles or a face shield over safety glasses.
- Hand Protection: Wear appropriate gloves to protect hands from sparks and abrasive materials.
- Stable Work Surface: Mount the bench grinder securely to a stable workbench to prevent movement during operation.
- Proper Guarding: Ensure all wheel guards, eye shields, and tool rests are correctly installed and adjusted before use.
- Unplug Before Adjustments: Disconnect the grinder from the power source before changing accessories, making adjustments, or performing maintenance.
- Ventilation: Operate the grinder in a well-ventilated area.
- Workpiece Control: Always use the tool rest to support the workpiece and maintain control.
- Avoid Overloading: Do not force the tool. Allow the grinder to reach full speed before applying the workpiece.
- Proposition 65 Warning: This product may expose you to chemicals known to the State of California to cause cancer and birth defects or other reproductive harm. Wash hands after handling.
Package Contents
Verify that all items are present and undamaged upon unpacking.
- Dayton 6-inch Bench Grinder Unit
- 36-Grit Grinding Wheel (pre-installed or separate)
- 60-Grit Grinding Wheel (pre-installed or separate)
- Wheel Guards (2)
- Adjustable Eye Shields (2)
- Adjustable Tool Rests (2)
- Instruction Manual
Setup and Assembly
Follow these steps to prepare your bench grinder for operation.
1. Unpacking and Inspection
Carefully remove all components from the packaging. Inspect for any shipping damage. If any parts are damaged or missing, do not operate the grinder and contact customer support.
2. Mounting the Grinder
For safe operation, the bench grinder must be securely mounted to a sturdy workbench. Use bolts, washers, and nuts (not included) through the mounting holes in the base of the grinder. Ensure the mounting surface is level and stable.
3. Installing Guards, Shields, and Tool Rests
Attach the wheel guards, eye shields, and tool rests according to the diagrams. Ensure they are tightened securely. The tool rests should be adjusted to within 1/16 inch (1.5 mm) of the grinding wheel face. The eye shields should be positioned to provide maximum protection without obstructing your view of the workpiece.
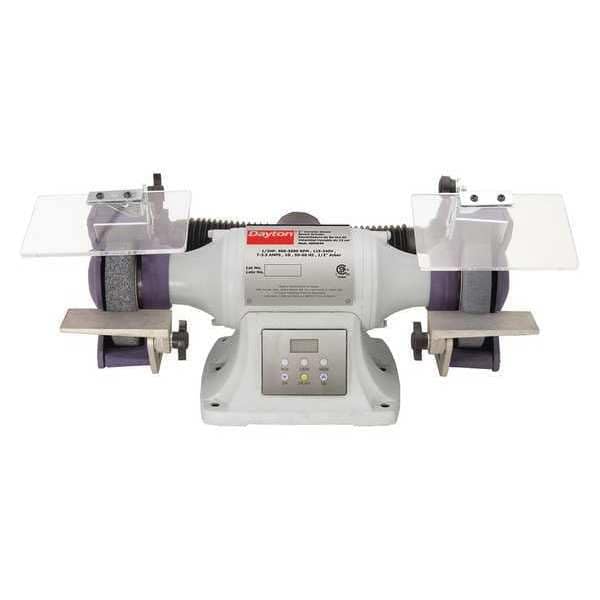
Image: The Dayton 6-inch Bench Grinder shown with both grinding wheels, protective eye shields, and adjustable tool rests in place, ready for operation.
4. Wheel Inspection
Before initial use and periodically thereafter, inspect the grinding wheels for cracks, chips, or other damage. Replace any damaged wheels immediately. Ensure the wheels are properly seated and the retaining nuts are tightened.
Operating Instructions
Understand the basic steps for operating your bench grinder safely and effectively.
1. Power Connection
Connect the grinder's power cord to a grounded electrical outlet. Ensure the power switch is in the "OFF" position before plugging in.
2. Starting and Stopping
To start the grinder, press the "ON" switch. Allow the wheels to reach full operating speed before beginning any work. To stop, press the "OFF" switch. Always wait for the wheels to come to a complete stop before leaving the grinder unattended or performing any adjustments.
3. Grinding Techniques
- Use Tool Rests: Always support the workpiece firmly on the tool rest. This provides stability and control, reducing the risk of kickback or injury.
- Light Pressure: Apply light, even pressure when grinding. Excessive force can damage the wheel, overheat the workpiece, or cause the motor to stall.
- Even Wear: Move the workpiece across the face of the grinding wheel to ensure even wear. This helps maintain the wheel's shape and prolongs its life.
- Cooling: For heat-sensitive materials, periodically dip the workpiece in water to prevent overheating and loss of temper.
Maintenance
Regular maintenance ensures optimal performance and extends the life of your bench grinder. Always unplug the grinder before performing any maintenance.
1. Cleaning
Periodically clean dust and debris from the grinder, especially around the motor vents, using a soft brush or compressed air. Keep the eye shields clean for clear visibility.
2. Dressing Grinding Wheels
Over time, grinding wheels can become glazed or out of round, reducing their effectiveness. Use a wheel dresser to restore the wheel's cutting surface and true its shape. Follow the dresser manufacturer's instructions carefully.
3. Replacing Grinding Wheels
When a grinding wheel becomes worn down or damaged, it must be replaced. Ensure the replacement wheel has the correct diameter, arbor hole size, and maximum RPM rating for your grinder. Refer to the setup section for wheel installation guidelines.
Troubleshooting
This section addresses common issues you might encounter with your bench grinder.
| Problem | Possible Cause | Solution |
|---|---|---|
| Grinder does not start. | No power, faulty switch, motor issue. | Check power cord and outlet. Ensure switch is ON. If problem persists, contact service. |
| Excessive vibration. | Loose mounting, unbalanced wheel, damaged wheel. | Check mounting bolts. Dress or replace grinding wheels. |
| Poor grinding performance. | Glazed or worn wheel, incorrect wheel for material. | Dress the grinding wheel. Replace with appropriate grit wheel. |
| Motor overheats. | Excessive load, blocked ventilation. | Reduce grinding pressure. Clear motor vents. Allow motor to cool. |
Specifications
| Brand | Dayton |
| Model Number | B08XMFH5GX |
| Max. Wheel Diameter | 6 inches |
| Grinding Wheel Grit | 36/60 Grit |
| Arbor Size | 1/2 inch |
| Motor Horsepower | 1/2 HP |
| Dust Management | Included |
| Lights | No |
| Application | Grinding |
| Package Dimensions | 20.1 x 13.2 x 11.8 inches |
| Product Weight | 41.3 Pounds |
| Manufacturer | DAYTON |
| UPC | 194484300395 |
Warranty and Support
For warranty information or technical support, please refer to the documentation included with your product or contact Dayton customer service. Keep your purchase receipt for warranty claims.