1. Introduction
This user manual provides comprehensive instructions for the installation, operation, and maintenance of the Bosch LBB 1925/10 Plena 6-Zone System Pre-Amplifier. This device is designed to manage and distribute audio signals across up to six independent zones, offering versatile control for various public address and background music applications. Please read this manual thoroughly before operating the unit to ensure proper functionality and safety.
2. Product Overview
The Bosch LBB 1925/10 is a robust 6-zone pre-amplifier featuring two input channels, designed for professional audio installations. Its intuitive front panel controls allow for easy management of audio sources and zone selection. The unit is built with quality materials, ensuring durability and reliable performance.
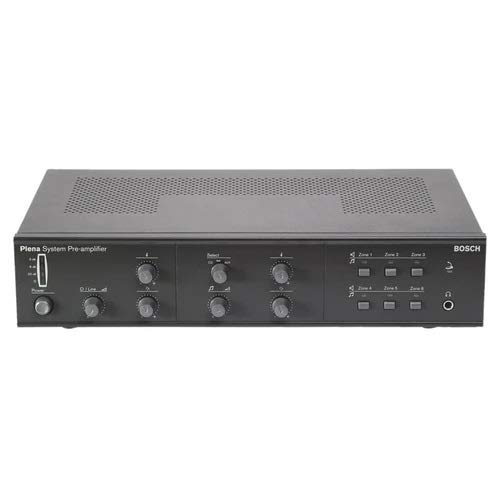
Figure 2.1: Front Panel View. This image displays the front panel of the Bosch LBB 1925/10 pre-amplifier, showing the main power switch, input level controls, tone controls, and six zone selection buttons with corresponding indicators. A headphone jack is also visible on the right side.
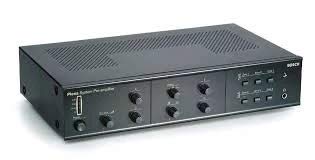
Figure 2.2: Angled Front View. This image provides an angled perspective of the pre-amplifier, highlighting the sleek design and the layout of the front panel controls, including the ventilation grilles on the top surface.
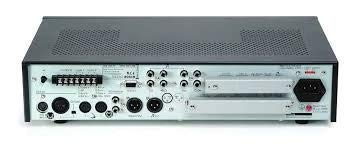
Figure 2.3: Rear Panel View. This image shows the rear panel of the pre-amplifier, detailing the various input and output connectors, including XLR and RCA inputs, zone outputs, and the power inlet. Terminal blocks for control connections are also visible.
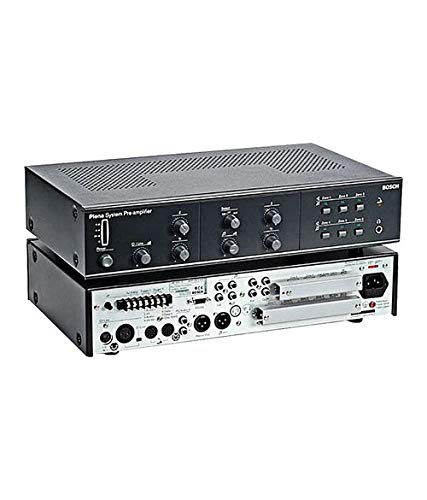
Figure 2.4: Stacked View. This image presents the pre-amplifier with its top cover removed or another unit stacked, providing a view of both the front control panel and the internal or rear connection layout, emphasizing its modular or rack-mountable design.
3. Setup and Installation
The Bosch LBB 1925/10 is designed for surface mount installation. Ensure the installation location is stable, well-ventilated, and free from excessive heat, moisture, or dust.
3.1. Unpacking
- Carefully remove the pre-amplifier from its packaging.
- Inspect the unit for any signs of damage during transit. If damaged, contact your supplier immediately.
- Retain the original packaging for future transport or storage.
3.2. Connections
- Power Connection: Connect the supplied power cable to the AC inlet on the rear panel and then to a suitable power outlet. Ensure the power switch on the front panel is in the OFF position before connecting.
- Audio Inputs: Connect your audio sources (e.g., microphones, CD players, media players) to the designated input channels on the rear panel. The unit supports 2 input channels. Use appropriate cables (XLR, RCA, etc.) as per your source devices.
- Zone Outputs: Connect the pre-amplifier's zone outputs to your power amplifiers, which will then drive the loudspeakers in each of the six zones. Ensure correct polarity for all connections.
- Control Connections (Optional): If using external control systems or remote paging microphones, refer to the specific wiring diagrams for those devices and connect them to the appropriate control terminals on the rear panel.
Note: Always ensure all connections are secure before powering on the unit.
4. Operating Instructions
4.1. Powering On/Off
- To power on, press the main power switch on the front panel to the 'ON' position.
- To power off, press the main power switch to the 'OFF' position.
4.2. Input Level Control
- Adjust the individual input level controls for each of the two input channels to achieve the desired signal strength without distortion.
- Monitor any level indicators (if present) to prevent clipping.
4.3. Tone Control
- Use the Bass and Treble controls to adjust the tonal characteristics of the audio output.
- Start with controls at the center (flat) position and adjust incrementally to suit the acoustic environment and program material.
4.4. Zone Selection and Volume
- Each of the six zones has dedicated selection buttons and volume controls.
- Press the desired zone button to activate or deactivate audio output to that specific zone.
- Rotate the corresponding zone volume knob to adjust the audio level for that zone independently.
4.5. Headphone Monitoring
- Connect headphones to the headphone jack on the front panel to monitor the main audio output.
- Adjust the headphone volume control for comfortable listening.
5. Maintenance
Regular maintenance ensures the longevity and optimal performance of your Bosch LBB 1925/10 pre-amplifier.
- Cleaning: Use a soft, dry cloth to wipe the exterior of the unit. For stubborn marks, a slightly damp cloth with mild detergent can be used, followed by a dry cloth. Do not use abrasive cleaners or solvents.
- Ventilation: Ensure that the ventilation grilles are clear of dust and obstructions to prevent overheating.
- Connections: Periodically check all audio and power connections to ensure they are secure and free from corrosion.
- Environmental Conditions: Operate the unit within its specified temperature and humidity ranges. Avoid exposing it to direct sunlight or extreme temperatures.
6. Troubleshooting
This section provides solutions to common issues you might encounter.
| Problem | Possible Cause | Solution |
|---|---|---|
| No power | Power cable disconnected; Power outlet faulty; Unit fuse blown. | Check power cable connection; Try a different outlet; Consult a qualified technician for fuse replacement. |
| No sound from any zone | Input source not playing; Input level too low; Main volume too low; Power amplifiers off/disconnected. | Verify input source operation; Increase input level; Increase main volume; Check power amplifier status and connections. |
| No sound from a specific zone | Zone not selected; Zone volume too low; Amplifier/speaker issue in that zone. | Ensure zone is selected; Increase zone volume; Check amplifier and speaker connections for that zone. |
| Distorted audio | Input level too high (clipping); Faulty cables; Speaker impedance mismatch. | Reduce input level; Check and replace faulty cables; Verify speaker impedance compatibility with amplifiers. |
If the problem persists after attempting these solutions, please contact qualified service personnel.
7. Specifications
| Feature | Detail |
|---|---|
| Model | LBB 1925/10 |
| Brand | Bosch (as per product name) / Generic (as per listing) |
| Type | 6-Zone System Pre-Amplifier |
| Number of Input Channels | 2 |
| Mounting Type | Surface Mount |
| Dimensions (approx.) | 100 x 430 x 270mm (Height x Width x Depth) |
| Color | Charcoal |
| ASIN | B08WJDQSBH |
| Manufacturer | Generic |
| Date First Available | 3 March 2021 |
8. Warranty and Support
For specific warranty terms and conditions, please refer to the documentation provided at the time of purchase or contact your retailer. Warranty coverage typically applies to defects in materials and workmanship under normal use.
For technical support, service, or replacement parts, please contact the seller or the manufacturer directly. When contacting support, please have your product model number (LBB 1925/10) and ASIN (B08WJDQSBH) readily available.