MakerHawk 0
Raspberry Pi 4 UPS Plus Power Supply User Manual
Model: 0
1. Introduction
The MakerHawk Raspberry Pi 4 UPS Plus Power Supply is an uninterruptible power supply (UPS) HAT designed for Raspberry Pi 4B, 3B+, and 3B models. It provides stable power, battery backup, and advanced power management features, ensuring continuous operation of your Raspberry Pi even during power interruptions. This module integrates power path management, high current line compensation, and multiple output ports for versatile use.
2. Key Features
- Intelligent Design: Specifically designed for Raspberry Pi 4B / 3B+ / 3B, featuring built-in power path management and high current line compensation.
- Multiple Output Ports: Includes two USB-A power output ports and one Type-C output port.
- Uninterruptible Power: Ensures continuous operation of the Raspberry Pi during power outages.
- Comprehensive Protection: Features output overcurrent, overvoltage, short circuit protection; input overvoltage, overcharge, overdischarge, overcurrent discharge protection, and machine overheat protection.
- Fast Charging Support: Compatible with FCP, AFC, SFCP fast charge protocols, supporting up to 18W protocol and 20W input.
- Advanced Monitoring: Supports current/voltage monitoring of Raspberry Pi power supply port and battery terminal, including two-way monitoring of charge and discharge.
- Battery Compatibility: Supports 4.2V, 4.35V, 4.4V, 4.5V lithium batteries. Note: Different types of batteries cannot be mixed.
- Independent RTC Function: Real-Time Clock for accurate timekeeping.
- OTA Function: Supports Over-The-Air firmware upgrades (forced and active modes).
- Programmable Functions: Includes programmable BACK-TO-AC auto power up, sample period, and Power Voltage Detector (PVD) function.
- I2C Communication: Allows for obtaining UPS information, including remaining power.
- Battery Temperature Monitoring: Includes forced temperature protection (threshold: 65 degrees Celsius).
- Self-Start Function: Incoming call self-start.
- Power Down Memory: Retains settings after power loss.
- Running Time Statistics: Tracks operational duration.
- Electrostatic Protection: Enhanced durability.
3. Package Contents
The package typically includes the following components:
- Raspberry Pi UPS Plus HAT Board
- Acrylic Bottom Plate
- Mounting Hardware (Screws, Standoffs, Nuts)
- Note: 18650 batteries are not included and must be purchased separately.

Image: Raspberry Pi UPS Plus HAT board, acrylic bottom plate, and various screws and standoffs.
4. Setup and Assembly
Follow these steps to assemble your Raspberry Pi UPS Plus HAT with your Raspberry Pi board.
4.1 Component Identification

Image: Labeled diagram of the UPS Plus HAT board, showing key features like USB ports, battery interface, and function key.
- Stack function interface
- USB-A port output (5V 2A total)
- USB-C port output (5V 4A total/shared with USB-A)
- Battery interface (for 18650 batteries)
- Positioning mounting hole
- USB-Micro fast charging interface
- Multi-function buttons (K1)
4.2 Assembly Steps
Refer to the following visual guide for assembly:

Image: Step-by-step assembly instructions showing battery insertion, attaching the acrylic plate, adding standoffs, and mounting the Raspberry Pi.
- Step 1: Insert Batteries. Carefully insert two 18650 lithium batteries into the battery holders on the UPS Plus HAT board, ensuring correct polarity (+ and -).
- Step 2: Attach Acrylic Plate. Place the clear acrylic bottom plate onto the bottom of the UPS Plus HAT board and secure it using the short screws and nuts.
- Step 3: Install Standoffs. Screw the longer brass standoffs into the designated mounting holes on the UPS Plus HAT board.
- Step 4: Mount Raspberry Pi. Carefully align your Raspberry Pi board with the standoffs and the GPIO pins on the UPS Plus HAT. Gently press down to connect the Pi to the HAT, then secure it with the remaining screws.
Important Note: This product is a power supply device. Keep it out of reach of children. Always install the battery first, then connect the UPS to the Raspberry Pi. Do not reverse the battery polarity, as this will directly damage the power management chip.
5. Operating Instructions
5.1 Powering On/Off
- To power on the Raspberry Pi, connect a compatible power adapter to the USB-Micro fast charging interface (5) or the USB-C input. The system will automatically power on.
- To manually power on/off, use the multi-function button (7). A short press typically toggles power, while a long press may initiate a safe shutdown or forced restart depending on configuration.
5.2 Battery Status Indicators
The UPS Plus HAT features LED indicators to display the battery charge level. Refer to the diagram below for interpretation:
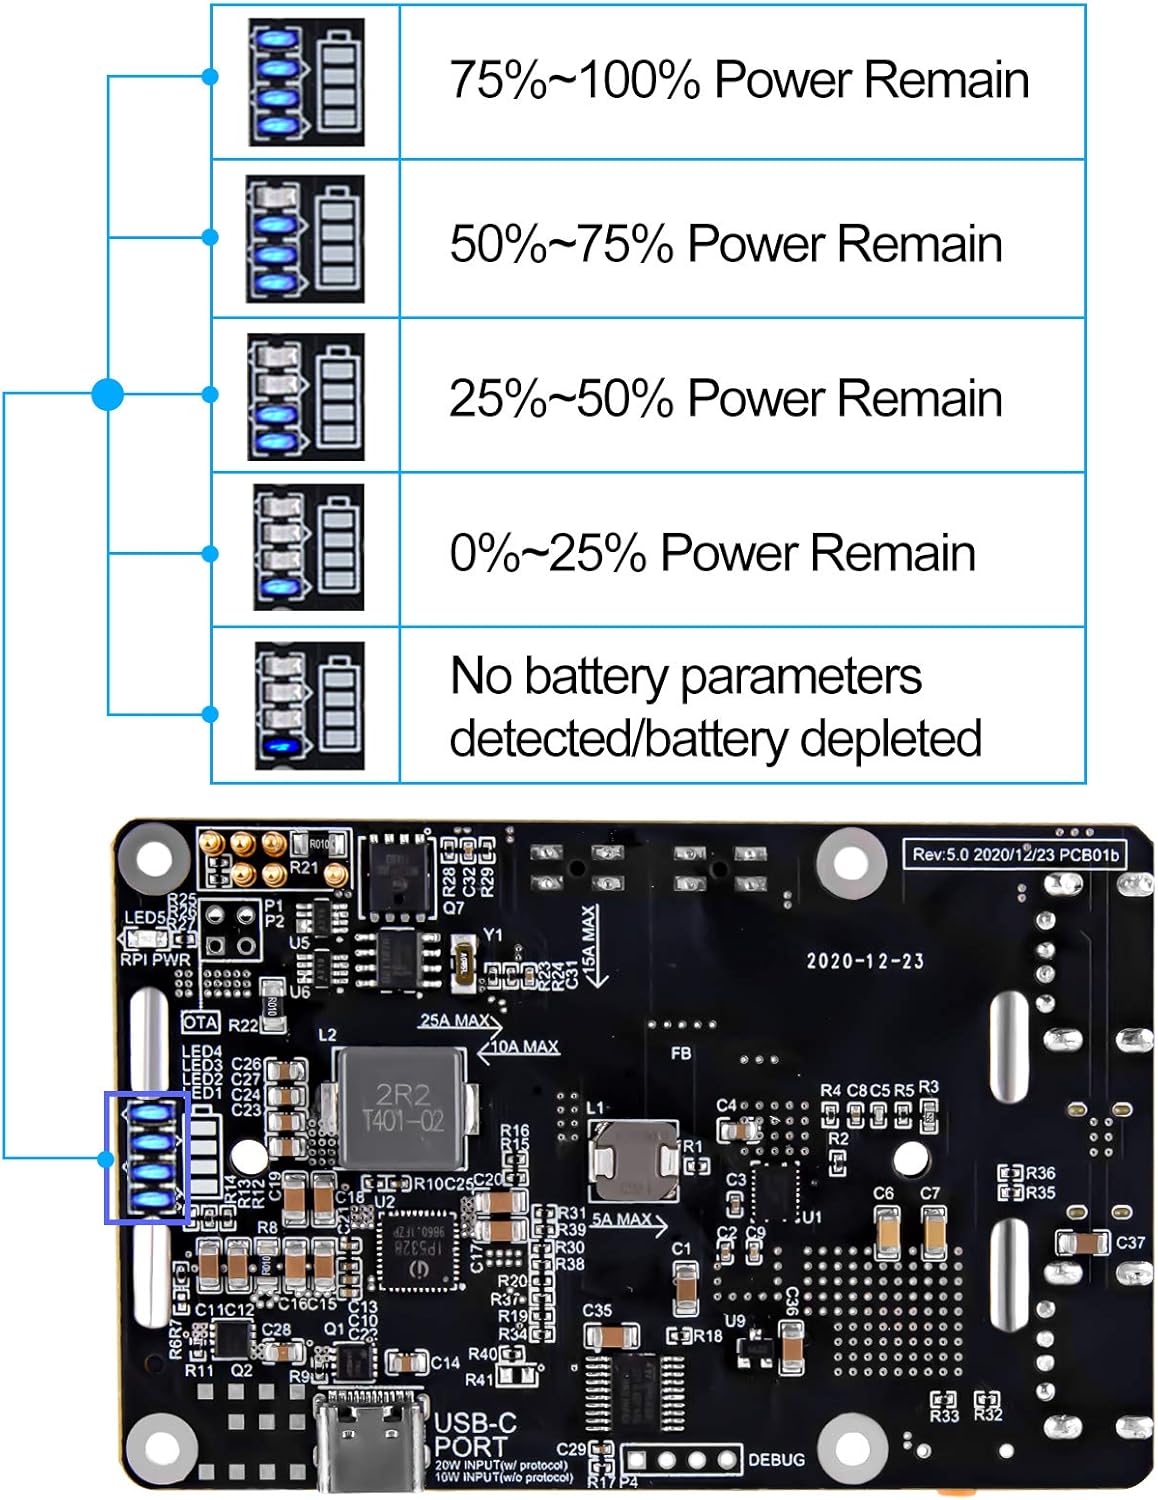
Image: Visual representation of the LED battery indicators and their corresponding power remaining percentages.
| LED Status | Power Remaining |
|---|---|
| All 4 LEDs solid | 75% ~ 100% |
| 3 LEDs solid | 50% ~ 75% |
| 2 LEDs solid | 25% ~ 50% |
| 1 LED solid | 0% ~ 25% |
| No LEDs / Flashing | No battery parameters detected / Battery depleted |
5.3 Power Management and Monitoring
The UPS Plus HAT offers advanced power management capabilities. For detailed monitoring and control, it is recommended to utilize the I2C communication interface. This allows for real-time access to data such as current/voltage of the Raspberry Pi power supply, battery charge/discharge status, and estimated power remaining.
Refer to the manufacturer's official documentation or Wiki for specific software libraries and commands to interact with the UPS via I2C. A link to the Wiki may be found in the product's online documentation.
6. Technical Specifications
| Feature | Specification |
|---|---|
| Input Voltage (Charging) | 4.5V 5A / 5V 2.5A / 9V 2A / 12V 1.5A (Max 20W) |
| Output Voltage (Discharge) | 5V |
| Linear Compensation Range Discharge Capacity | 5V 4.5A |
| Non-linear Compensation Range Discharge Capacity | 5V 8A |
| Battery Compatibility | 4.2V, 4.35V, 4.4V, 4.5V Lithium Battery (18650 type) |
| Communication Interface | I2C |
| RTC Function | Independent RTC |
| Overheat Protection Threshold | 65°C (forced protection) |
| Programmable PVD Default Value | 3.6V |
| Dimensions (Package) | 4.65 x 3.35 x 1.65 inches |
| Weight | 3.17 ounces |
| Model Number | 0 |
| Manufacturer | MakerHawk |
7. Troubleshooting
- Device not powering on:
- Ensure batteries are correctly inserted with proper polarity.
- Verify batteries are charged.
- Check all connections between the UPS HAT and Raspberry Pi.
- Ensure the power adapter connected to the UPS HAT is functional and provides sufficient power.
- Battery not charging:
- Confirm the power adapter is connected to the correct charging port (USB-Micro or USB-C input).
- Check if the power adapter meets the required voltage and current specifications.
- Ensure batteries are not completely depleted, as some protection circuits may prevent charging from a very low state.
- Raspberry Pi reboots unexpectedly or unstable operation:
- This could indicate insufficient power delivery. Ensure the power adapter is robust enough for both charging the UPS and powering the Raspberry Pi and its peripherals.
- Verify that the output voltage from the UPS HAT is stable (should be around 5V). Fluctuations can cause instability.
- Check battery health. Old or damaged batteries may not hold charge or deliver stable power.
- Ensure the operating temperature is within limits. The device has overheat protection at 65°C.
- LED indicators are inaccurate or not functioning:
- Ensure that at least one full charge and discharge cycle has been completed for accurate power estimation.
- If no battery parameters are detected, ensure batteries are properly seated and functional.
- Cannot communicate via I2C:
- Verify I2C connections and ensure the Raspberry Pi's I2C interface is enabled.
- Check software libraries and scripts for correct implementation.
For further assistance, refer to the official product Wiki or contact MakerHawk customer support.
8. Maintenance
- Cleaning: Use a dry, soft cloth to clean the module. Do not use liquid cleaners or solvents.
- Battery Care: For optimal battery life, avoid fully discharging the batteries frequently. If storing the device for an extended period, ensure batteries are charged to approximately 50-70%.
- Firmware Updates: Periodically check the manufacturer's website or Wiki for available OTA firmware updates to ensure optimal performance and access to new features.
- Environmental Conditions: Operate the device within recommended temperature and humidity ranges to prevent damage.
9. Warranty and Support
This product is manufactured by MakerHawk. For specific warranty information, please refer to the terms and conditions provided at the time of purchase or visit the official MakerHawk website. Technical support and additional resources, including detailed guides and software examples, may be available through the manufacturer's online platforms or community forums.
For the most up-to-date information and support, please visit the MakerHawk Store on Amazon or their official website.
A user guide in PDF format may also be available: User Guide (PDF).
Related Documents - 0
 |
Battery Capacity and DC Power Multi-function Tester User Guide Comprehensive guide for the MakerHawk Battery Capacity and DC Power Multi-function Tester, covering usage introduction, interface functions, key operations, connection instructions, detailed specifications, and important warnings for safe and effective testing of batteries, power adapters, chargers, and power banks. |
 |
MakerHawk Type-C Tester User Guide: Features and Instructions Comprehensive guide to the MakerHawk Type-C Tester, detailing its display panel functions, specifications, and operational instructions for voltage, current, power, and capacity measurements. |
 |
Wireless Bluetooth Lapel Microphone: Operating Instructions & Specifications This document provides operating instructions and technical specifications for the MakerHawk Wireless Bluetooth Lapel Microphone (Model N100). It details setup, button functions, usage methods, prompt tones, indicator states, and product parameters for wireless audio recording. |
Ask a question about this manual
Ask about setup, troubleshooting, compatibility, parts, safety, or missing instructions. Manuals+ will review the question and use this page’s manual context to help answer it.