Bore HCD-RG88
User Manual: Replacement Optical Pickup for SONY HCD-RG88 CD Player
Model: HCD-RG88
Brand: Bore
Introduction
This manual provides essential information for the installation, operation, and maintenance of the replacement optical pickup unit for the SONY HCD-RG88 CD Player. This component is designed to restore the CD reading functionality of your device.
The optical pickup, also known as a laser lens or laser unit, is a critical part responsible for reading data from CDs. Proper handling and installation are crucial for its performance and longevity.
Product Overview

Figure 1: Front view of the complete optical pickup assembly, showing the laser lens and tracking mechanism.
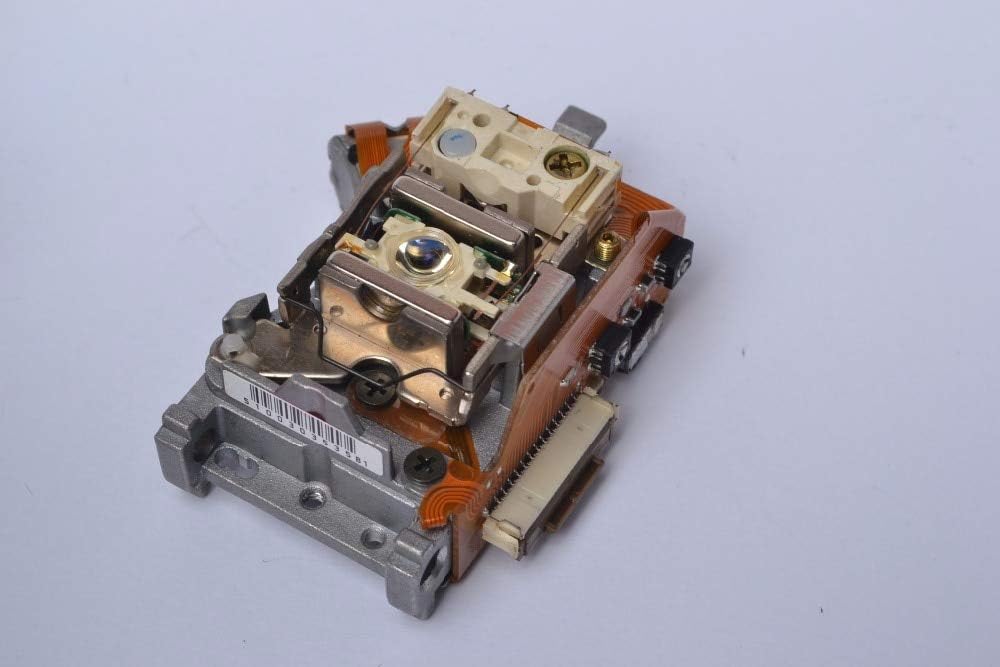
Figure 2: Angled view of the optical pickup, highlighting the flexible circuit board connections and mounting points.

Figure 3: Top-down view of the optical pickup, showing the laser diode and associated components.
Setup and Installation
Installation of the optical pickup unit requires technical proficiency and familiarity with electronic component replacement. It is recommended that this procedure be performed by a qualified technician.
Safety Precautions:
- Always disconnect the CD player from the power source before beginning any installation or repair work.
- Wear anti-static gloves or use an anti-static wrist strap to prevent electrostatic discharge (ESD), which can damage sensitive electronic components.
- Avoid touching the laser lens directly with bare hands. Fingerprints or oils can impair performance.
- Be careful with small screws and delicate ribbon cables.
Installation Steps:
- Disassembly: Carefully open the SONY HCD-RG88 CD player casing according to its service manual. Locate the existing optical pickup unit.
- Disconnect Old Unit: Gently disconnect all ribbon cables and power connectors attached to the old optical pickup. Note their orientation for reassembly.
- Remove Old Unit: Unscrew and remove the old optical pickup unit from its mounting rails or chassis.
- Install New Unit: Carefully place the new replacement optical pickup unit into position. Ensure it aligns correctly with the mounting points.
- Secure New Unit: Secure the new unit with the appropriate screws. Do not overtighten.
- Connect Cables: Reconnect all ribbon cables and power connectors to the new optical pickup. Ensure connections are firm and correctly oriented.
- Laser Protection: Some new optical pickups come with a solder shorting point to protect the laser during shipping. This point must be desoldered before operation. Consult the specific instructions provided with the unit if applicable.
- Reassembly: Carefully reassemble the CD player casing.
Operating Considerations
Once installed, the optical pickup unit operates automatically as part of the CD player's functionality. There are no user-adjustable settings for this component.
- Ensure CDs are clean and free of scratches or dust before insertion to optimize reading performance and prolong the life of the laser lens.
- Avoid exposing the CD player to excessive dust, humidity, or extreme temperatures, as these can negatively impact the optical pickup's performance.
Maintenance
The optical pickup unit is a delicate component and generally does not require routine user maintenance. However, if issues arise, a gentle cleaning may be attempted.
Cleaning the Laser Lens (Advanced Users Only):
- Caution: This procedure should only be attempted if you are comfortable with disassembling the CD player. Improper cleaning can cause damage.
- Disconnect power from the CD player.
- Carefully open the CD player to access the optical pickup unit.
- Using a specialized lens cleaning pen or a cotton swab very lightly dampened with isopropyl alcohol (99% pure), gently wipe the surface of the laser lens. Wipe in one direction only.
- Allow the lens to air dry completely before reassembling the unit.
- Do not use abrasive materials or excessive force.
Troubleshooting
If you experience issues after installing the new optical pickup, consider the following:
| Problem | Possible Cause | Solution |
|---|---|---|
| CD not reading / No disc error |
|
|
| Skipping or distorted audio |
|
|
| Unit not moving / Tray issues |
|
|
If problems persist after attempting these solutions, professional assistance may be required.
Specifications
| Feature | Detail |
|---|---|
| Model Number | HCD-RG88 |
| Compatibility | SONY HCD-RG88 CD Player |
| Type | Optical Pickup / Laser Lens Unit |
| Package | Yes (Indicates component is packaged) |
| Display Included | No (Refers to the optical unit itself, not the CD player) |
| Intended Use | Home Audio Equipment Repair |
| Manufacturer | Bore |
| ASIN | B08VHGQYWM |
Warranty and Support
Specific warranty information for this replacement part is typically provided by the seller at the time of purchase. Please refer to your purchase documentation or contact the seller directly for details regarding warranty coverage and technical support.
For general inquiries related to the SONY HCD-RG88 CD Player, please consult the original SONY product manual or their official support channels.