
Introduction
This manual provides comprehensive instructions for the assembly, operation, and maintenance of your RIVECO 12U Server Rack Open Frame with Casters. This 4-post open frame rack is designed to accommodate 19-inch standard equipment, offering a sturdy and versatile solution for various networking, data, and audio/video applications. Please read these instructions carefully before beginning assembly or use to ensure proper installation and safe operation.
Package Contents
Before assembly, verify that all components listed below are present in your package. If any parts are missing or damaged, please contact RIVECO customer support.
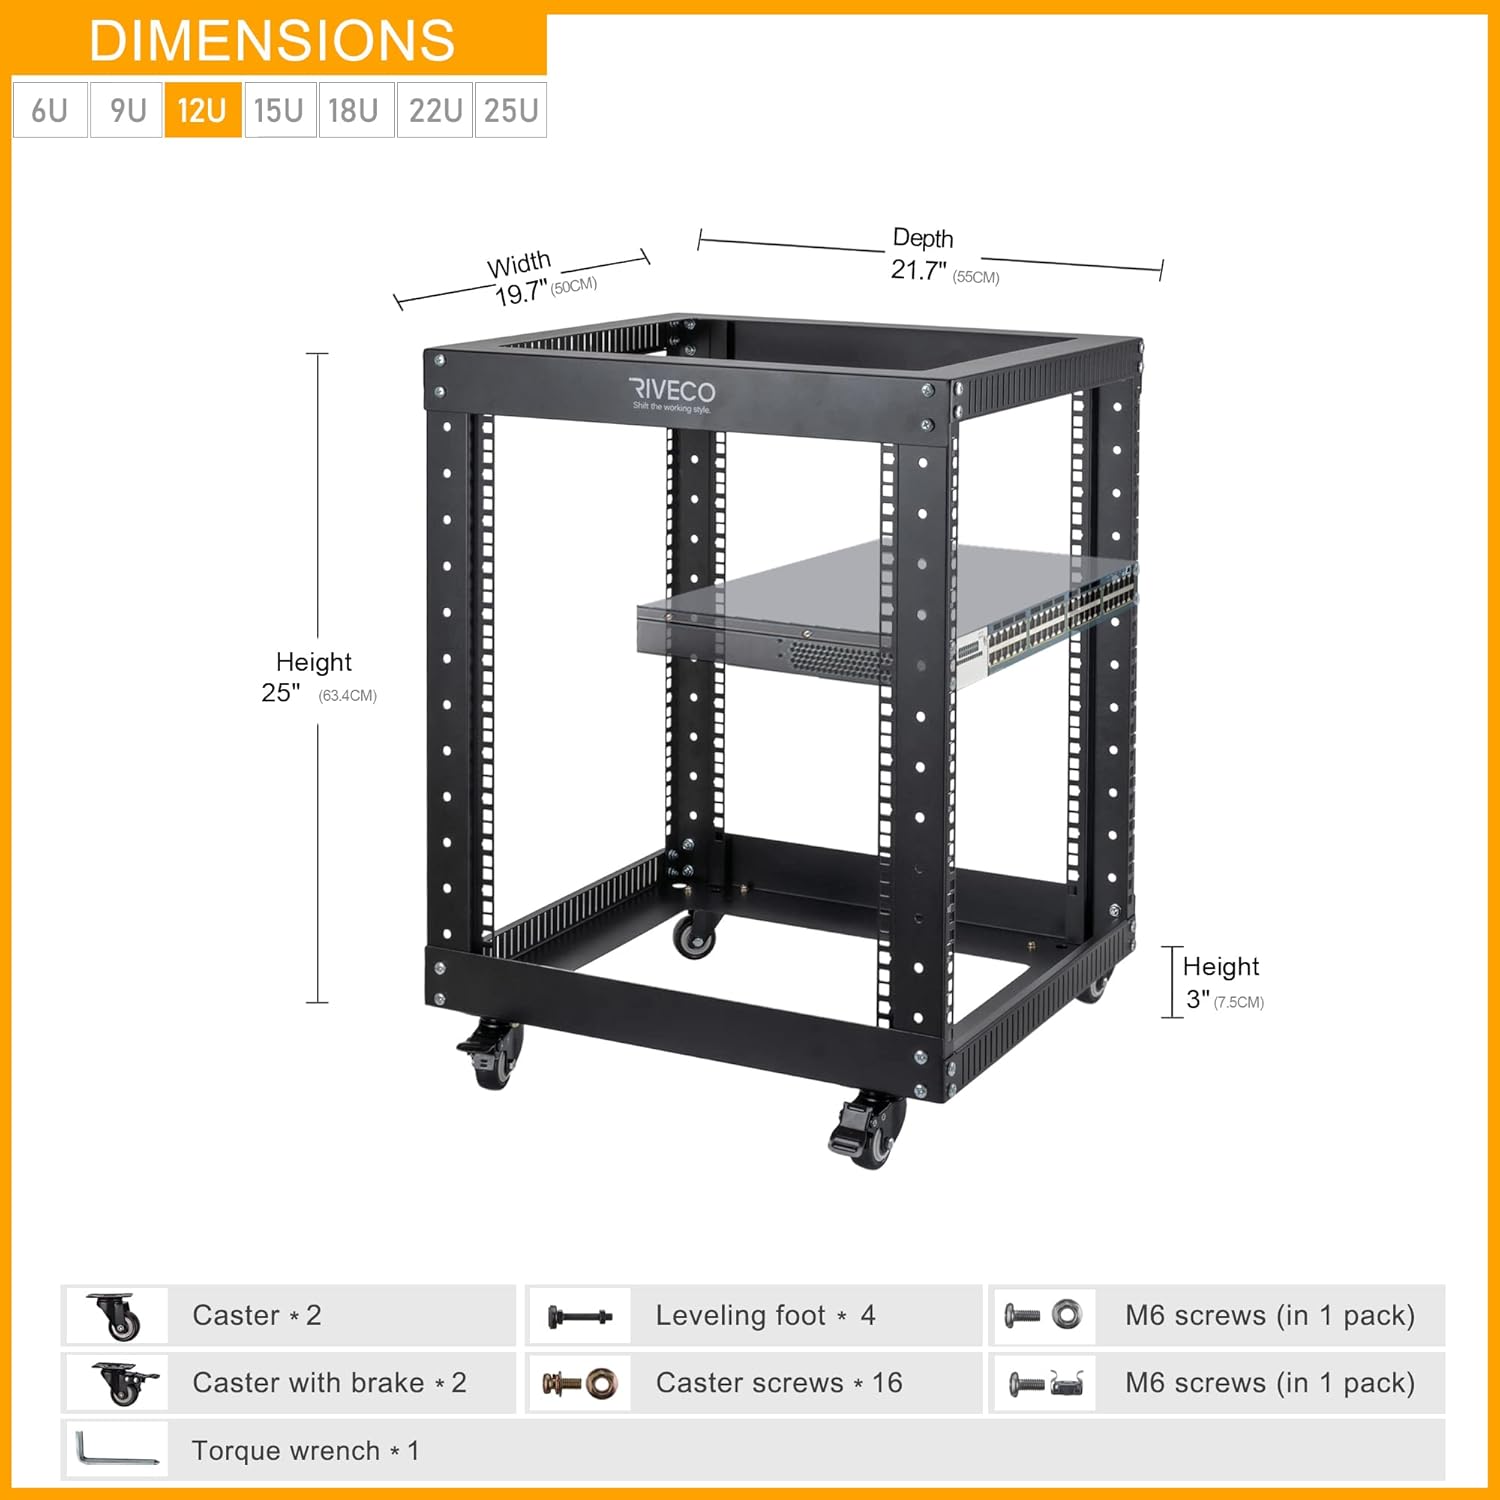
Figure 1: Overview of the RIVECO 12U Server Rack dimensions and included accessories. This image illustrates the overall size and lists the various parts you should find in your package, including casters, leveling feet, M6 screws, and cage nuts.
- 12U Network Rack Frame (Top and Bottom sections, Vertical Posts)
- Casters (4 units, including 2 with brakes)
- Leveling Feet (4 units)
- M6 Screws & Cage Nuts (for equipment mounting)
- Assembly Tool (e.g., Hex Key/Allen Wrench)
- Instruction Manual
Setup and Assembly
Follow these steps to assemble your RIVECO 12U Server Rack. It is recommended to have a clear, flat workspace for assembly.
Video 1: Official assembly guide for the RIVECO 19-inch network rack. This video demonstrates the step-by-step process of putting together the rack components.
- Install Vertical Posts: Place the bottom frame on a flat surface. Attach the four vertical posts to the designated corners of the bottom frame using the provided screws and the assembly tool. Ensure the posts are oriented correctly with the rack unit markings facing outwards and aligned.
- Install Top Frame: Carefully place the top frame onto the installed vertical posts. Align the screw holes and secure the top frame to the vertical posts using the remaining screws. Tighten all screws firmly but do not overtighten.
- Install Casters: Turn the assembled rack upside down. Attach the four casters to the pre-drilled holes on the bottom frame using the caster screws. Ensure that the two casters with brakes are installed on the same side for easier locking.
- (Optional) Install Leveling Feet: If you prefer a stationary setup or require additional stability, you can replace the casters with the included leveling feet. Screw the four leveling feet into the same holes used for the casters. Adjust the height of each foot to ensure the rack is level and stable on your surface.

Figure 2: Illustration of the secure screw connections for the integrated top and bottom frames, ensuring a solid structure.

Figure 3: Detailed view highlighting the numbered rack units, thick cold-rolled steel construction, and the design of the removable non-skid casters with brakes and optional leveling feet.

Figure 4: This image shows the heavy-load feet, which support up to 600 lbs of equipment when the rack is secured to the floor with leveling feet.
Operating Instructions
The RIVECO 12U Server Rack is designed for straightforward operation. Consider the following guidelines for optimal use:
- Equipment Installation: Mount your 19-inch standard equipment (servers, switches, patch panels, etc.) into the rack using the provided M6 screws and cage nuts. Ensure equipment is evenly distributed to maintain balance.
- Cable Management: Utilize the open frame design for easy cable routing. Consider adding cable management accessories (not included) to keep cables organized and prevent obstruction of airflow.
- Mobility and Stability: If using casters, unlock the brakes when moving the rack. Always lock the brakes once the rack is in its desired position to prevent accidental movement. If using leveling feet, ensure they are properly adjusted for maximum stability.
- Weight Capacity: Adhere to the maximum weight capacity: 600 lbs with leveling feet, and 500 lbs with casters. Do not exceed these limits to prevent damage or instability.

Figure 5: This image demonstrates the versatility of the RIVECO server rack, suitable for various applications in both commercial and residential environments, accommodating different types of electronic equipment.
Maintenance
Regular maintenance helps ensure the longevity and safe operation of your server rack.
- Cleaning: Periodically wipe down the rack with a soft, dry cloth to remove dust and debris. Avoid abrasive cleaners or solvents that could damage the powder coat finish.
- Fastener Check: Every few months, inspect all screws and bolts to ensure they remain tight. Retighten any loose fasteners to maintain the rack's structural integrity.
- Caster/Leveling Feet Inspection: If using casters, check for smooth rotation and ensure brakes are functioning correctly. If using leveling feet, verify they are securely in place and providing stable support.
- Load Distribution: Regularly review the distribution of equipment within the rack to ensure it is balanced and not exceeding the weight capacity.
Troubleshooting
If you encounter any issues with your RIVECO 12U Server Rack, refer to the following common troubleshooting tips:
- Rack is Wobbly:
- Ensure all assembly screws are securely tightened.
- If using leveling feet, adjust each foot until the rack is stable and all feet are making firm contact with the floor.
- If using casters, ensure the brakes are engaged when the rack is stationary.
- Difficulty Installing Equipment:
- Verify that your equipment is 19-inch rack-mountable.
- Ensure cage nuts are properly inserted into the square holes before attempting to screw in equipment.
- Check for any obstructions or misalignments in the rack rails.
- Missing or Damaged Parts: If you find any parts missing or damaged upon opening the package, please contact RIVECO customer support immediately for assistance.
Specifications
| Feature | Detail |
|---|---|
| Model Number | OF5512 |
| Rack Units | 12U |
| Product Dimensions (D x W x H) | 21.7" x 19.7" x 28" (550mm x 500mm x 709mm with casters) |
| Item Weight | 23.5 pounds |
| Material | SPCC Cold-Rolled Steel, Acrylonitrile Butadiene Styrene (ABS) |
| Color | Black |
| Weight Capacity (with Leveling Feet) | Up to 600 lbs |
| Weight Capacity (with Casters) | Up to 500 lbs |
| Included Accessories | Casters, Leveling Feet, M6 Screws & Cage Nuts |
Warranty and Support
RIVECO products are manufactured to high-quality standards and are backed by a manufacturer's warranty. For specific warranty details, technical support, or to report missing/damaged parts, please refer to the warranty information provided with your purchase or contact RIVECO customer service directly through their official website or the retailer where the product was purchased.