Besdor AW3-2
Besdor Yellow Duck Automatic Foaming Soap Dispenser
Model: AW3-2 | User Manual
1. Introduction
Thank you for choosing the Besdor Yellow Duck Automatic Foaming Soap Dispenser. This device is designed to provide a hygienic and convenient handwashing experience with its touchless infrared sensor and charming yellow duck design. Please read this manual carefully before use to ensure proper operation and maintenance.

Image 1.1: Front view of the Besdor Yellow Duck Automatic Foaming Soap Dispenser.
2. Safety Information
- Do not immerse the entire dispenser in water. The device has an IPX4 waterproof rating, meaning it is protected against splashing water, but not full submersion.
- Keep out of reach of small children to prevent accidental ingestion of soap or batteries.
- Use only the recommended battery type (3 AA batteries). Do not mix old and new batteries, or different types of batteries.
- If the dispenser will not be used for an extended period, remove the batteries to prevent leakage.
- Avoid placing the dispenser in direct sunlight or near heat sources.
- Do not attempt to disassemble or repair the unit yourself. Contact customer support for assistance.
3. Package Contents
Please check the package for the following items:
- 1 x Besdor Yellow Duck Automatic Foaming Soap Dispenser (Model: AW3-2)
- 1 x User Manual
Note: 3 AA batteries are NOT included and must be purchased separately.
4. Product Overview
Familiarize yourself with the components of your soap dispenser:
- A. Sensor Window: Infrared sensor for touchless operation.
- B. Dispensing Nozzle: Where foam soap is dispensed.
- C. Power Button/Indicator Light: Touch-sensitive button to turn the device on/off, with LED indicator.
- D. Soap Reservoir: Transparent bottom section for liquid soap.
- E. Battery Compartment: Located at the bottom, secured with a twist-lock mechanism.
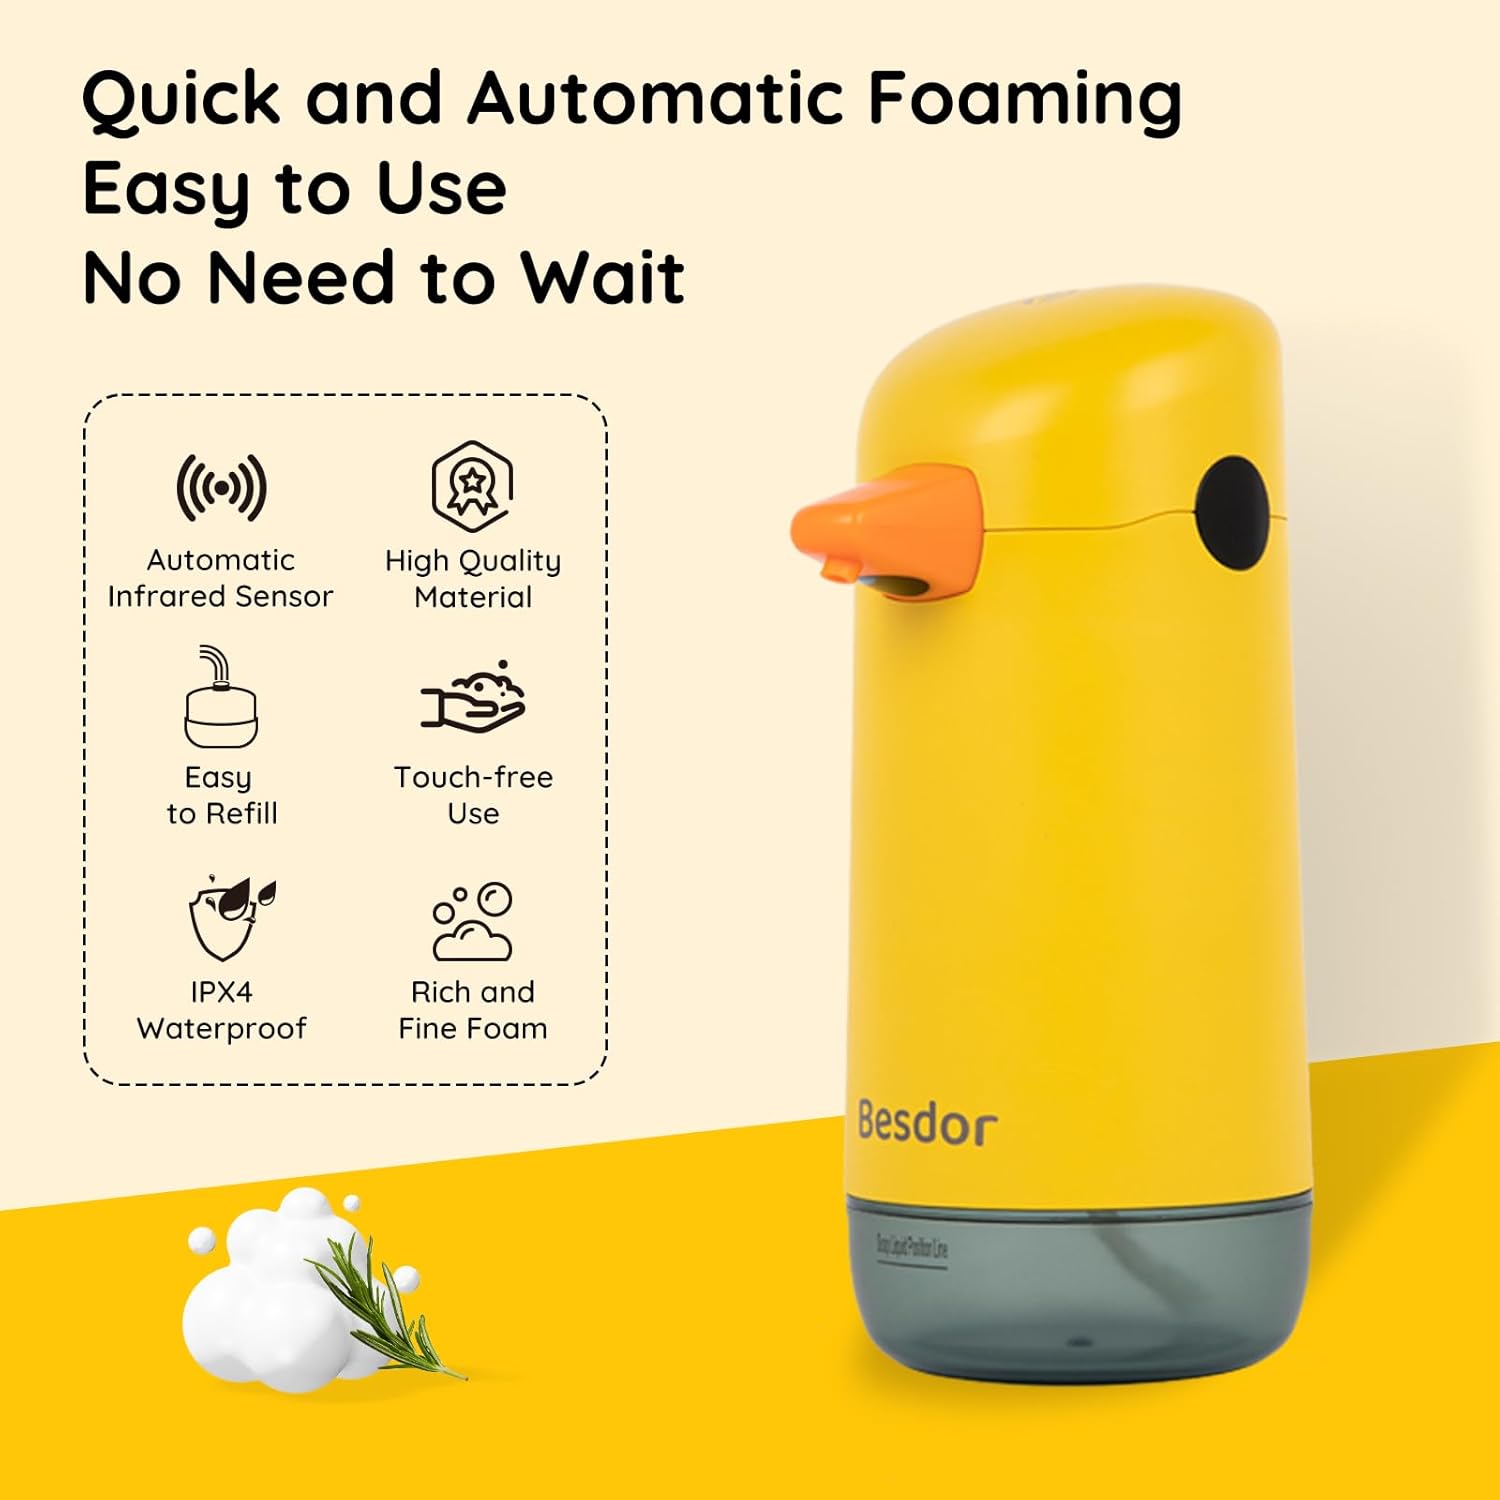
Image 4.1: Key features of the automatic foaming soap dispenser, including infrared sensor, high-quality material, easy refill, touch-free use, IPX4 waterproof rating, and rich foam.
5. Setup
5.1 Battery Installation
- Gently twist the bottom soap reservoir counter-clockwise to detach it from the main body.
- Locate the battery compartment cover at the bottom of the main body. Twist it counter-clockwise to open.
- Insert 3 new AA batteries, ensuring the correct polarity (+/-) as indicated inside the compartment.
- Replace the battery compartment cover by twisting it clockwise until secure.

Image 5.1: Illustration of the battery compartment and the insertion of 3 AA batteries.
5.2 Filling the Soap Dispenser
The dispenser is designed for foam soap. If using gel soap, dilution is required.
- Ensure the soap reservoir is detached from the main body.
- For Foam Soap: Pour foam hand sanitizer directly into the reservoir.
- For Gel Soap: Fill the reservoir with gel soap up to the indicated "Soap Liquid Position Line". Then, add water to the top, maintaining a 1:3 ratio (1 part gel soap to 3 parts water). Gently shake the reservoir to mix the solution thoroughly.
- Insert the dispensing hose into the bottle and press it firmly to ensure a secure connection.
- Reattach the soap reservoir to the main body by twisting it clockwise until it locks securely.

Image 5.2: Detailed steps for installing batteries, adding foam soap or diluted gel soap, inserting the hose, and tightening the reservoir.
5.3 Initial Use
After filling, touch the top power button. The indicator light will turn green, signifying the dispenser is ready for use. Place your hand under the nozzle to test the foam dispensing.
6. Operating Instructions
6.1 Power On/Off
- To turn on: Lightly touch the power button located on the top of the dispenser. The indicator light will illuminate green.
- To turn off: Lightly touch the power button again. The indicator light will illuminate red, then turn off, indicating the dispenser is powered down.

Image 6.1: The top touch switch controls power, indicated by a green light for 'Open' and a red light for 'Close'.
6.2 Dispensing Soap
Once powered on, the dispenser is ready for use:
- Place your hand flat under the dispensing nozzle, within 1 inch of the infrared sensor.
- The sensor will detect your hand, and foam soap will be dispensed automatically within 0.25 seconds.
- Remove your hand once the desired amount of foam is dispensed. Each dispense provides approximately 0.05oz (1.5ml) of foam.

Image 6.2: The dispenser provides touchless operation with quick foaming in 0.25 seconds.
7. Maintenance
7.1 Cleaning
- Wipe the exterior of the dispenser with a soft, damp cloth. Do not use abrasive cleaners or solvents.
- Do not rinse the main body directly under running water. The IPX4 rating protects against splashes, but not direct water jets or submersion.
- If the nozzle becomes clogged, gently clean it with a small brush or toothpick.

Image 7.1: The dispenser features an IPX4 waterproof level, making it resistant to splashing water.
7.2 Refilling Soap
Follow the instructions in Section 5.2 to refill the soap reservoir when the soap level is low.
7.3 Battery Replacement
When the dispenser stops working or the foam output weakens, it may be time to replace the batteries. Follow the instructions in Section 5.1 for battery installation.
8. Troubleshooting
| Problem | Possible Cause | Solution |
|---|---|---|
| Dispenser does not turn on. | Batteries are dead or incorrectly installed. | Replace with new AA batteries, ensuring correct polarity. |
| No foam dispensed, but motor runs. | Soap reservoir is empty or clogged. Soap is too thick. Hose is not properly inserted. | Refill soap. Clean the nozzle. Dilute gel soap with water (1:3 ratio). Ensure hose is firmly connected. |
| Foam output is weak or inconsistent. | Low battery power. Soap is too thick or diluted incorrectly. | Replace batteries. Adjust soap-to-water ratio for gel soap (1:3). |
| Sensor is not responding. | Obstruction near sensor. Dispenser is off. | Ensure nothing is blocking the sensor window. Turn on the dispenser (green light). |
9. Specifications
| Feature | Detail |
|---|---|
| Model Number | AW3-2 |
| Brand | Besdor |
| Color | Yellow |
| Material | ABS Plastic |
| Product Dimensions (L x W x H) | 3.9" x 3.3" x 7.5" (9.9cm x 8.4cm x 19.1cm) |
| Liquid Volume Capacity | 7.4 oz (220 ml) |
| Dispense Volume | 0.05 oz (1.5 ml) per use |
| Sensor Type | Infrared Motion Sensor |
| Response Time | 0.25 seconds |
| Waterproof Rating | IPX4 |
| Power Source | 3 x AA Batteries (not included) |
| Item Weight | 9.6 ounces (272 grams) |

Image 9.1: Front, side, and top view dimensions of the soap dispenser.
10. Warranty and Customer Support
Besdor is committed to providing high-quality products and excellent customer service. Your satisfaction is our priority.
- If you encounter any issues with your product, such as damage, malfunction, missing parts, or incorrect items, please do not hesitate to contact us.
- Please have your order information ready when contacting support. Providing photos of any issues can also be helpful.
- Our dedicated customer support team is available 24 hours a day to provide prompt and satisfactory solutions.
- You can contact us via buyer message or email through the platform where you purchased the product.

Image 10.1: Steps to contact customer support for product issues.
Ask a question about this manual
Ask about setup, troubleshooting, compatibility, parts, safety, or missing instructions. Manuals+ will review the question and use this page’s manual context to help answer it.