1. Introduction
The Hotlabel S8 Thermal Shipping Label Printer is designed for efficient and reliable label printing for various applications, including logistics, packaging, postage, and small business needs. This printer utilizes direct thermal technology, eliminating the need for ink or toner. It supports multiple label sizes and is compatible with major shipping and selling platforms.
2. Package Contents
Verify that all items listed below are included in your package:
- S8 Thermal Printer
- Free 100 Labels (Roll)
- User Manual
- USB Cable
- Power Adapter
- Power Cable
- Fixing Tab
- Label Spindle
- Thumb Drive (USB Disk)
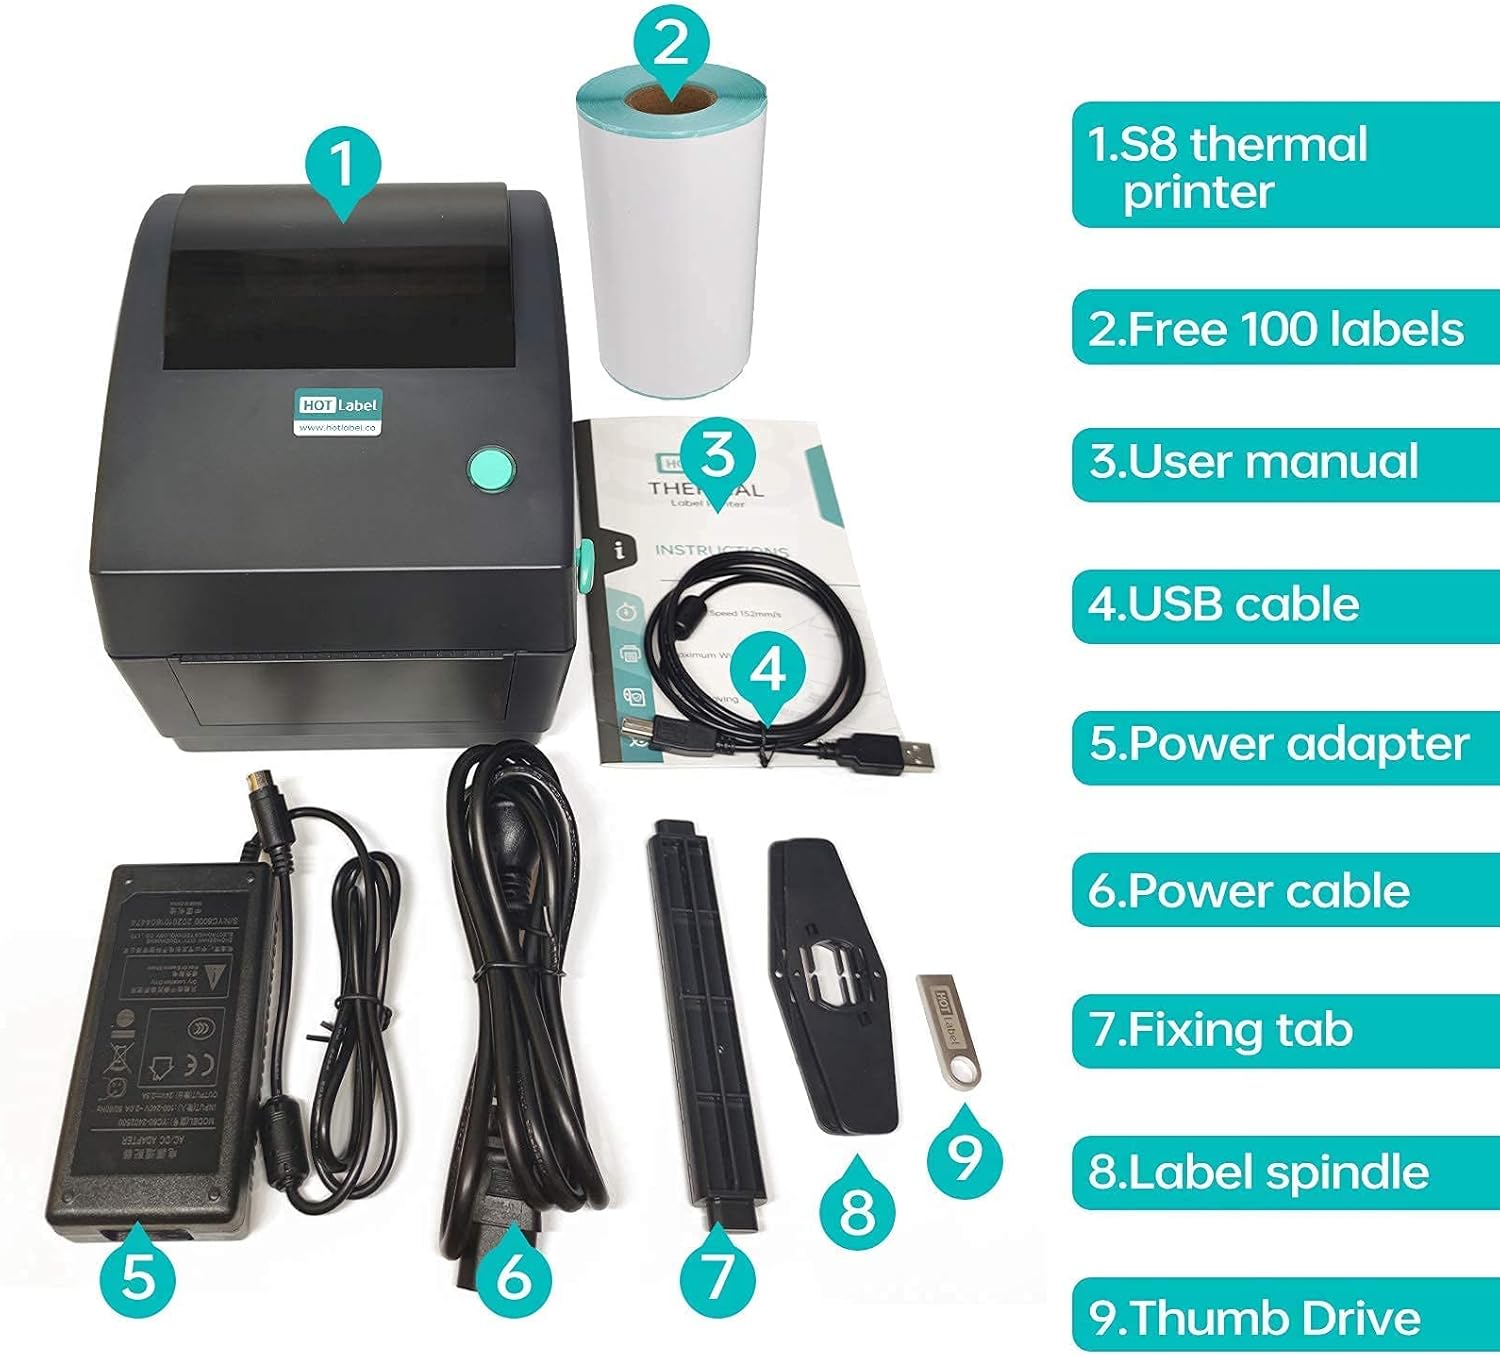
Figure 2.1: Contents of the Hotlabel S8 Thermal Printer package. This image displays the printer, a roll of labels, the user manual, USB cable, power adapter, power cable, fixing tab, label spindle, and a thumb drive.
3. Setup
3.1 Connecting the Printer
- Plug the power cable into the power adapter, then connect the power adapter to a power outlet.
- Connect the power adapter to the printer's power input port.
- Connect the USB cable from the printer to your computer (Mac or Windows PC).
- Insert the provided USB thumb drive into your computer for driver installation.
Video 3.1: This video demonstrates the process of connecting the Hotlabel S8 printer to a Mac computer, including power and USB connections, and the initial steps for driver installation.
3.2 Driver Installation (Mac)
For Mac users, follow these steps to install the printer driver:
- Open the USB thumb drive and navigate to the "Drivers" folder.
- Locate and open the "Printer Driver for Mac OS" folder.
- Run the "S8 Mac Printer driver.pkg" file.
- If a security warning appears (e.g., "cannot be opened because it was not downloaded from the Mac App Store"), go to System Preferences > Security & Privacy.
- Under the "General" tab, click "Open Anyway" next to the blocked driver file. You may need to click the lock icon and enter your password to make changes.
- Follow the on-screen instructions to complete the driver installation.
3.3 Driver Installation (Windows)
For Windows users, the printer drivers are also available on the provided USB thumb drive. Navigate to the "Drivers" folder and select the appropriate driver for your Windows version (e.g., "Printer Driver for Win7 Win8 Win10"). Follow the on-screen instructions to complete the installation.
4. Label Installation
Proper label installation is crucial for clear prints. The Hotlabel S8 supports both label rolls and fan-fold labels.
4.1 Installing Label Rolls
- Open the top cover of the printer by pushing the levers on both sides.
- Place a roll of labels onto the label roll mount inside the printer. The S8 can accommodate rolls with up to 500 4x6 labels.
- Feed the label through the label guides, ensuring the thermal side (the side that prints) is facing up. If the label is inserted incorrectly, nothing will print.
- Adjust the label guides to lightly touch the edges of the label roll, ensuring it is centered and moves smoothly.
- Close the top cover.

Figure 4.1: Internal view of the Hotlabel S8 printer, illustrating the correct placement of a label roll and the label guides.
4.2 Installing Fan-Fold Labels
Fan-fold labels can be fed from the back of the S8 printer. Ensure the thermal side of the labels is facing up and that the labels pass over the platen roller. Adjust the label guides to lightly touch the label edges.

Figure 4.2: The Hotlabel S8 printer actively printing a label, demonstrating the label output and the compact design.
5. Operating Instructions
5.1 Printing a Sample Label
After driver installation, you can print a sample label from the USB thumb drive to test the printer's functionality:
- Open the "Sample Label.pdf" file located on the USB thumb drive.
- Press Command + P (Mac) or Ctrl + P (Windows) to open the print dialog.
- Verify that the correct printer name ("4BARCODE 4B-2074A") is selected.
- In the "Paper Size" dropdown menu, select "4 x 6 (4.00 in x 6.00 in)".
- Click "Print".

Figure 5.1: The Hotlabel S8 printer positioned on a desk, illustrating its compact size and readiness for printing tasks.
5.2 Printing from Shipping Platforms
The Hotlabel S8 is compatible with most shipping platforms such as Amazon, Shopify, Etsy, eBay, Poshmark, FedEx, ShipStation, ShippingEasy, UPS, and USPS. When printing shipping labels, ensure that the label size is set to 4x6 inches within the platform's print settings. Many platforms default to 8.5x11 inches for inkjet/laser printers, which will result in improperly sized labels on your thermal printer.

Figure 5.2: This image visually demonstrates common printing errors (labels too small or sideways) and contrasts them with a correctly printed 4x6 shipping label, emphasizing the importance of correct settings.
6. Maintenance
The Hotlabel S8 uses direct thermal printing technology, meaning it does not require ink or toner. This simplifies maintenance significantly.
- Cleaning the Print Head: Regularly clean the print head with an alcohol wipe to ensure optimal print quality.
- Dust Removal: Keep the printer free from dust and debris, especially around the label path and sensors, to prevent paper jams and maintain performance. The dark transparent lid helps protect labels from the environment.
Figure 6.1: A detailed view of the Hotlabel S8's internal components, showing the Japanese imported print head and the automatic paper location detector, which are key to its thermal printing capability.
7. Troubleshooting
7.1 Labels Not Clear Enough or Faded
If your labels appear faded or only partially printed, consider the following:
- Label Quality: Ensure you are using high-quality thermal labels, as this directly impacts print darkness.
- Margins and Page Size: Incorrect margin or page size settings can cause content to be "shrunk" or cut off, leading to faded appearance. Always set your print size to 4x6 inches for shipping labels.
- Print Density and Speed: Adjust the "Density" and "Speed" settings within your printer preferences to optimize print clarity. Higher density generally results in darker prints.
7.2 Label Printed Too Small or Sideways
This issue typically arises from incorrect print settings on your shipping or selling platform. Most platforms default to 8.5x11 inches for standard printers. You must change this setting to 4x6 inches for your thermal label printer. Refer to your platform's help section or the Hotlabel support page for specific instructions on adjusting these settings.
8. Specifications
| Feature | Detail |
|---|---|
| Brand | Hotlabel |
| Model Name | S8 |
| Printing Technology | Thermal |
| Connectivity Technology | USB |
| Compatible Devices | Laptops, PC, Tablets |
| Sheet Size | 4 inch x 6 Inches, 8.5 inch x 11 Inches (for software settings) |
| Resolution | 203 x 203 DPI (8 dots/mm) |
| Max Print Speed | 152mm/s (60+ labels per minute) |
| Max Input Sheet Capacity | 60 (fan-fold) / 500 (roll) |
| Item Weight | 5.74 pounds |
| UPC | 798814785588 |
9. Warranty and Support
Hotlabel offers dedicated customer support to assist with any issues or questions regarding your S8 printer. You can reach the Hotlabel tech-support team via phone, live chat, email, and remote desktop assistance.
For additional resources and solutions, please visit the official Hotlabel wiki page or website. Contact information can typically be found in the included user manual or on the Hotlabel official website.