1. Introduction
This manual provides essential information for the safe and efficient operation of your HP Pro Laminator 600 A4. Please read these instructions thoroughly before using the device and retain them for future reference. Proper use ensures optimal performance and extends the lifespan of your laminator.
2. Safety Instructions
- Always connect the laminator to a grounded power outlet.
- Do not operate the device with wet hands or near water.
- Ensure adequate ventilation around the laminator during operation.
- Keep children and pets away from the device.
- Do not insert objects other than lamination pouches into the feed slot.
- Unplug the laminator when not in use or before cleaning.
- Avoid touching the heated parts of the laminator during and immediately after use.
- If the power cord is damaged, it must be replaced by the manufacturer, its service agent, or similarly qualified persons to avoid a hazard.
3. Package Contents
Verify that all items are present in the package:
- HP Pro Laminator 600 A4
- Power Cord
- Instruction Manual
- Starter set of lamination pouches (quantity may vary)
4. Product Overview
Familiarize yourself with the components of your HP Pro Laminator 600 A4.

Figure 4.1: Front angled view of the HP Pro Laminator 600 A4, showcasing its sleek design and control panel.
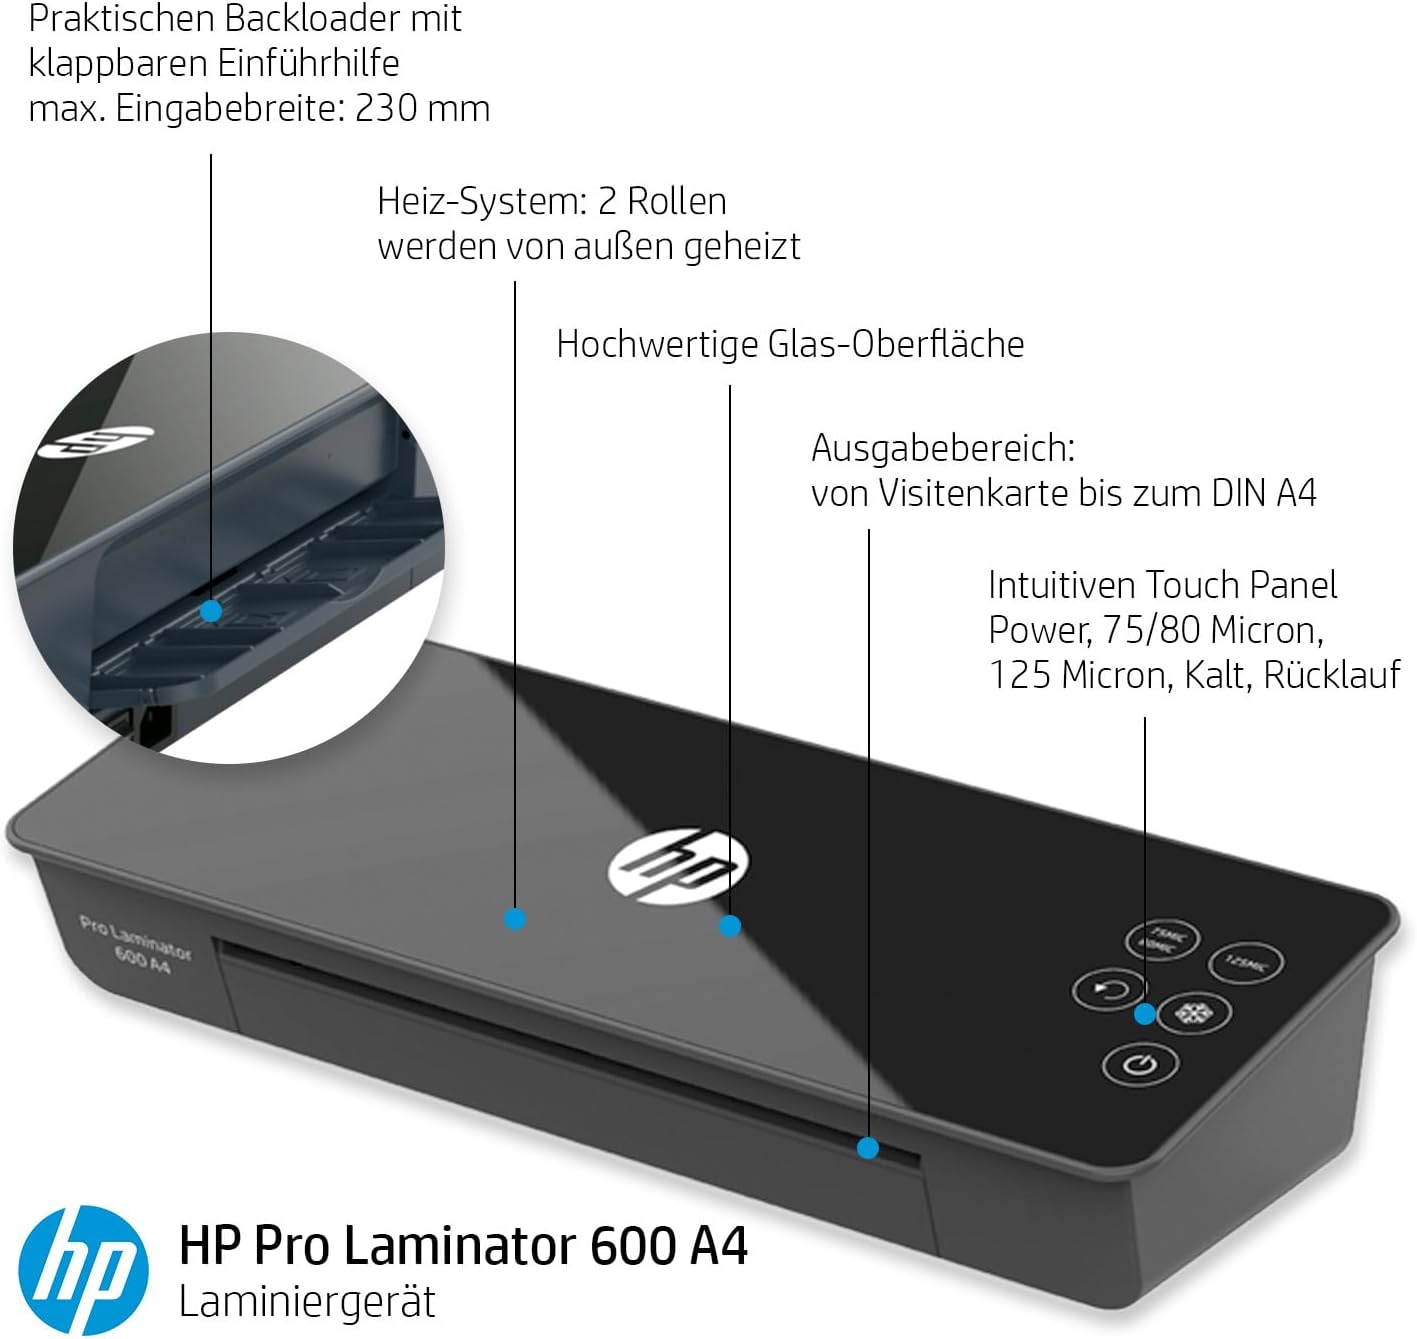
Figure 4.2: Detailed diagram highlighting key features including the practical backloader with foldable feed aid, max input width of 230mm, 2-roller heating system, high-quality glass surface, output area for business cards up to DIN A4, and the intuitive touch panel for power, 75/80 micron, 125 micron, cold lamination, and reverse functions.

Figure 4.3: Close-up view of the touch control panel, showing buttons for 75/80 micron, 125 micron, reverse (ABS), cold lamination (snowflake icon), and power.
Key Components:
- Feed Slot: Where documents with lamination pouches are inserted.
- Output Tray: Where laminated documents exit.
- Control Panel: Touch-sensitive buttons for power, temperature settings, and jam release.
- Power Switch: Located at the rear of the device.
- Power Inlet: For connecting the power cord.
5. Setup
- Unpack: Carefully remove the laminator from its packaging. Retain packaging for storage or transport.
- Placement: Place the laminator on a stable, flat, and heat-resistant surface. Ensure there is sufficient space around the device for proper ventilation and for documents to exit freely.
- Power Connection: Connect the power cord to the power inlet at the rear of the laminator, then plug the other end into a suitable grounded electrical outlet.
- Power On: Flip the main power switch located at the rear of the device to the 'ON' position.
6. Operating Instructions
6.1 Powering On and Warm-up
- After connecting the power and turning on the rear switch, press the power button on the touch control panel.
- The laminator will begin its warm-up cycle. The warm-up time is approximately 60 seconds.
- Once the laminator is ready, the indicator light for the selected lamination mode will illuminate steadily.
6.2 Selecting Lamination Mode
The HP Pro Laminator 600 A4 supports both hot and cold lamination, with different settings for pouch thickness.
- 75/80 Micron: For standard hot lamination pouches. Press the '75MIC/80MIC' button.
- 125 Micron: For thicker hot lamination pouches. Press the '125MIC' button.
- Cold Lamination: For self-adhesive cold lamination pouches. Press the 'snowflake' icon button. No heat is applied in this mode.

Figure 6.1: The control panel indicating the lamination temperature range of 130-160°C for hot lamination modes.
6.3 Lamination Process (Hot Lamination)
- Select the appropriate hot lamination mode (75/80 micron or 125 micron) based on your pouch thickness. Wait for the laminator to reach operating temperature.
- Place your document centrally into the lamination pouch, ensuring it is straight and there is an even border around the document.
- Insert the sealed edge of the lamination pouch into the feed slot. The laminator will automatically draw the pouch through.
- Support the laminated document as it exits the output tray to prevent bending.
- Allow the laminated document to cool on a flat surface before handling or trimming.
6.4 Lamination Process (Cold Lamination)
- Select the 'Cold Lamination' mode (snowflake icon).
- Prepare your document with a cold lamination pouch according to the pouch manufacturer's instructions.
- Insert the sealed edge of the cold lamination pouch into the feed slot.
- Retrieve the laminated document from the output tray.
6.5 Jam Release (ABS Function)
In the event of a paper jam or misfeed:
- Press and hold the 'ABS' (reverse) button on the control panel.
- The laminator rollers will reverse, allowing you to carefully pull the pouch out of the feed slot.
- Once the jammed pouch is removed, release the ABS button.
- Inspect the pouch and document for damage. If reusable, re-align and attempt lamination again.
7. Maintenance
Regular maintenance ensures the longevity and optimal performance of your laminator.
- Cleaning: Ensure the laminator is unplugged and completely cool before cleaning. Use a soft, dry cloth to wipe the exterior. For stubborn marks, a slightly damp cloth can be used, followed by a dry cloth.
- Roller Cleaning: Occasionally, run a laminator cleaning sheet (available separately) through the machine to remove adhesive residue from the rollers.
- Storage: When not in use, store the laminator in a clean, dry place, away from direct sunlight and extreme temperatures.
8. Troubleshooting
Refer to the following table for common issues and their solutions.
| Problem | Possible Cause | Solution |
|---|---|---|
| Laminator does not turn on. | No power supply. | Check power cord connection and wall outlet. Ensure rear power switch is ON and front power button is pressed. |
| Pouch jams in the laminator. | Pouch inserted incorrectly, wrinkled, or too thick. | Press and hold the ABS (reverse) button to release the pouch. Ensure pouch is flat and inserted sealed-edge first. Use correct pouch thickness for selected mode. |
| Laminated document is cloudy or bubbly. | Incorrect temperature setting or low-quality pouch. | Ensure correct temperature setting for pouch thickness. Use high-quality lamination pouches. |
| Laminated document is not sealed properly. | Temperature too low or laminator not fully warmed up. | Wait for the laminator to fully warm up. Ensure correct temperature setting is selected. |
9. Specifications
Technical specifications for the HP Pro Laminator 600 A4.
| Feature | Specification |
|---|---|
| Brand | HP |
| Model Number | 3163 |
| Dimensions (L x W x H) | 50 x 50 x 28 cm (approximate product dimensions) |
| Weight | 2.24 Kilograms |
| Color | Black |
| Sheet Size | A4 (max. 230 mm input width) |
| Warm-up Time | 60 seconds |
| Number of Rollers | 2 |
| Lamination Temperature | 130-160°C (for hot lamination) |
| Pouch Thickness Support | 75/80 micron, 125 micron |
| Lamination Speed | Up to 600 mm/min |
| Special Features | ABS (Anti-Blocking System) for jam release, Cold Lamination function |
| Manufacturer | 'GO Europe |
10. Warranty and Support
The HP Pro Laminator 600 A4 comes with a manufacturer's warranty. Based on available information, spare parts availability is indicated for 1 year. For specific warranty terms and conditions, please refer to the warranty card included with your product or contact HP customer support.
For technical assistance, troubleshooting beyond this manual, or to inquire about spare parts, please visit the official HP support website or contact their customer service department in your region. Keep your purchase receipt and product model number (3163) handy when contacting support.