1. Introduction
This manual provides essential instructions for the safe operation, assembly, maintenance, and troubleshooting of your RYOBI 40-Volt HP Brushless Lithium-Ion Cordless Carbon Fiber Shaft Attachment Capable 16" String Trimmer (Model RY40290VNM). Please read this manual thoroughly before using the product to ensure proper function and safety.

Figure 1: RYOBI 40-Volt HP Brushless String Trimmer. This image shows the complete string trimmer unit, highlighting its carbon fiber shaft and overall design.
2. Safety Information
Operating power tools requires adherence to safety guidelines to prevent injury. Always prioritize your safety and the safety of others.
- Always wear eye protection and sturdy shoes when operating the trimmer.
- Never operate the trimmer without the guard in place.
- Be aware of the high power output and potential hazards from flying debris. Clear the work area of any objects that could be thrown by the trimmer head.
- Always follow the manufacturer's instructions for safe operation and attachment use.
- Keep hands, face, and feet away from the rotating trimmer line.
- Ensure the battery is removed before performing any maintenance, cleaning, or when the tool is not in use.
- Do not operate in wet conditions or rain.
3. Package Contents
Verify that all items are present upon unpacking. If any parts are missing or damaged, contact RYOBI customer service.
- RYOBI 40-Volt HP Brushless String Trimmer Unit
- Trimmer Guard
- Auxiliary Handle
- Operator's Manual
- (Note: Battery and Charger are not included with this tool-only model.)
4. Assembly
4.1 Attaching the Trimmer Guard
- Align the trimmer guard with the mounting holes on the trimmer head assembly.
- Secure the guard using the provided screws. Tighten securely, but avoid over-tightening to prevent damage to the plastic components.
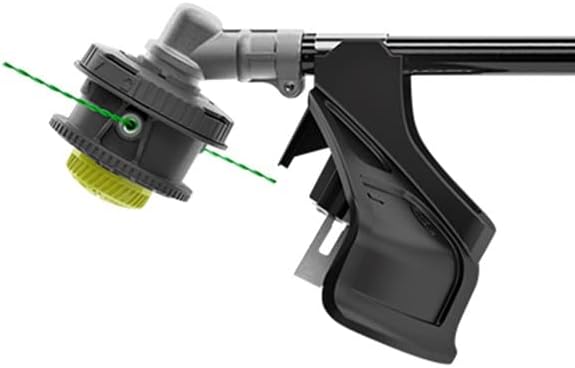
Figure 2: Trimmer head and guard assembly. This image illustrates the trimmer head with the guard attached, showing the cutting line exiting the head.
4.2 Attaching the Auxiliary Handle
- Slide the auxiliary handle onto the trimmer shaft.
- Adjust the handle to a comfortable operating position.
- Tighten the handle clamp securely.
4.3 Connecting Expand-It Attachments
This trimmer is attachment capable, designed to work with RYOBI Expand-It attachments and other universal gas attachments.
- Ensure the trimmer is turned off and the battery is removed.
- Loosen the coupler knob on the trimmer shaft.
- Press the release button on the trimmer shaft.
- Pull the lower shaft assembly (with the trimmer head) away from the upper shaft.
- Insert the desired Expand-It attachment into the upper shaft until the release button snaps into the attachment's hole.
- Tighten the coupler knob firmly to secure the attachment.

Figure 3: RYOBI Expand-It attachment connection. This image shows the mechanism for connecting and disconnecting Expand-It attachments to the trimmer's carbon fiber shaft.
5. Setup
5.1 Battery Installation
This trimmer operates with a RYOBI 40-Volt Lithium-Ion battery (sold separately).
- Ensure the battery is fully charged before use.
- Align the ribs on the battery with the grooves in the trimmer's battery port.
- Slide the battery into the trimmer until it clicks into place.
- To remove, press the battery release latch and pull the battery out.
5.2 Loading Trimmer Line
The trimmer features a REEL-EASY+ bump-feed string head, compatible with 0.080 in. and 0.095 in. line.
- Ensure the trimmer is off and the battery is removed.
- Align the arrows on the bump knob and the trimmer head.
- Insert one end of the new trimmer line through the eyelet and push it straight through the head until it exits the opposite eyelet.
- Pull the line through until an equal amount extends from both sides.
- Rotate the bump knob clockwise to wind the line into the head. Continue winding until approximately 6 inches of line extend from each side.
6. Operating Instructions
6.1 Starting and Stopping the Trimmer
- Ensure the battery is securely installed.
- To start, press the safety lock-out button and then squeeze the variable speed trigger.
- To stop, release the variable speed trigger.

Figure 4: Variable speed trigger. This image highlights the trigger mechanism and the "LOW" switch for controlling cutting speed and power.
6.2 Adjusting Cutting Width
The trimmer offers an adjustable cutting width from 13 inches to 15 inches. A wider cutting path covers more area, while a narrower path can extend battery run time.
- Ensure the trimmer is off and the battery is removed.
- Locate the cutting width adjustment mechanism on the trimmer guard (refer to your specific model's diagram in the printed manual for exact location).
- Adjust the blade or guide to the desired cutting width.
6.3 Trimming Techniques
- Sweeping Motion: Use a side-to-side sweeping motion, keeping the trimmer head slightly above the ground.
- Edging: For clean edges, tilt the trimmer head to a vertical position and walk along the edge of sidewalks or driveways.
- Around Obstacles: Approach obstacles carefully, using the tip of the line to trim around them.
- Line Advancement: To advance the line, lightly tap the bump knob on the ground while the trimmer is running at full speed. The line will automatically cut to the correct length by the blade on the guard.

Figure 5: Person using RYOBI string trimmer for edging. This image shows a user operating the trimmer to create a clean edge along a brick wall, demonstrating its power and maneuverability.
7. Maintenance
Regular maintenance ensures optimal performance and extends the life of your trimmer.
- Cleaning: After each use, remove the battery and clean the trimmer head, guard, and shaft with a damp cloth. Remove any accumulated grass or debris.
- Line Replacement: Replace trimmer line as needed following the instructions in Section 5.2. Use only recommended line sizes (0.080 in. or 0.095 in.).
- Storage: Store the trimmer in a dry, secure location out of reach of children. Remove the battery before storing for extended periods.
- Inspection: Periodically inspect the trimmer for loose fasteners, damaged parts, or worn components. Contact RYOBI service for repairs if necessary.
8. Troubleshooting
| Problem | Possible Cause | Solution |
|---|---|---|
| Trimmer does not start. | Battery not installed correctly or discharged. Safety lock-out not engaged before trigger. | Ensure battery is fully charged and properly seated. Press safety lock-out button before squeezing trigger. |
| Trimmer line does not advance. | Line tangled or fused inside head. Incorrect line loading. | Remove battery, open trimmer head, untangle/re-spool line. Ensure line is loaded correctly as per Section 5.2. |
| Reduced cutting performance. | Worn or short trimmer line. Low battery charge. | Advance or replace trimmer line. Recharge battery. |
For issues not listed here, or if solutions do not resolve the problem, contact RYOBI customer support.
9. Specifications
- Brand: RYOBI
- Model Number: RY40290VNM
- Power Source: 40-Volt Lithium-Ion Battery (not included)
- Motor Type: HP Brushless
- Shaft Type: Carbon Fiber, Attachment Capable
- Cutting Width: 13 in. to 15 in. (Adjustable)
- Trimmer Line Diameter: 0.080 in. and 0.095 in. compatible
- Trimmer Head: REEL-EASY+ Bump-Feed
- Item Weight: 10.8 Pounds (approximately)
- UPC: 046396036926
10. Warranty and Support
For warranty information, technical support, or to order replacement parts, please refer to the warranty card included with your product or visit the official RYOBI website. Keep your purchase receipt as proof of purchase for warranty claims.
Online Support: www.ryobitools.com


