Ideation 1201
GoPower Plus Portable Emergency Power Station User Manual
Model: 1201
1. Introduction
Thank you for choosing the GoPower Plus Portable Emergency Power Station. This device is designed to provide reliable power in various situations, from outdoor adventures to emergency preparedness. It features a high-capacity battery, multiple charging outputs, and an integrated emergency weather band radio.
This manual provides essential information for the safe and efficient operation, maintenance, and troubleshooting of your GoPower Plus power station. Please read this manual thoroughly before using the product and retain it for future reference.
2. Safety Information
To ensure safe operation, always adhere to the following precautions:
- Do not disassemble, repair, or modify the unit. Incorrect reassembly may cause fire or electric shock.
- Do not expose the unit to fire or direct heat.
- Do not use or store the unit in high-temperature environments, such as direct sunlight or inside a vehicle in hot weather.
- Do not use or store the unit in a bathroom or in areas exposed to rain or moisture.
- Do not drop, strike, or subject the unit to strong impacts.
- Keep out of reach of children.
- Use only the provided or approved accessories.
- Ensure proper ventilation during use to prevent overheating.
- If the unit emits smoke, odor, or any unusual behavior, stop using it immediately and contact customer support.
Warning:
This device complies with Part 15 of the FCC Rules. Operation is subject to the following two conditions: (1) This device may not cause harmful interference, and (2) This device must accept any interference received, including interference that may cause undesired operation.
3. Product Overview
The GoPower Plus is a versatile portable power station designed for various applications. It integrates a powerful battery, multiple output ports, and an emergency weather radio.
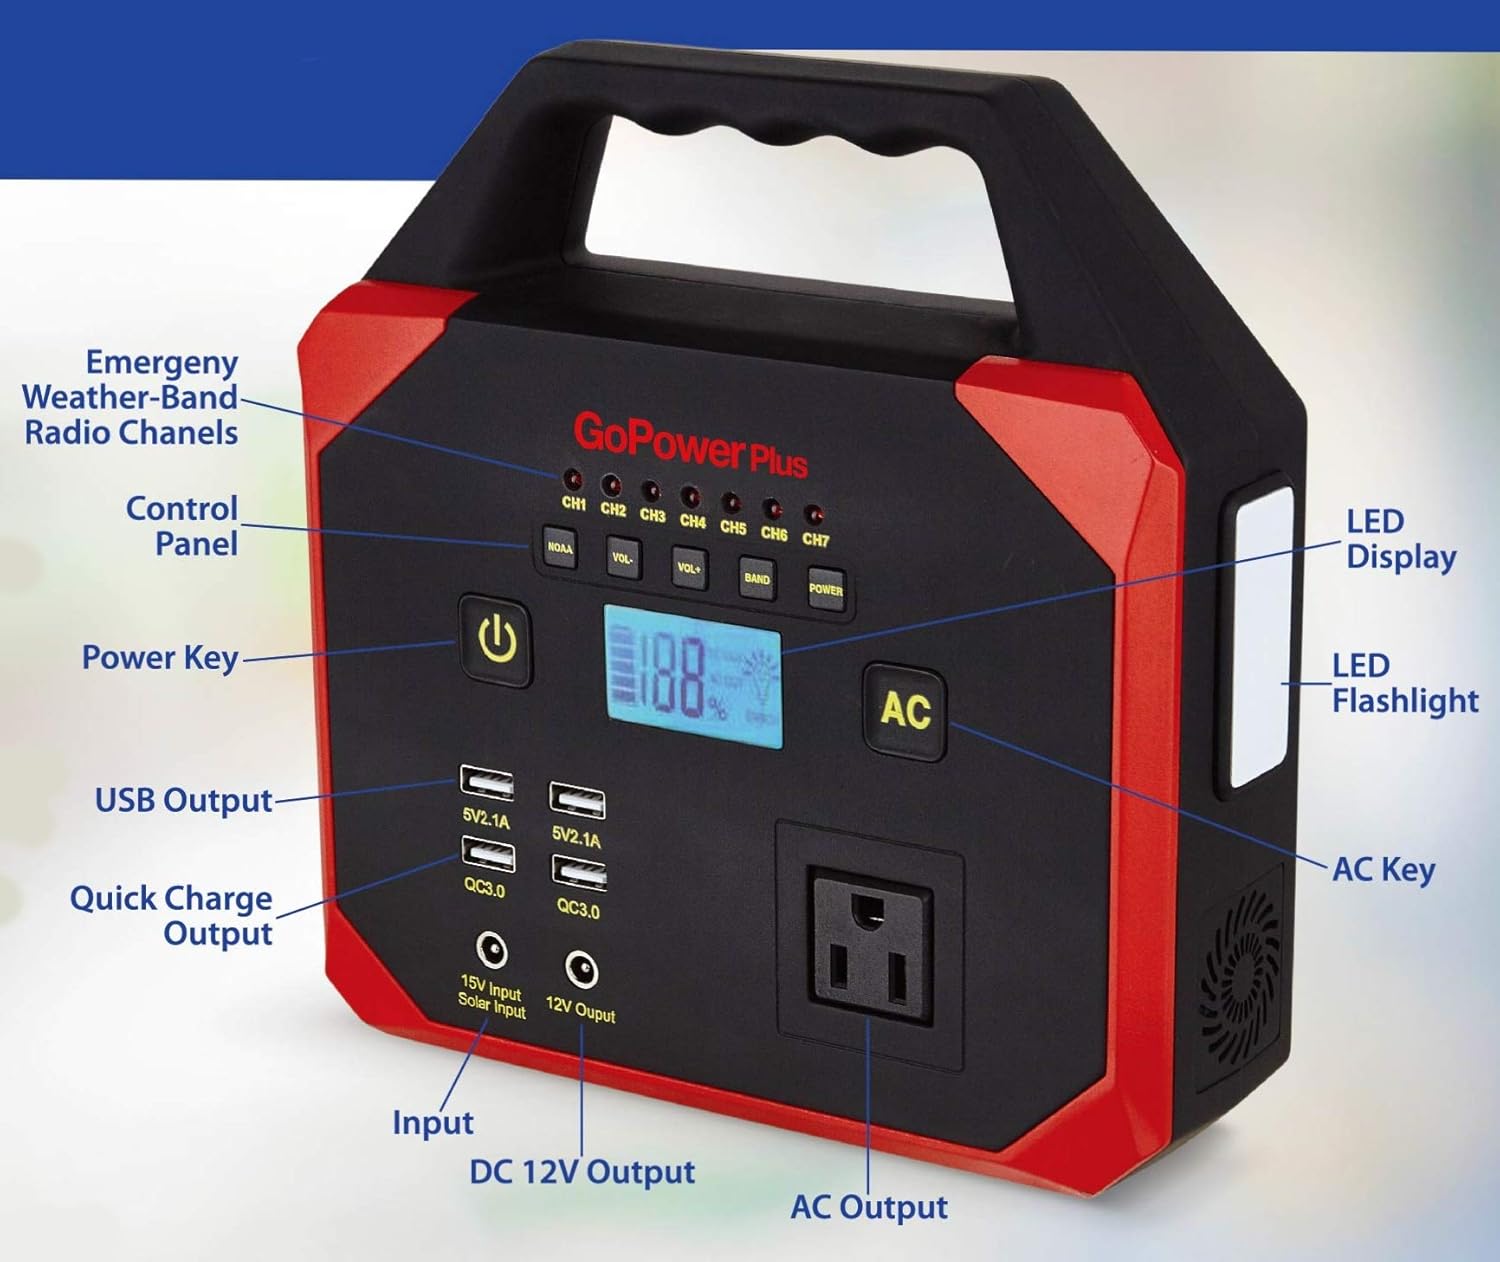
Figure 3.1: Front view of the GoPower Plus Portable Power Station with key components labeled. This includes the Emergency Weather-Band Radio Channels, Control Panel, Power Key, USB Output, Quick Charge Output, Input, DC 12V Output, AC Output, LED Display, LED Flashlight, and AC Key.
3.1 Key Features
- High Capacity: 45000 mAh / 150 Wh rechargeable lithium-ion battery.
- Multiple Outputs:
- 110V AC Output (100W max)
- 12V DC Output
- 2 x USB-A Charging Ports (5V/2.1A)
- 2 x USB 3.0 Quick Charge Ports (QC3.0)
- Emergency Weather Band Radio: Receives alerts for severe weather and other emergencies (earthquakes, chemical spills, etc.).
- Integrated LED Flashlight: Provides illumination in low-light conditions.
- Portable Design: Compact and lightweight with a sturdy handle for easy transport.
- LED Display: Shows battery level and operational status.
3.2 Package Contents
Verify that all items are present in the package:
- 1 x GoPower Plus Portable Power Station
- 1 x AC Power Adapter
- 1 x Car Charger Adapter
- 1 x USB Cord
- 1 x User Manual (this document)

Figure 3.2: Image illustrating the GoPower Plus Portable Power Station, highlighting its key features such as 45,000 mAh / 150W capacity, Hi Power LED Flashlight, Fast charging USB, AC Output / DC 12V, and LED Display. The image also shows the UPC barcode 0011891420303.
4. Setup and Charging
4.1 Initial Charging
Before first use, fully charge the GoPower Plus power station. This ensures optimal battery performance and longevity.
- Connect the provided AC power adapter to the 15V Input port on the power station.
- Plug the AC power adapter into a standard wall outlet.
- The LED display will show the charging progress. The unit is fully charged when the display indicates 100%.
- Unplug the adapter once charging is complete.
Note: The unit can also be charged via a solar panel (not included) or the included car charger adapter.
4.2 Charging Time
Charging time varies depending on the charging method and remaining battery level. Typically, a full charge using the AC adapter takes approximately 6-8 hours.
5. Operating Instructions
5.1 Powering On/Off
- To power on the unit, press and hold the Power Key (labeled with a power symbol) for 2-3 seconds. The LED display will illuminate.
- To power off the unit, press and hold the Power Key again for 2-3 seconds until the display turns off.
5.2 Using AC Output
The AC output port provides 110V AC power for small appliances and electronics up to 100W.
- Ensure the power station is turned on.
- Press the AC Key to activate the AC output. The AC indicator on the display will light up.
- Plug your device's power cord into the AC outlet.
- After use, press the AC Key again to turn off the AC output to conserve battery.
Caution: Do not exceed the maximum 100W output. Overloading may cause the unit to shut down.
5.3 Using DC 12V Output
The 12V DC output port is suitable for devices requiring 12V DC power, such as car accessories.
- Ensure the power station is turned on.
- Plug your 12V DC device into the 12V DC Output port.
- The DC output is typically active when the unit is on.
5.4 Using USB Outputs (Standard and Quick Charge)
The unit features two standard USB-A ports (5V/2.1A) and two Quick Charge 3.0 (QC3.0) ports for faster charging of compatible devices.
- Ensure the power station is turned on.
- Connect your USB device using a compatible USB cable to any of the USB-A or QC3.0 ports.
- Charging will begin automatically.
5.5 Operating the Emergency Weather Band Radio
The integrated weather band radio provides critical alerts for severe weather and other emergencies.
- Ensure the power station is turned on.
- Press the BAND button on the control panel to activate the weather radio.
- Use the VOL- and VOL+ buttons to adjust the volume.
- Use the CH1 through CH7 buttons to select different weather channels.
- The radio will automatically scan for and receive NOAA weather alerts.
- To turn off the radio, press the BAND button again.
5.6 Using the LED Flashlight
The built-in LED flashlight is located on the side of the unit.
- To turn on the flashlight, press the dedicated Flashlight Button (located on the side, near the light).
- Press the button again to cycle through different light modes (e.g., steady on, SOS, strobe, off).
6. Maintenance and Storage
6.1 General Maintenance
- Clean the unit with a dry, soft cloth. Do not use abrasive cleaners or solvents.
- Keep the ventilation openings clear of dust and debris.
- Avoid exposing the unit to extreme temperatures, humidity, or direct sunlight.
6.2 Battery Maintenance and Storage
- For optimal battery life, fully charge the unit at least once every 3 months, even if not in use.
- Store the unit in a cool, dry place, away from direct sunlight and heat sources.
- Avoid storing the unit with a completely depleted battery for extended periods.
7. Troubleshooting
| Problem | Possible Cause | Solution |
|---|---|---|
| Unit does not turn on. | Battery is depleted. | Charge the unit fully using the AC adapter. |
| AC output not working. | AC output not activated. Device power consumption exceeds 100W. Battery too low. | Press the AC Key to activate. Use devices within the 100W limit. Recharge the power station. |
| USB charging not working. | Unit is off. USB cable is faulty. | Ensure the unit is powered on. Try a different USB cable. |
| Weather radio no signal. | Weak signal area. Radio not activated. | Relocate to an area with better reception. Press the BAND button. |
| Flashlight not working. | Battery is depleted. Flashlight button not pressed correctly. | Recharge the power station. Press the flashlight button firmly to cycle modes. |
8. Specifications
| Feature | Detail |
|---|---|
| Model Number | 1201 |
| Battery Type | Lithium-ion |
| Battery Capacity | 45000 mAh / 150 Wh |
| AC Output | 110V AC, 60Hz, 100W (Max) |
| DC Output | 12V DC |
| USB-A Output | 2 x 5V/2.1A |
| Quick Charge USB Output | 2 x QC3.0 |
| Input (Charging) | 15V DC (via AC adapter, car charger, or solar panel) |
| Weather Radio Frequency | 108 MHz (NOAA Weather Band) |
| Dimensions (L x W x H) | 27.2 x 21.69 x 9.19 cm (10.7 x 8.5 x 3.6 inches) |
| Weight | 1.45 kg (3.2 lbs) |
| Color | Red/Black |
9. Warranty and Support
9.1 Limited Warranty
Ideation warrants this product against defects in material and workmanship for a period of one (1) year from the original date of purchase. This warranty does not cover damage caused by misuse, abuse, accident, unauthorized modification, or normal wear and tear. Proof of purchase is required for warranty service.
9.2 Customer Support
For technical support, warranty claims, or general inquiries, please contact Ideation customer service. Refer to the product packaging or the official Ideation website for the most current contact information.
When contacting support, please have your product model number (1201) and proof of purchase ready.