1. Introduction
This user manual provides comprehensive instructions for the installation, operation, and maintenance of your TP-Link TL-SG3428XMP Jetstream 24 Port Gigabit Smart Managed L2+ PoE Switch. Please read this manual thoroughly before using the device to ensure proper functionality and to prevent damage.
2. Product Overview
The TP-Link TL-SG3428XMP is a high-performance L2+ managed switch designed for robust network environments. It features 24 Gigabit PoE+ ports and 4 10GE SFP+ slots, offering flexible connectivity and high-bandwidth uplink capabilities. This switch supports the Omada SDN platform for centralized cloud management.
2.1 Key Features
- 10G Lightning-Fast Uplink: Equipped with 4× 10 Gbps SFP+ slots for high-bandwidth connectivity and non-blocking switching capacity.
- Flexible PoE Port Configuration: 24× PoE+ (802.3at/af) 10/100/1000 Mbps RJ45 ports, providing up to 30W per port with a total PoE budget of 380W.
- Integrated into Omada SDN: Seamlessly integrates with Omada's Software Defined Networking platform for unified management of switches, access points, and gateways.
- Cloud Access: Enables remote cloud access and management via the Omada app, allowing control from anywhere, anytime.
- Enhanced Network Security: Features include 802.1Q VLAN, IP-MAC-Port binding, ACL, Port Security, DoS defend, Storm control, DHCP Snooping, and 802.1X radius authentication.
- L2+ Features: Static Routing for efficient internal traffic management.
- Standalone Management: Supports Web, CLI (Console Port, Telnet, SSH), SNMP, RMON, and Dual Image for powerful management capabilities.
2.2 Front Panel Layout

Figure 2.2.1: Front view of the TL-SG3428XMP switch, showing 24 Gigabit Ethernet ports, 4 SFP+ ports, and LED indicators.
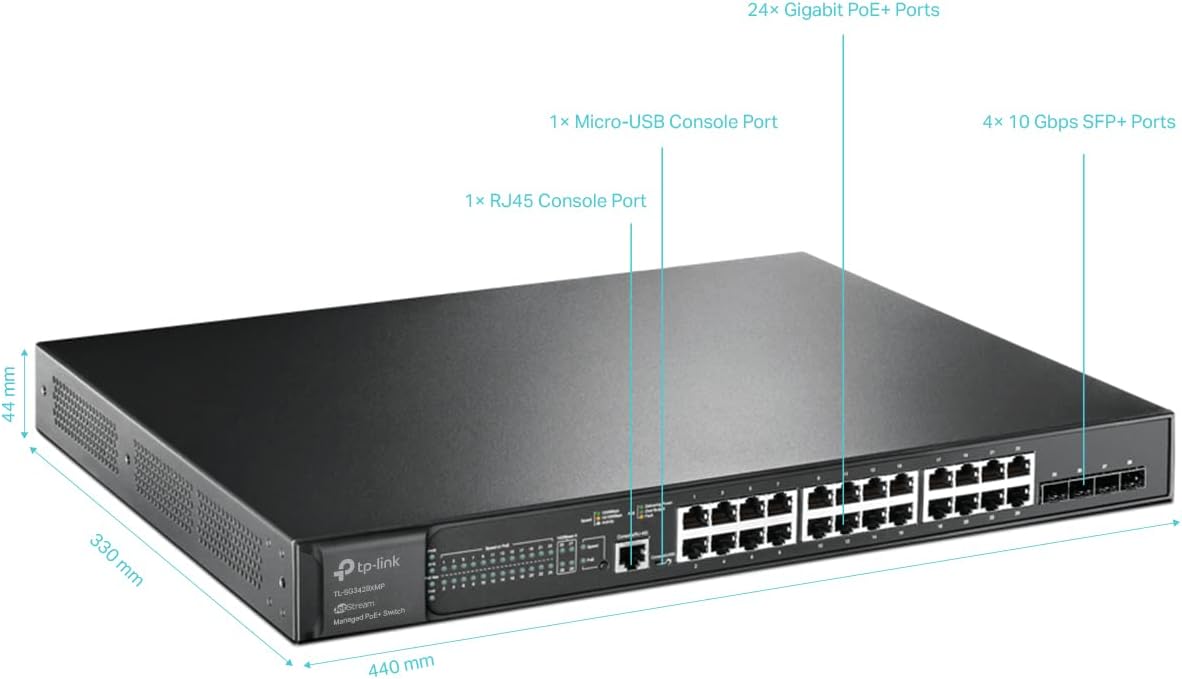
Figure 2.2.2: Detailed diagram of the TL-SG3428XMP, highlighting 24 Gigabit PoE+ Ports, 4 10Gbps SFP+ Slots, 1 RJ45 Console Port, and 1 Micro-USB Console Port, along with physical dimensions.
2.3 Rear Panel Layout

Figure 2.3.1: Rear view of the TL-SG3428XMP switch, showing the power input and grounding screw.
3. Package Contents
Verify that your package contains the following items:
- TL-SG3428XMP Switch
- Power Cord
- Quick Installation Guide
- Rackmount Kit
- Rubber Feet
If any item is missing or damaged, please contact your reseller.
4. Setup
4.1 Safety Precautions
- Ensure the power supply voltage matches the device's requirements.
- Do not block ventilation openings.
- Avoid placing the device in direct sunlight, near heat sources, or in excessively humid or dusty environments.
- Use only the power adapter provided with the device.
4.2 Physical Installation
The TL-SG3428XMP can be placed on a desktop or mounted in a standard 19-inch rack.
4.2.1 Desktop Placement
Attach the provided rubber feet to the bottom of the switch to prevent slipping and protect the surface. Place the switch on a flat, stable surface with adequate ventilation around it.
4.2.2 Rack Mounting
Use the included rackmount kit to install the switch into a standard 19-inch rack. Secure the mounting brackets to the sides of the switch using the provided screws, then attach the switch to the rack using appropriate rack screws.
4.3 Connecting the Switch
- Power Connection: Connect the power cord to the switch's power input and then to a power outlet.
- Network Connections:
- Connect your network devices (computers, servers, access points, IP cameras, IP phones) to the RJ45 ports using Ethernet cables.
- For high-speed uplinks or connections to other network devices, insert compatible SFP+ modules into the 10GE SFP+ slots and connect fiber optic cables.
- Console Connection (Optional): For CLI management, connect a console cable from your computer to either the RJ45 console port or the Micro-USB console port on the switch.
5. Operating Instructions
5.1 Power over Ethernet (PoE+) Functionality
The TL-SG3428XMP provides 24 PoE+ ports, capable of delivering power and data over a single Ethernet cable to compatible devices such as IP cameras, IP phones, and wireless access points. Each PoE+ port can supply up to 30W, with a total power budget of 380W for the entire switch.

Figure 5.1.1: Illustration of how PoE+ ports simplify network deployment by powering devices like IP cameras, IP phones, and access points directly from the switch.
5.2 10 Gigabit SFP+ Uplinks
The four 10GE SFP+ slots allow for high-speed fiber optic connections, providing lightning-fast uplinks to your core network or servers. This ensures non-blocking data transfer and supports demanding applications.
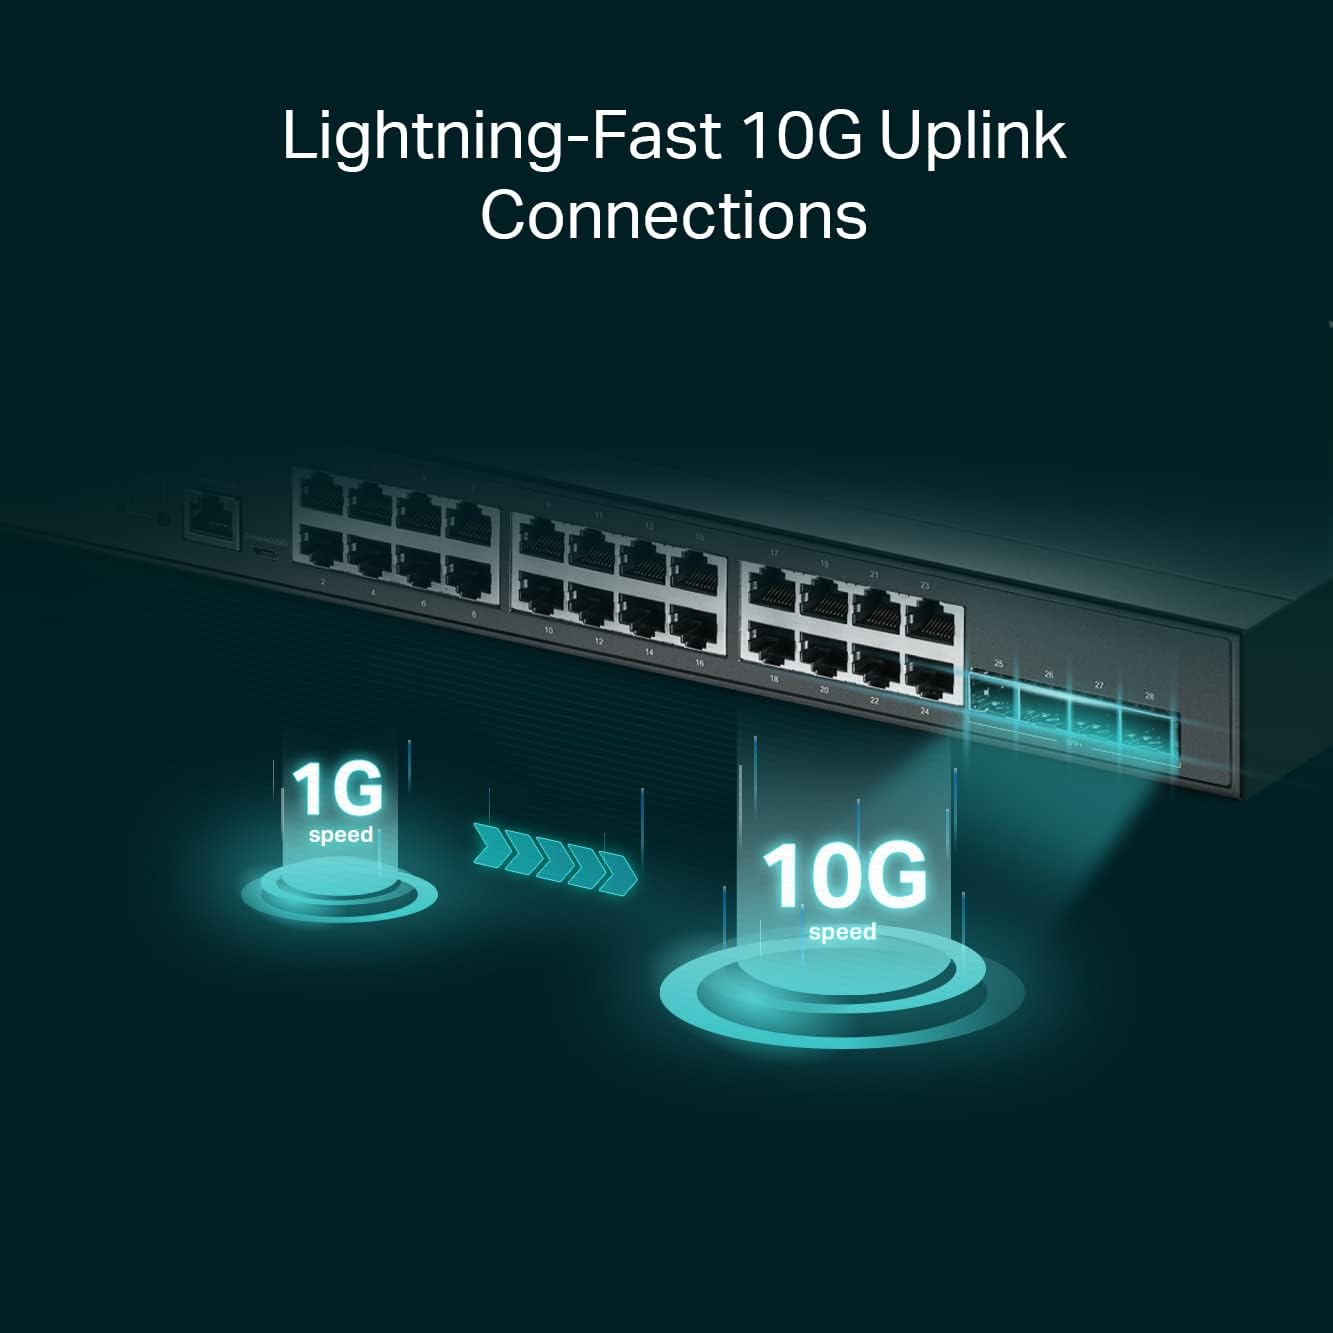
Figure 5.2.1: Visual representation of the speed advantage provided by 10G SFP+ uplinks compared to 1G connections.
5.3 Management Options
The TL-SG3428XMP offers multiple management methods:
- Web-based GUI: Access the switch's configuration interface via a web browser for intuitive setup and monitoring.
- Command Line Interface (CLI): Manage the switch using a command-line interface via the console port (RJ45 or Micro-USB), Telnet, or SSH for advanced configurations.
- SNMP: Integrate the switch into existing network management systems using Simple Network Management Protocol.
- Omada Software Defined Networking (SDN): For centralized management of multiple TP-Link Omada devices, the switch can be integrated into the Omada SDN platform. This allows for remote cloud access and management from a single interface, anywhere, anytime.

Figure 5.3.1: Overview of Omada's centralized cloud management, illustrating control via Omada Software Controller, Omada Hardware Controller, or Omada Cloud-Based Controller.
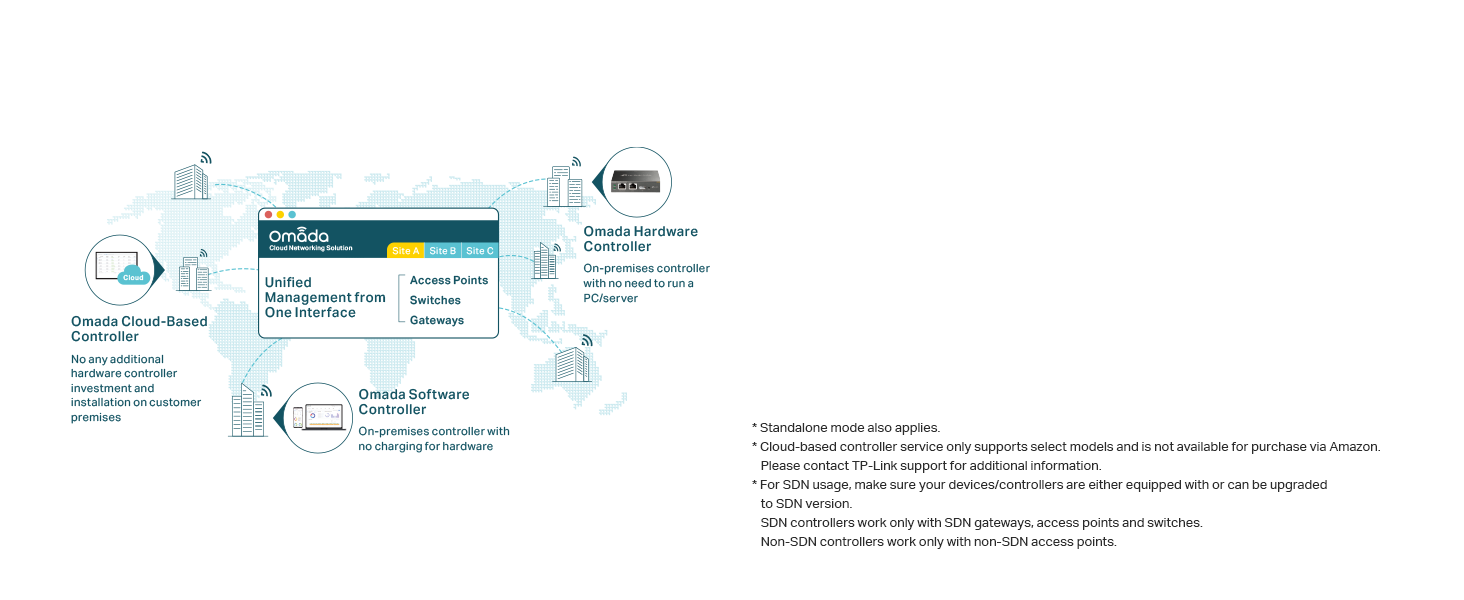
Figure 5.3.2: Diagram illustrating the Omada Cloud-Based Controller providing unified management for access points, switches, and gateways across multiple sites.
6. Maintenance
6.1 PoE Auto Recovery
The switch features PoE Auto Recovery, which automatically reboots unresponsive PoE-powered devices (PDs) such as IP cameras or access points. This helps to ensure continuous operation and reduces the need for manual intervention.

Figure 6.1.1: Illustration of the PoE Auto Recovery feature, where the switch detects an unresponsive IP camera and automatically reboots its PoE port to restore functionality.
6.2 General Care
- Keep the device clean and free from dust.
- Ensure proper ventilation to prevent overheating.
- Regularly check cable connections for security.
- Perform firmware updates as recommended by TP-Link to ensure optimal performance and security.
7. Troubleshooting
If you encounter issues with your TL-SG3428XMP switch, consider the following common troubleshooting steps:
- No Power: Ensure the power cord is securely connected to the switch and the power outlet. Verify the power outlet is functional.
- No Link/Activity on Port: Check the Ethernet cable connection between the switch and the connected device. Ensure the connected device is powered on and functioning correctly. Verify the port LED indicators on the switch.
- PoE Device Not Powering On: Confirm the connected device is PoE compatible. Check the PoE status LED for the specific port. Ensure the total PoE budget of the switch is not exceeded.
- Cannot Access Management Interface: Verify your computer's IP address is in the same subnet as the switch's management IP. Check physical connections. Try accessing via a different browser or clear browser cache.
- Slow Network Performance: Check for network loops, excessive broadcast storms, or high network utilization. Ensure cables are of appropriate quality and length.
For more detailed troubleshooting and advanced configurations, please refer to the official User Manual (PDF) available on the TP-Link support website.
8. Specifications
| Attribute | Value |
|---|---|
| Model Number | TL-SG3428XMP |
| Switch Type | Network Switch (24 PoE+ ports, 4 SFP+ slots) |
| Number of Ports | 24 |
| Interface Type | PoE+, SFP+ |
| Maximum Power | 380 Watts |
| Data Transfer Rate | 40 Gigabits Per Second |
| Voltage | 48 Volts |
| Current Rating | 1 Amps |
| Case Material | Metal |
| Color | black |
| Product Dimensions | 17.32 x 13.27 x 1.73 inches |
| Item Weight | 11.29 pounds (5.13 Kilograms) |
| Upper Temperature Rating | 45 Degrees Celsius |
| Compatible Devices | Desktop |
9. Warranty and Support
The TP-Link TL-SG3428XMP is backed by an industry-leading 5-year warranty. For technical assistance, free support is available from 6am to 6pm PST, Monday to Friday.
For further information, support, or to download the latest firmware and documentation, please visit the official TP-Link support website or refer to the Installation Manual (PDF) or User Manual (PDF).


