1. Introduction
The LiebeWH TM623 Automatic Latitude Timer Switch is a versatile and intelligent device designed for precise control of electrical equipment. It allows for automatic scheduling of power ON/OFF cycles, making it ideal for various applications such as street lighting, factory machinery, advertising signs, production equipment, and radio/television systems. This manual provides essential information for the safe and effective use of your TM623 timer switch.

Figure 1: Front view of the TM623 Automatic Latitude Timer Switch, showing the digital display and control buttons.

Figure 2: Examples of the TM623 Timer Switch's wide application in street lighting, factory environments, and stage equipment.
2. Safety Information
Please read and understand all safety instructions before installation and operation. Failure to follow these instructions may result in electric shock, fire, or serious injury.
- Ensure the power supply is disconnected before any installation or wiring work.
- Installation should be performed by a qualified electrician or competent person.
- Do not exceed the specified voltage and current ratings of the device.
- Keep the device away from water, moisture, and extreme temperatures.
- Do not attempt to open or repair the device yourself. Contact qualified personnel for service.
3. Product Overview and Features
The TM623 timer switch offers advanced functionality for automated control:
- Large Display: Features a 1.6-inch large screen for clear and convenient reading of time and settings.
- Programmable Cycles: Supports up to 8 ON and 8 OFF programs, allowing for flexible scheduling.
- Automatic Latitude Adjustment: Automatically adjusts ON/OFF times based on latitude, year, month, day, and hour, adapting to seasonal changes.
- DIN Rail Mounting: Designed for simple and convenient installation on a DIN rail, saving time and effort.
- Wide Application: Suitable for various electrical equipment requiring regular power scheduling.

Figure 3: Close-up of the TM623's digital display and control buttons (ON, MD, R, Up/Down arrows).
4. Specifications
| Parameter | Value |
|---|---|
| Model | TM623 |
| Supply Voltage | AC 220V, 50Hz |
| Conventional Thermal Current (Ith) | 16A |
| Rated Operating Current (Ie) | AC-15 220V 3A; AC-1 220V 16A |
| Time Error | ≤ 1 second/day |
| Power Consumption | 1.5W |
| Display | 1.6-inch Large Screen |
| Time Setting Range | 1 minute to 1 day |
| Latitude Setting Range | N/S -60° ~ +60° |
| Mechanical Life | ≥ 30,000 times |
| Electrical Life | ≥ 10,000 times |
| Installation | DIN Rail |
| Battery Type | Ni-MH |
| Battery Model | NI-MH40H |
| Battery Rated Capacity | 40mAh |
| Weight | 119 g |
| Dimensions (L x W x H) | 68mm x 35mm x 82mm (approx.) |
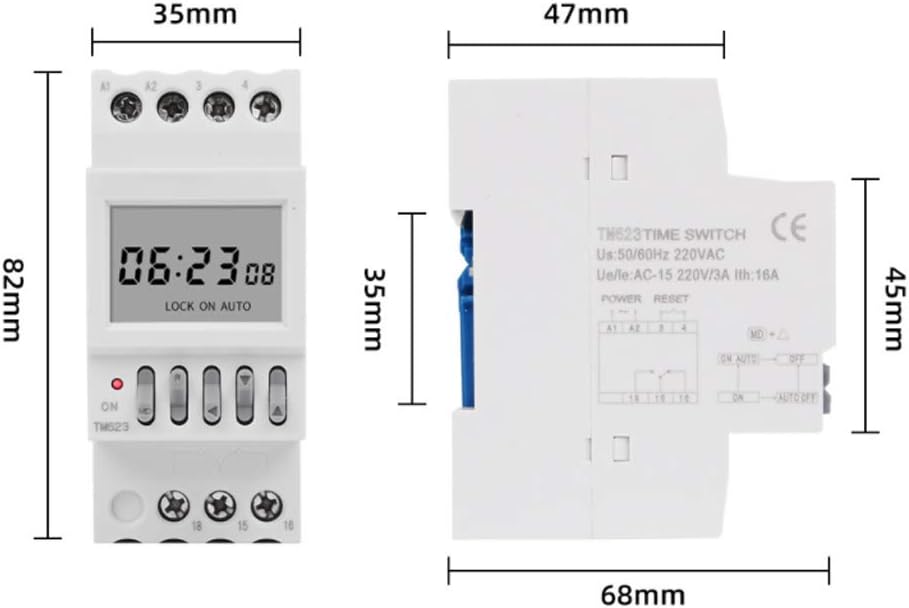
Figure 4: Dimensional drawing of the TM623 Timer Switch, showing approximate measurements.
5. Package Contents
Upon opening the package, please verify that all items are present and undamaged:
- 1 x TM623 Timer Switch
- 1 x English User Manual
6. Setup and Installation
The TM623 timer switch is designed for DIN rail mounting. Follow these steps for installation:
6.1 DIN Rail Mounting
- Ensure the power supply to the installation area is completely disconnected.
- Align the timer switch with the DIN rail.
- Press the timer switch firmly onto the rail until it clicks into place.
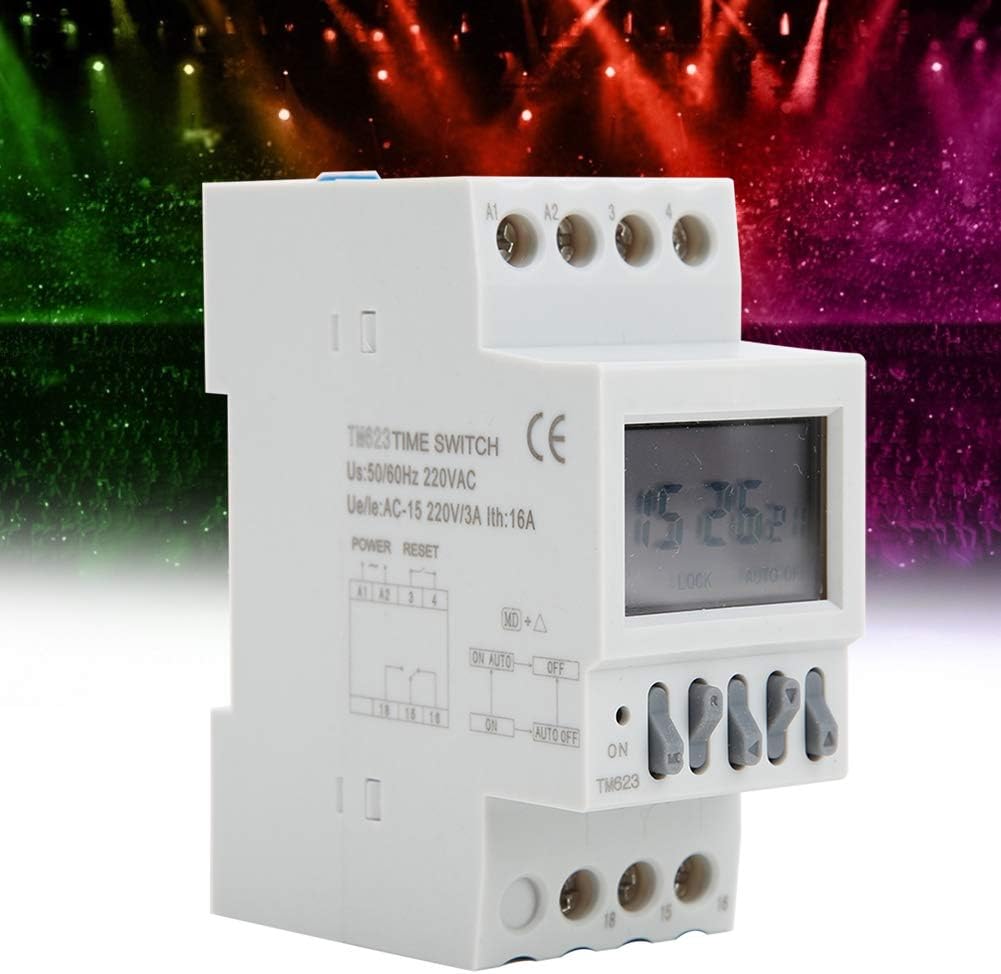
Figure 5: Side view of the TM623 Timer Switch, illustrating its compatibility with DIN rail mounting.
6.2 Wiring Connections
Refer to the wiring diagram provided in the included English User Manual for precise connections. General connection points are as follows:
- Terminals A1, A2: Connect to the AC 220V power supply for the timer itself.
- Terminals 15, 16, 18: These are the relay output terminals for controlling your load. Typically, 15 is the common terminal, 16 is normally open (NO), and 18 is normally closed (NC). Connect your electrical load to these terminals as required.
Important: Always ensure correct polarity and secure connections. Incorrect wiring can damage the device or connected equipment.

Figure 6: Angled view of the TM623 Timer Switch, highlighting the power input (A1, A2) and load output (15, 16, 18) terminals.
7. Operating Instructions
The TM623 timer switch features an intuitive interface for setting time and programs.
7.1 Button Functions
- ON: Manual ON/OFF override.
- MD: Mode button, used to cycle through setting modes (time, program, latitude).
- R: Reset button (press and hold to reset).
- Up/Down Arrows: Used to adjust values (hours, minutes, program numbers, latitude).
7.2 Setting Current Time
- Press the MD button until the clock icon is displayed.
- Use the Up/Down arrows to set the current hour and minute.
- Press MD again to confirm.
7.3 Programming ON/OFF Events
The timer supports 8 ON and 8 OFF programs.
- Press the MD button repeatedly until '1 ON' appears on the display.
- Use the Up/Down arrows to set the desired ON time (hour and minute) for program 1.
- Press MD to proceed to '1 OFF'. Set the desired OFF time for program 1.
- Repeat steps 2 and 3 for programs 2 through 8.
- After setting all desired programs, press MD until the clock icon reappears to exit programming mode.
7.4 Latitude Adjustment
The TM623 can automatically adjust ON/OFF times based on your geographical latitude.
- Press the MD button until the latitude setting appears (e.g., N/S -60° ~ +60°).
- Use the Up/Down arrows to set your approximate latitude.
- Press MD to confirm and exit.
8. Maintenance
To ensure the longevity and proper functioning of your TM623 timer switch, follow these maintenance guidelines:
- Keep the device clean and free from dust. Use a soft, dry cloth for cleaning.
- Avoid exposing the device to direct sunlight, high humidity, or corrosive environments.
- The internal Ni-MH battery is designed for long-term operation and is not user-replaceable. If the display becomes dim or loses settings frequently, the battery may need professional service.
9. Troubleshooting
If you encounter issues with your TM623 timer switch, refer to the following common problems and solutions:
| Problem | Possible Cause | Solution |
|---|---|---|
| Device not powering on / Display blank | No power supply; Internal battery depleted. | Check power connections (A1, A2). Ensure the device is receiving 220V AC. If the battery is depleted, connect to power for several hours to charge. |
| Load not switching ON/OFF as programmed | Incorrect program settings; Incorrect wiring; Manual override engaged. | Verify program times. Check load wiring (terminals 15, 16, 18). Ensure the device is in AUTO mode (not manually overridden). |
| Time or settings are lost after power outage | Internal battery not holding charge. | The internal Ni-MH battery may need replacement. Contact customer support. |
10. Warranty and Support
For warranty information, technical support, or service inquiries, please contact your retailer or the manufacturer directly. Keep your purchase receipt as proof of purchase.
Manufacturer: LiebeWH