
McGraw 792363575676
McGraw 3 Gallon 1/3 HP 110 PSI Oil-Free Pancake Air Compressor User Manual
Model: 792363575676
Introduction
Thank you for choosing the McGraw 3 Gallon 1/3 HP 110 PSI Oil-Free Pancake Air Compressor. This manual provides essential information for the safe operation, maintenance, and troubleshooting of your new air compressor. Please read this manual thoroughly before operating the unit and keep it for future reference.
This compact and lightweight air compressor is designed for various tasks including jobsite nailing/stapling, inflation, and general cleaning. Its oil-free pump ensures no-maintenance operation, offering convenience and reliability.
Important Safety Information
Always follow basic safety precautions when using electrical appliances to reduce the risk of fire, electric shock, and personal injury.
- Read all instructions before use.
- Wear appropriate personal protective equipment (PPE), including eye protection.
- Ensure the work area is well-lit and clear of obstructions.
- Do not operate the compressor in wet or damp conditions.
- Always unplug the unit before performing any maintenance or adjustments.
- This unit is equipped with Thermal Overload Protection. If the compressor automatically shuts off before reaching its normal cutoff pressure, turn it off and unplug it for 15 minutes. Plug it back in, then turn unit on and resume operation.
Product Components
Familiarize yourself with the main components of your McGraw Air Compressor:
- Pressure Gauges: Displays tank pressure and regulated tool pressure.
- Pressure Regulator: Adjusts the air pressure supplied to the tool.
- Quick Connect Coupler: For attaching air hoses and tools.
- Drain Valve: Located at the bottom of the tank for draining condensation.
- Power Cord: For connecting to a 110V power outlet.
- Handle: Integrated into the design for easy portability.

Figure 1: Front view of the McGraw 3 Gallon Pancake Air Compressor, showing the main control panel with pressure gauges and the integrated handle.
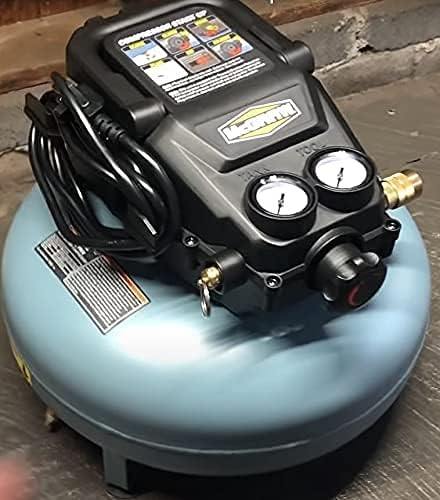
Figure 2: Side view of the compressor, highlighting the power cord wrap and compact design.
Setup
- Unpacking: Carefully remove the compressor from its packaging. Inspect for any shipping damage.
- Placement: Place the compressor on a stable, level surface. Ensure adequate ventilation around the unit.
- Connect Air Hose: Attach your air hose to the quick connect coupler on the compressor. Ensure a secure connection.
- Power Connection: Ensure the power switch is in the "OFF" position. Plug the power cord directly into a grounded 110V wall outlet. Extension cords are not recommended; use a longer hose instead if needed.

Figure 3: The compressor set up with an air hose and nozzle, demonstrating its readiness for operation.
Operating Instructions
- Initial Start-up:
- Close the drain valve at the bottom of the tank.
- Turn the pressure regulator knob fully counter-clockwise to the lowest pressure setting.
- Turn the power switch to the "ON" position. The compressor will begin to fill the tank.
- Allow the compressor to reach its maximum pressure and shut off automatically. This may take a few minutes.
- Adjusting Pressure:
- With the compressor running or fully charged, slowly turn the pressure regulator knob clockwise to increase the output pressure to your desired setting for the tool.
- Monitor the "TOOL" gauge to set the correct pressure.
- Connecting Tools:
- Ensure the tool you are connecting is rated for the pressure you are setting.
- Connect your air tool to the quick connect coupler.
- Operation: Begin using your air tool. The compressor will cycle on and off as needed to maintain tank pressure.
- Shut Down:
- Turn the power switch to the "OFF" position.
- Disconnect the air tool.
- Slowly open the drain valve to release all air pressure from the tank. This is crucial for safety and to prevent condensation buildup.
Maintenance
Regular maintenance ensures optimal performance and extends the life of your compressor.
- Drain Tank Daily: Open the drain valve at the bottom of the tank daily after each use to release accumulated condensation. Failure to do so can lead to rust and damage to the tank.
- Clean Air Filter: Periodically inspect and clean the air filter to ensure proper airflow and prevent debris from entering the pump.
- General Cleaning: Keep the compressor clean and free of dust and debris. Use a damp cloth for cleaning; avoid harsh chemicals.
- Oil-Free Pump: This compressor features an oil-free pump, requiring no lubrication maintenance.

Figure 4: Close-up view of the compressor's underside, indicating the location of the drain valve for daily condensation release.
Troubleshooting
| Problem | Possible Cause | Solution |
|---|---|---|
| Compressor does not start or stops unexpectedly. |
|
|
| Air leaks. |
|
|
| Compressor runs continuously. |
|
|
Specifications
| Feature | Detail |
|---|---|
| Brand | McGraw |
| Model Number | 792363575676 |
| Voltage | 110 Volts |
| Capacity | 3 Gallons |
| Maximum Pressure | 110 PSI |
| Horsepower | 1/3 HP (0.33 Horsepower) |
| Pump Type | Oil-Free |
| Noise Level | 62 dB |
| Item Weight | 16.34 pounds |
| Dimensions (L x W x H) | 14.7 x 14.6 x 13.1 inches |
| Recommended Uses | Nailing, Stapling, Inflation, Cleaning |
Warranty and Support
For warranty information, technical support, or to purchase replacement parts, please contact McGraw customer service. Refer to your product packaging or the manufacturer's website for the most current contact details.
Note: Protection plans are available for extended coverage. Please refer to the product listing or contact your retailer for details on available plans.
For assistance, you may also refer to the contact information provided on the product label: WE ARE HERE TO HELP FOR ASSISTANCE, CONTACT TECHNICAL SUPPORT AT 1-888-866-5797
Related documents792363575676


Ask a question about this manual
Ask about setup, troubleshooting, compatibility, parts, safety, or missing instructions. Manuals+ will review the question and use this page’s manual context to help answer it.