1. Introduction
This manual provides detailed instructions for the knntrooler D02M Programmable Timer Outlet. This device allows you to automate the power supply to electrical appliances based on programmed schedules, offering convenience and energy management. Please read this manual thoroughly before operation to ensure correct usage and to maximize the product's lifespan.
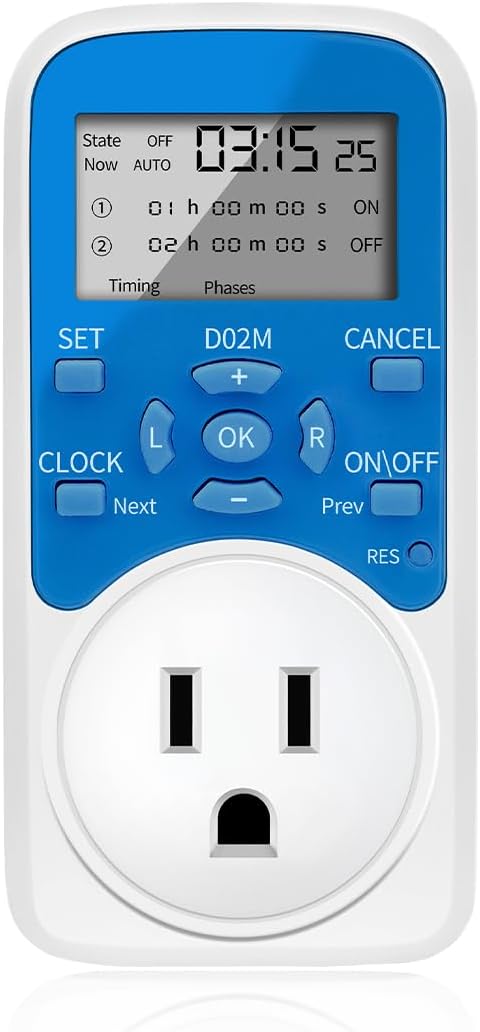
Figure 1: Front view of the knntrooler D02M Programmable Timer Outlet, showing the display, control buttons, and power outlet.
2. Product Overview
The knntrooler D02M is a versatile programmable timer outlet designed for automatic control of electrical devices. Key features include:
- Daily Clock Timing Function: Set up to 8 ON/OFF programs that repeat daily.
- Clear Display: On-time and off-time are displayed simultaneously for easy understanding.
- Cursor Operating System: Intuitive navigation using "L/R" buttons for cursor movement and "+/-" buttons for value changes.
- Second-Level Precision: Minimum setting can be adjusted to seconds for precise timing requirements.
- High Power Relay: Equipped with a 30A high-power relay to handle demanding electrical appliances without overload.
- Stable Circuit Design: Ensures reliable operation and a low failure rate.
- Intuitive Status Display: The screen displays "ON" or "OFF" and an indicator light illuminates when the jack has electrical output.
- Internal Rechargeable Battery: No replacement needed. If the screen is blank after prolonged storage, charge for 30 minutes and press "RES".
- Misoperation Prevention: The "OK" button confirms settings, preventing accidental changes.

Figure 2: Labeled diagram of the timer outlet's display and control buttons.
Button Functions:
- SET: Enters the timing settings screen.
- CLOCK: Enters the clock setting screen.
- L/R: Moves the cursor position during setting.
- +/-: Controls the number changes at the cursor position.
- OK: Confirms and executes the current settings.
- ON/OFF: Changes the current output status of the timer jack (manual override).
- CANCEL: Cancels the current settings.
- RES: Restarts the timer (reset button).
- Next/Prev: Navigates between timing groups.
3. Setup
- Initial Power-Up: If the screen does not display after unpacking, plug the timer into a power supply for at least 30 minutes to charge the internal rechargeable battery.
- Resetting the Device: After charging, press the "RES" button (a small recessed button, often requiring a pen tip) to restore the display and reset all settings to default.
4. Operating Instructions
4.1 Setting the Current Time (Clock)
- Press the "CLOCK" button to enter the clock setting screen.
- Use the "L" and "R" buttons to move the cursor to the desired digit (hour, minute, second).
- Use the "+" and "-" buttons to adjust the time.
- Once the current time is set, press the "OK" button to save and exit the clock setting mode.


Figure 3: Sequence of button presses for setting the clock.
4.2 Setting Timing Programs (Up to 8 Groups)
- Press the "SET" button to enter the timing setting screen. The screen will display "01" indicating the first timing group.
- Use the "L" and "R" buttons to move the cursor to the desired digit (hour, minute, second) for the ON time.
- Use the "+" and "-" buttons to adjust the ON time.
- Repeat steps 2 and 3 for the OFF time of the current group.
- After setting one group, press the "Next" button to proceed to the next timing group (e.g., "02"). You can set up to 8 groups.
- After setting all desired timing groups, press the "OK" button to save all timing programs and activate them. The timer will now execute these programs daily.

Figure 4: Example of daily ON/OFF timing function with multiple groups.
4.3 Manual ON/OFF Control
The "ON/OFF" button allows you to manually change the current output state of the timer jack without affecting the programmed schedule.
- If the timer jack is currently ON and you wish to turn it OFF manually, press the "ON/OFF" button. The display will change to "OFF".
- If the timer jack is currently OFF and you wish to turn it ON manually, press the "ON/OFF" button. The display will change to "ON".
- After changing the state, press the "OK" button to confirm the manual override. The timer's programmed functions will continue to execute as planned, and the manual override will be temporary until the next programmed event.
5. Maintenance
- Battery: The timer features an internal rechargeable battery that does not require replacement.
- Cleaning: Wipe the device with a dry, soft cloth. Do not use liquid cleaners or immerse the device in water.
- Storage: Store the timer in a cool, dry place away from direct sunlight and extreme temperatures.
6. Troubleshooting
- Screen is blank/Timer not responding:
This may occur after long periods of non-use due to the internal battery discharging. Plug the timer into a power supply for at least 30 minutes to charge. Then, press the "RES" button to restore the display and functionality.
- Timer not executing programs:
Ensure that all timing settings were confirmed by pressing the "OK" button after programming. Also, check the current time setting to ensure it is accurate.
- Difficulty in programming:
The timer uses a cursor operating system. Ensure you are using the "L/R" buttons to move the cursor and the "+/-" buttons to change values. Always press "OK" to confirm each step or group.
- Indicator light is off but device is ON (or vice versa):
The indicator light corresponds to the electrical output of the jack. If the screen displays "ON" and the light is off, or "OFF" and the light is on, there might be an internal issue. Ensure the device is properly plugged in and the appliance is functional. If the issue persists, contact support.
7. Specifications
| Feature | Detail |
|---|---|
| Brand | knntrooler |
| Model Number | D02M |
| Material | Polycarbonate |
| Product Dimensions (D x W x H) | 2.17" x 4.33" x 1.73" |
| Item Weight | 0.14 Kilograms (4.9 ounces) |
| Number of Settings | 8 (timing groups) |
| UPC | 788390463970 |
| Screen Size | 2.5 Inches |
| Battery | 1 LR44 batteries required (included, internal rechargeable) |
| Nominal Voltage | AC85V-265V |
| Maximum Output | 20A |

Figure 5: Dimensions of the timer outlet.

Figure 6: Common application scenarios for the timer outlet.
8. Warranty and Support
No specific warranty information is provided in the product details. For support or warranty inquiries, please contact the manufacturer, knntrooler, or your retailer directly.