HUZARO Combat 3.0 Grey Gaming Chair User Manual
Model: Combat 3.0 Grey
Introduction
Thank you for choosing the HUZARO Combat 3.0 Grey Gaming Chair. This manual provides essential information for the safe assembly, operation, and maintenance of your new gaming chair. Please read this manual thoroughly before assembly and retain it for future reference.
The HUZARO Combat 3.0 is designed for optimal ergonomics and comfort, featuring a ventilated Air Mesh fabric for excellent air circulation, a solid reinforced construction, and a comfortable fold-out footrest. Its design is inspired by the world of gaming and technology, making it a perfect addition to any gaming or office setup.

Image: Front view of the HUZARO Combat 3.0 Grey Gaming Chair, showcasing its ergonomic design and grey fabric.
Safety Information
- Ensure all parts are present and undamaged before assembly. Do not use if any parts are missing or damaged.
- Follow assembly instructions carefully. Incorrect assembly can lead to instability and injury.
- Do not stand on the chair. Use it only for sitting.
- Do not exceed the maximum weight capacity of 140 kg (308 lbs).
- Keep children and pets away during assembly. Small parts can be a choking hazard.
- Avoid placing the chair near heat sources or in direct sunlight for prolonged periods, as this may damage the material.
- Regularly check all bolts and screws to ensure they are tight. Retighten if necessary.
- Use the chair on a flat, stable surface.
Package Contents
Before beginning assembly, verify that all components listed below are present in your package. If any parts are missing or damaged, please contact customer support.
| Component | Quantity |
|---|---|
| Backrest | 1 |
| Seat Base | 1 |
| Armrests | 2 |
| Gas Lift Cylinder | 1 |
| Gas Lift Cover | 1 |
| Star Base (5-star) | 1 |
| Casters (Wheels) | 5 |
| Mechanism (Tilt/Height Adjustment) | 1 |
| Footrest Assembly | 1 |
| Hardware Kit (Screws, Allen Wrench) | 1 |
Assembly Instructions
Please follow these steps carefully for proper assembly. It is recommended to assemble the chair on a soft, clean surface to prevent scratches.
Step 1: Attach Casters to Star Base
Insert each of the five casters into the holes at the end of each leg of the star base. Push firmly until they click into place.

Image: Close-up of a polyurethane rubber caster wheel, designed to protect floors.
Step 2: Install Gas Lift Cylinder
Place the gas lift cylinder into the center hole of the assembled star base. Cover it with the gas lift cover.
Step 3: Attach Mechanism to Seat Base
Align the mechanism with the pre-drilled holes on the underside of the seat base. Ensure the front of the mechanism faces the front of the seat. Secure it with the provided screws and Allen wrench. Tighten all screws firmly.
Step 4: Attach Armrests to Seat Base
Attach the armrests to the sides of the seat base using the designated screws. Ensure they are oriented correctly (left and right). Tighten screws securely.
Step 5: Attach Backrest to Seat Base
Align the backrest with the mounting plates on the seat base. Secure it using the remaining screws. It is often easier to do this with the chair lying on its side. Ensure all screws are fully tightened.
Step 6: Attach Footrest Assembly
Locate the attachment points for the footrest assembly, typically under the seat. Slide and secure the footrest mechanism according to the specific design. Ensure it can extend and retract smoothly.
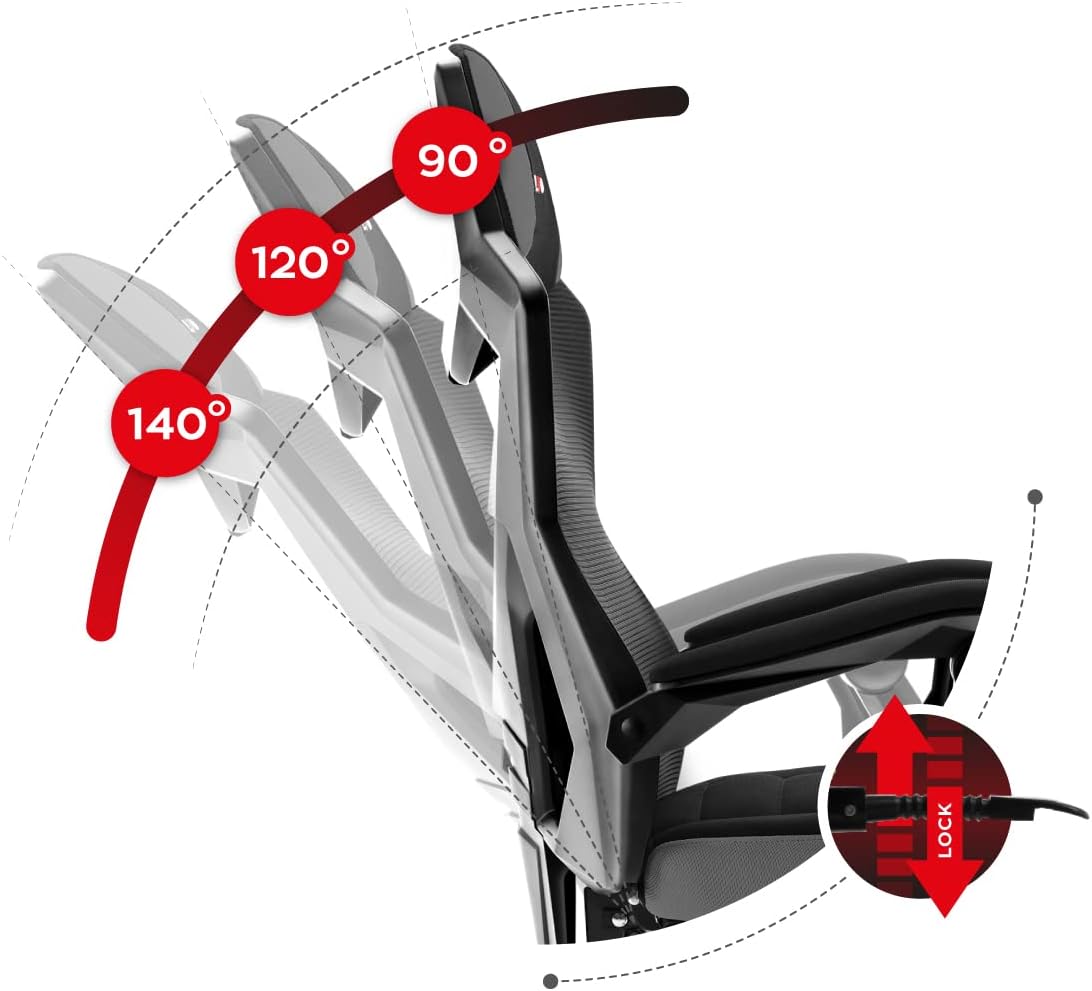
Image: Side view of the gaming chair with its integrated footrest fully extended, demonstrating its reclining capability.
Step 7: Connect Assembled Top to Base
Carefully place the assembled seat and backrest onto the gas lift cylinder. The tapered hole in the mechanism should fit snugly over the top of the gas lift cylinder. Apply gentle downward pressure to secure it.
Once assembled, sit on the chair to ensure all components are properly seated and stable.
Operating Instructions
Height Adjustment
To adjust the chair's height, locate the lever on the right side, beneath the seat. While seated, pull the lever up to lower the chair. To raise the chair, stand up slightly to remove weight from the seat, then pull the lever up. Release the lever at the desired height.
Backrest Recline Adjustment
The chair features a cradle mechanism allowing the backrest to be tilted. Locate the recline lever on the right side of the chair, typically near the seat. Pull the lever up to unlock the backrest, then lean back to your desired angle (up to 140 degrees). Release the lever to lock the backrest in position.

Image: Diagram illustrating the adjustable backrest, showing recline angles of 90, 120, and 140 degrees, with a lock mechanism.
Footrest Operation
To extend the footrest, pull it out from underneath the seat. To retract it, push it back in until it is fully stored. The footrest is designed for comfortable leg support when reclining.
Maintenance and Care
- Cleaning: For general cleaning, wipe the chair with a soft, damp cloth. For fabric areas, use a mild soap solution if necessary, and then wipe with a clean, damp cloth to remove any soap residue. Do not use harsh chemicals or abrasive cleaners.
- Ventilated Fabric: The Air Mesh fabric is designed for excellent air circulation. Ensure it remains free of excessive dust or debris to maintain its breathability.
- Casters: Periodically check the casters for hair or debris that may impede smooth movement. Clean as needed. The polyurethane rubber wheels are designed to protect floors from scratches.
- Hardware: Every 3-6 months, check all screws and bolts to ensure they are tight. Retighten any loose fasteners to maintain stability and safety.
- Avoid Overloading: Do not exceed the maximum weight capacity of 140 kg.
- Storage: If storing the chair, do so in a cool, dry place away from direct sunlight and extreme temperatures.

Image: Diagram highlighting the ventilated Air Mesh fabric and foam padding, emphasizing air circulation and comfort.
Troubleshooting
| Problem | Possible Cause | Solution |
|---|---|---|
| Chair wobbles or is unstable | Loose screws; uneven floor; improper assembly. | Check and tighten all assembly screws. Ensure the chair is on a flat surface. Re-assemble if necessary, ensuring all parts are correctly aligned. |
| Chair does not adjust height | Gas lift cylinder malfunction; lever not engaged. | Ensure the height adjustment lever is fully engaged. If the issue persists, the gas lift cylinder may need replacement. Contact customer support. |
| Backrest does not recline or lock | Recline mechanism jammed or damaged; lever not engaged. | Ensure the recline lever is fully engaged. Check for any obstructions in the mechanism. If damaged, contact customer support. |
| Casters do not roll smoothly | Debris (hair, lint) caught in wheels; damaged casters. | Turn the chair over and remove any debris from the caster wheels. If casters are damaged, they may need replacement. |
| Squeaking noises | Loose connections; friction between parts. | Tighten all screws. Apply a small amount of silicone lubricant to moving parts or joints if the noise persists. |
Technical Specifications
- Model Name: Combat 3.0 Grey
- Brand: HUZARO
- Color: Grey
- Material: Ventilated Air Mesh Fabric, Foam Fill
- Maximum Weight Recommendation: 140 kg (308 lbs)
- Product Dimensions: 19.69 x 28.35 x 41.73 inches (50 x 72 x 106 cm)
- Item Weight: 37.8 pounds (17.14 kg)
- Backrest Recline Angle: Up to 140 degrees
- Special Features: Fold-out footrest, Height adjustment, Reclining backrest, Polyurethane Rubber Wheels
- Manufacturer: Meester Group Sp. z o.o.

Image: Detailed diagram showing the dimensions of the HUZARO Combat 3.0 Grey Gaming Chair in centimeters.
Warranty and Support
For warranty information or technical support, please refer to the warranty card included with your purchase or contact HUZARO customer service directly. Our dedicated customer service team is available to assist with any questions or concerns regarding your Combat 3.0 Grey Gaming Chair.
Please have your model number (Combat 3.0 Grey) and purchase date ready when contacting support.