1. Introduction
Thank you for choosing the FARBIN 12V Car Horn Relay Wiring Harness Kit. This kit is designed to provide a reliable and efficient solution for controlling your vehicle's horn, especially when upgrading to higher current horns or replacing existing wiring. It includes an 80A relay, a push-button switch, and a 3-meter wiring harness for convenient installation in 12V DC automotive systems.
Please read this manual carefully before installation and operation to ensure proper use and safety. Keep this manual for future reference.
2. Product Overview and Components
The FARBIN Car Horn Relay Wiring Harness Kit includes the following main components:
- 80A Relay: A high-capacity relay designed for large current applications.
- Relay Socket: Pre-wired socket for easy connection to the relay.
- Push Button Switch: A momentary-type switch with adhesive backing and a 3-meter wire.
- Wiring Harness: Pre-assembled wires with various connectors for power, ground, and horn connections.
- 30A Fuse and Fuse Box: For circuit protection.
- Cable Ties: For securing wiring.

Figure 2.1: Overview of the FARBIN 12V Car Horn Relay Wiring Harness Kit components.

Figure 2.2: Detailed diagram illustrating the FARBIN Relay Wiring Method and its labeled components, including the 80A relay, relay socket, horn wires, power cord, 30A fuse, and cable ties. All wires are copper, and all copper parts are riveted.

Figure 2.3: Close-up view of the 12V 80A relay, showing its transparent housing and copper coil.

Figure 2.4: Diagram highlighting the features of the push button switch, including its compact size (28mm diameter, 10mm height), 3m long copper wire, and waterproof/dustproof design for stable quality and easy installation.

Figure 2.5: Side view of the push button switch, illustrating its compact design and the adhesive backing for easy mounting.
3. Specifications
| Feature | Specification |
|---|---|
| Model Number | FB-JDQ |
| Voltage | 12 Volts DC |
| Current Rating | 80 Amperes |
| Wattage | 960 W |
| Product Dimensions (L x W x H) | 19 x 11 x 5 cm |
| Item Weight | 181 g |
| Material | Polycarbonate, Copper |
| Contact Material | Copper |
| Contact Type | Normally Open |
| Mounting Type | Panel Mount (for button) |
| Button Wire Length | 3 meters (approx. 118 inches) |
| Relay Power Cord Length | 1.5 meters (approx. 59 inches) |
4. Safety Information
- Professional Installation Recommended: Installation of automotive electrical components should ideally be performed by a qualified professional or individuals with relevant electrical expertise. Incorrect wiring can lead to electrical shorts, component damage, or fire.
- Disconnect Power: Always disconnect the vehicle's battery (negative terminal first) before attempting any electrical installation or maintenance.
- Verify Voltage: Ensure your vehicle operates on a 12V DC system. This kit is not compatible with other voltage systems.
- Fuse Protection: The kit includes a 30A fuse. Do not bypass or replace it with a fuse of a higher rating, as this can lead to overheating and fire hazards.
- Secure Wiring: Ensure all wiring is securely connected, insulated, and routed away from hot or moving parts to prevent damage and short circuits. Use the provided cable ties.
- Water and Heat: While the button is waterproof/dustproof, ensure all electrical connections are protected from moisture and excessive heat.
5. Setup and Installation
The following steps outline the installation process. Refer to the wiring diagrams for visual guidance. The installer must have relevant expertise.
5.1 Wiring Diagram Overview

Figure 5.1: Comprehensive wiring diagram showing connections for the battery, horns, 80A relay, 30A fuse, and push button switch. This diagram illustrates both independent button wiring and car horn button control wiring methods.
5.2 Step-by-Step Installation
- Prepare for Installation:
- Ensure the vehicle's ignition is off.
- Disconnect the negative terminal of the vehicle's battery to prevent accidental shorts.
- Identify a suitable mounting location for the relay and the push button switch. The button has adhesive backing for easy placement.
- Connect to Battery:
- Locate the red wire (approx. 150cm long, with a wire sheath of Ø11mm) from the relay harness. This is the main positive (+) power supply.
- Connect this red wire to the positive (+) terminal of your vehicle's battery. Ensure the 30A fuse is properly seated in its holder.
- Locate the black and white wires (each 25cm long) from the relay power cord. These are for the relay's negative (-) connection. Connect these to a reliable chassis ground point or the negative terminal of the battery.
- Connect to Horns:
- Identify the two sets of wires for Horn A and Horn B from the relay socket. These typically consist of black wires (30cm) and yellow wires (25cm).
- Connect the black wires to one terminal of each horn.
- Connect the yellow wires to the other terminal of each horn.
- If your car has only one horn plug, connect the blue wire to the horn and the white wire to the negative or ground.
- Connect Push Button Switch:
- The push button switch has a 3-meter copper wire.
- Connect one wire from the push button to the positive (+) terminal of the battery or a switched 12V source.
- Connect the other wire from the push button to the blue wire of the relay harness. This blue wire acts as the trigger for the relay.
- The button can be mounted in various locations using its adhesive backing, such as next to the keyhole, near the meter, or above the shift handle.
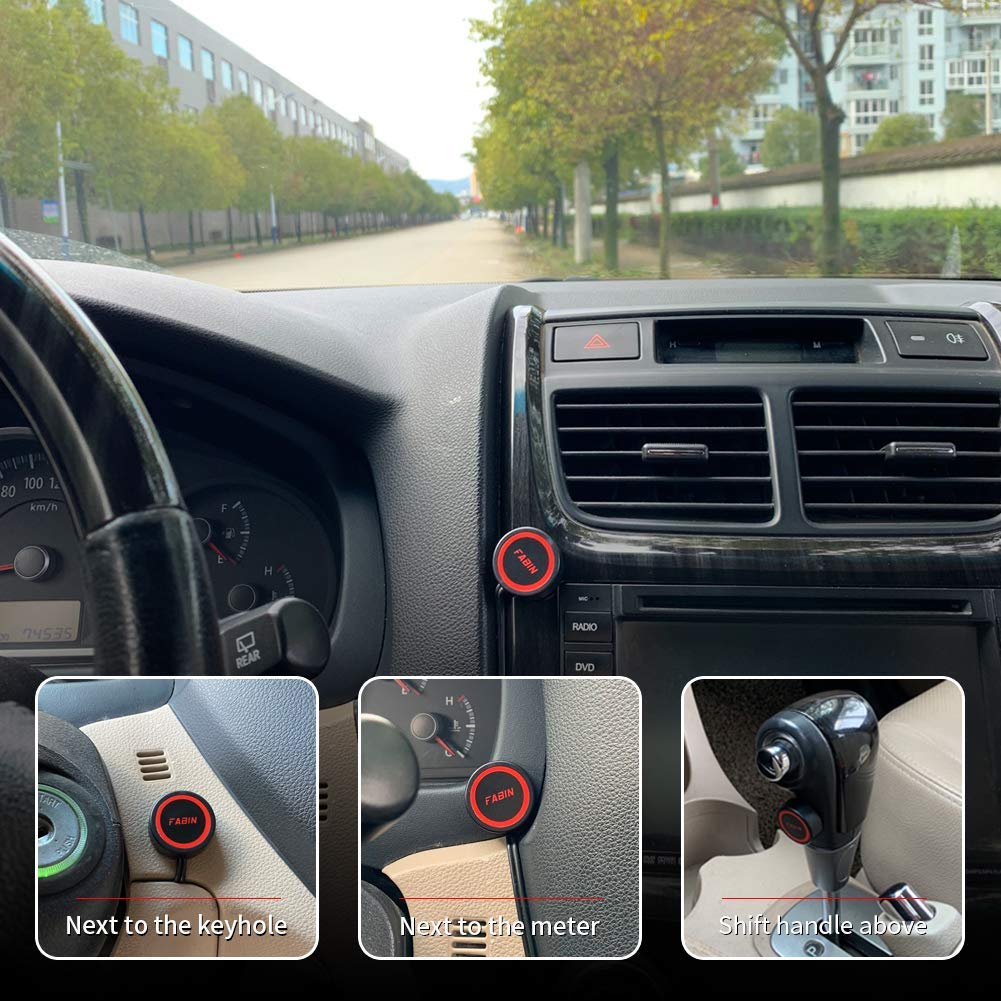
Figure 5.2: Examples of suitable installation locations for the push button switch within a car's interior, demonstrating its versatility.
- Secure Wiring:
- Use the provided cable ties to neatly secure all wires, preventing them from dangling or interfering with moving parts.
- Ensure all connections are tight and properly insulated.
- Test System:
- Reconnect the negative terminal of the vehicle's battery.
- Turn on the vehicle's ignition (if necessary for horn operation).
- Press the newly installed push button to test the horn functionality.
6. Operation
The push button switch included in this kit is a momentary type. To operate the horn:
- Press and Hold: Press and hold the red push button. This will activate the relay, which in turn powers the horn(s).
- Release: Release the button to deactivate the horn.
This momentary action is ideal for horn applications, PC power switches, or kill switches where a temporary circuit closure is required.
7. Maintenance
The FARBIN Car Horn Relay Wiring Harness Kit is designed for durability and requires minimal maintenance. Follow these guidelines to ensure long-term performance:
- Regular Inspection: Periodically check all wiring connections for tightness and signs of wear or corrosion. Ensure insulation is intact.
- Fuse Check: If the horn stops working, check the 30A fuse in the fuse box. Replace it only with a fuse of the same rating (30A).
- Cleanliness: Keep the relay and button free from excessive dirt and moisture. While the button is waterproof/dustproof, extreme conditions should be avoided.
- Relay Life: The relay has a mechanical life of over 10,000 cycles. If the relay fails after extensive use, it can be replaced.
8. Troubleshooting
If you encounter issues with your FARBIN Car Horn Relay Wiring Harness Kit, refer to the following troubleshooting steps:
| Problem | Possible Cause | Solution |
|---|---|---|
| Horn does not sound when button is pressed. |
|
|
| Horn sounds continuously or intermittently. |
|
|
| Weak horn sound. |
|
|
9. Warranty and Support
FARBIN products are manufactured to high-quality standards. For specific warranty information, please refer to the product packaging or contact your retailer. If you require technical assistance or have questions regarding the installation or operation of this product, please contact FARBIN customer support through your purchase platform or the official FARBIN website.