
Introduction
This manual provides essential information for the installation, operation, and maintenance of the Lysee Laptop Motherboard, compatible with Hasee CW65S, W650SJ, and K650D laptop models. Please read this manual thoroughly before proceeding with any installation or troubleshooting steps to ensure proper functionality and to prevent damage to your components.
Safety Information
- Always disconnect power from the laptop before handling internal components.
- Wear an anti-static wrist strap to prevent electrostatic discharge (ESD) damage to sensitive electronic components.
- Handle the motherboard by its edges to avoid touching components or connectors.
- Ensure proper ventilation during operation.
- Keep liquids away from the motherboard and laptop.
Product Overview
The Lysee Laptop Motherboard is a replacement or upgrade component designed for specific laptop models. It features an Intel chipset and supports DDR3 memory. This motherboard does not include an integrated CPU or graphics card.

Figure 1: Top view of the Lysee Laptop Motherboard, showing the CPU socket, memory slots, and various integrated circuits. This side is typically visible when the laptop's bottom cover is removed.
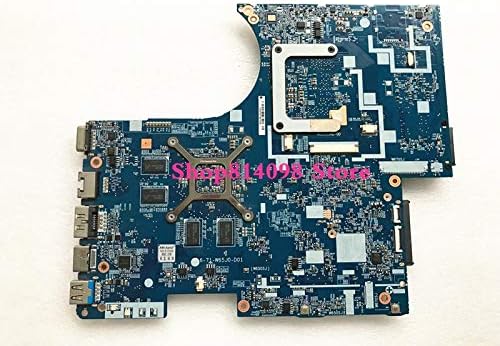
Figure 2: Bottom view of the Lysee Laptop Motherboard, illustrating the mounting points and the bracket for the CPU heatsink. This side faces the laptop chassis.
Installation Guide
Important: Before beginning installation, ensure all other laptop components are in good working condition. A faulty component (CPU, RAM, video cable, heatsink, LCD, AC adapter, power jack, daughter board, etc.) can prevent the motherboard from functioning correctly or even cause damage.
Required Tools:
- Small Phillips head screwdriver
- Anti-static wrist strap
- Plastic spudger (optional, for prying)
- Thermal paste (if reinstalling CPU/GPU)
Installation Steps:
- Preparation: Disconnect the laptop from all power sources (AC adapter and battery).
- Disassembly: Carefully disassemble your laptop according to its specific service manual to access the existing motherboard. This typically involves removing the bottom cover, keyboard, and other components.
- Remove Old Motherboard: Disconnect all cables (display, power, data, etc.) and unscrew the old motherboard from the chassis. Gently lift it out.
- Transfer Components: Transfer essential components such as the CPU, RAM modules, and Wi-Fi card from your old motherboard to the new Lysee motherboard. Ensure the CPU is properly seated and secured, and apply new thermal paste if necessary.
- Install New Motherboard: Carefully place the new Lysee motherboard into the laptop chassis, aligning it with the screw posts. Secure it with the appropriate screws.
- Reconnect Cables: Reconnect all cables that were detached during disassembly. Ensure all connections are firm and correctly oriented.
- Reassembly: Reassemble the laptop, ensuring all components are properly seated and all screws are tightened.
- Initial Power On: Connect the AC adapter (do not connect the battery initially). Power on the laptop to check for basic functionality (e.g., POST, display output).
- Full Test: If initial power-on is successful, install the battery and perform a full system test, including operating system boot, peripheral checks, and stress tests.
Operating Considerations
Once installed, the motherboard operates as the central hub for your laptop's components. Ensure that all drivers for your operating system are up-to-date to guarantee optimal performance and compatibility with the new motherboard. Regularly check for BIOS updates from your laptop manufacturer (Hasee) if available, as these can improve stability and performance.
Maintenance
- Dust Removal: Periodically clean dust from the heatsink and fan assembly to prevent overheating. Use compressed air, ensuring the fan blades do not spin excessively.
- Thermal Paste: If you notice increased temperatures or thermal throttling, consider reapplying thermal paste to the CPU and GPU (if applicable) after a few years of use.
- Physical Inspection: Occasionally inspect the motherboard for any visible damage, loose connections, or bulging capacitors.
Troubleshooting
If you encounter issues after installing the motherboard, consider the following:
- No Power/No POST:
- Ensure the AC adapter is functional and correctly connected. Avoid using third-party adapters that may not meet specifications.
- Verify all internal power cables are securely connected to the motherboard.
- Reseat RAM modules and check if they are compatible (DDR3).
- Ensure the CPU is correctly seated and its heatsink is properly installed.
- Disconnect all non-essential peripherals (USB devices, external monitors) and try booting.
- Display Issues:
- Check the display cable connection to the motherboard and LCD.
- Ensure the integrated graphics (if any) or discrete GPU is properly connected and functioning.
- System Instability/Crashes:
- Run memory diagnostic tools to check RAM integrity.
- Monitor CPU and GPU temperatures to rule out overheating.
- Ensure all drivers are correctly installed and updated.
- Component Compatibility:
- Verify that all other components (CPU, RAM, etc.) are compatible with the specific motherboard model (6-71-W65J0-D02 or 6-71-W65J0-D01).
- As mentioned in the product description, ensure all other components of your laptop are good. The motherboard will not function if there are defective components.
Specifications
| Feature | Detail |
|---|---|
| Brand | Lysee |
| Model Numbers | 6-71-W65J0-D02, 6-71-W65J0-D01 |
| Compatible Laptop Models | Hasee CW65S, W650SJ, K650D |
| Chipset Manufacturer | Intel |
| Graphics Card Type | Non-Integrated (Requires discrete GPU or CPU with integrated graphics) |
| CPU Included | NO |
| Memory Type | DDR3 |
| RAM Technology | DDR3 |
| Graphics Card Interface | PCI, Integrated (refers to slot/connection type, not integrated GPU) |
| Condition | Used (as per product data) |
Warranty and Support
Warranty Period: The product typically comes with a 45-day warranty period, starting from the date the buyer signs for the package. Please refer to your purchase agreement for exact terms.
Customer Support: If you encounter any issues with the product, please contact the seller directly before initiating a dispute. Provide detailed information about the problem to facilitate a quicker resolution.
Payment Methods: Accepted payment methods generally include Visa, credit card, Western Union, T/T, and Pay-Pal.
Shipping Time: Delivery typically takes 2-4 business days.
Customs Duties: Any applicable customs duties depend on the local customs decisions of the buyer's country.
Pre-shipment Testing: All motherboards are tested before shipment to ensure functionality.
Disclaimer
This manual is for informational purposes only. Lysee is not responsible for any damage or injury caused by improper installation, misuse, or unauthorized modifications. Professional installation is recommended.