
1. Introduction
This manual provides essential information for the installation, operation, and maintenance of your Lysee Motherboard, models 696234-001 and 701413-001. This motherboard is designed for use with HP Pro 3500 Desktop systems, featuring an H61 chipset and LGA-1155 CPU socket. Please read this manual thoroughly before proceeding with installation to ensure proper setup and functionality.
2. Safety Information
Observe the following safety precautions to prevent damage to the motherboard and injury to yourself:
- Always disconnect the power supply from the wall outlet before installing or removing any components.
- Wear an anti-static wrist strap or frequently touch a grounded metal object to discharge static electricity before handling the motherboard or other components.
- Handle the motherboard by its edges to avoid touching sensitive components.
- Ensure proper ventilation within the computer case to prevent overheating.
- Keep the motherboard away from moisture and extreme temperatures.
- Do not attempt to repair the motherboard yourself. Refer to qualified service personnel.
3. Package Contents
Verify that all items are present in your package. If any item is missing or damaged, contact your retailer.
- Lysee Motherboard (Model 696234-001 or 701413-001)
- I/O Shield (may be included)
- SATA Data Cables (may be included)
- User Manual (this document, or a quick start guide)
4. Setup and Installation
Follow these steps carefully for proper installation of the motherboard into your HP Pro 3500 Desktop system.
4.1 Pre-installation Checks
- Ensure your computer case is compatible with the ATX form factor.
- Gather necessary tools: Phillips head screwdriver, anti-static wrist strap.
- Prepare your CPU (LGA 1155 compatible), CPU cooler, and DDR3 RAM modules.
4.2 Motherboard Installation
- Prepare the Case: Open your computer case and install the I/O shield into the rear panel opening.
- Install CPU:
- Open the CPU socket lever.
- Carefully align the CPU (LGA 1155) with the socket, ensuring the gold triangle on the CPU matches the triangle on the socket.
- Gently place the CPU into the socket without forcing it.
- Close the socket lever to secure the CPU.
- Install CPU Cooler: Apply thermal paste (if not pre-applied) and install the CPU cooler according to its manufacturer's instructions. Connect the CPU fan cable to the "CPU_FAN" header on the motherboard.
- Install RAM:
- Open the clips on both ends of the DIMM slots.
- Align the RAM module's notch with the slot's key.
- Press down firmly on both ends of the RAM module until the clips snap into place. This motherboard supports 2 memory slots.
- Mount Motherboard: Carefully place the motherboard into the case, aligning the screw holes with the standoffs. Secure the motherboard with screws.
4.3 Connecting Peripherals and Power
- Connect Power Supply:
- Connect the 24-pin ATX power connector from your power supply to the corresponding header on the motherboard.
- Connect the 4-pin or 8-pin ATX 12V CPU power connector to the appropriate header near the CPU socket.
- Connect Storage Devices: Connect SATA data cables from your hard drives or SSDs to the SATA ports on the motherboard. Connect power cables from the power supply to these devices.
- Connect Front Panel Cables: Connect the power button, reset button, HDD LED, power LED, and USB/audio headers from your case to the corresponding pins on the motherboard. Refer to your case manual for specific pin assignments if needed.
- Connect Expansion Cards: Install any necessary expansion cards (e.g., graphics card) into the appropriate PCIe slots and secure them.
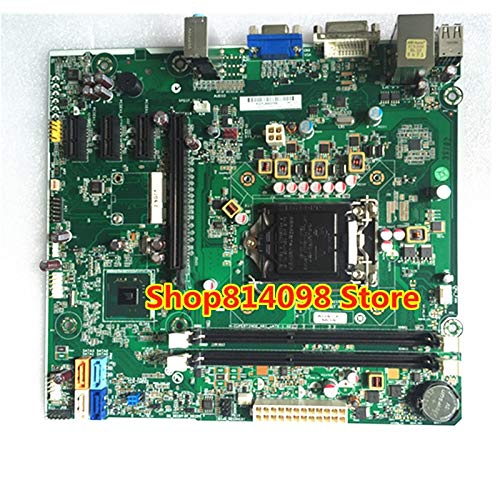
Image 1: Lysee Motherboard (model 696234-001 or 701413-001) with CPU and RAM installed, ready for case mounting. This image illustrates the general appearance and layout of the motherboard.
5. Operating Instructions
After completing the installation, you can power on your system.
- Initial Power On: Connect your monitor, keyboard, and mouse. Plug the power cord into the power supply and a wall outlet. Press the power button on your computer case.
- BIOS/UEFI Setup: During startup, press the designated key (commonly DEL, F2, F10, or F12) to enter the BIOS/UEFI setup utility. Here you can configure boot order, system time, and other hardware settings.
- Operating System Installation: Install your preferred operating system from a bootable USB drive or DVD.
6. Maintenance
Regular maintenance helps ensure the longevity and stable performance of your motherboard and system.
- Dust Removal: Periodically clean dust from inside your computer case, especially from fans and heatsinks, using compressed air. Ensure the system is powered off and unplugged before cleaning.
- BIOS/UEFI Updates: Check the manufacturer's website (HP or Lysee, if applicable) for BIOS/UEFI updates. Updates can improve compatibility, stability, and performance. Follow update instructions carefully to avoid system damage.
- Driver Updates: Keep your system drivers (chipset, audio, network, etc.) updated for optimal performance and compatibility.
7. Troubleshooting
If you encounter issues, refer to the following common troubleshooting steps:
| Problem | Possible Cause / Solution |
|---|---|
| No Power / System Does Not Turn On |
|
| No Display on Monitor |
|
| System Boots but No Operating System |
|
| System Instability / Random Crashes |
|
8. Specifications
Key technical specifications for the Lysee Motherboard (Models 696234-001 / 701413-001):
- Brand: Lysee
- Compatible Devices: Personal Computer (HP Pro 3500 Desktop)
- CPU Socket: LGA 1155
- Processor Socket: LGA 1155
- Memory Slots Available: 2
- System Bus Standard Supported: SATA 3
- S/PDIF Connector Type: Optical (if applicable)
- Manufacturer: Lysee
- ASIN: B08T94VYYL
9. Warranty and Support
For warranty information and technical support, please refer to the documentation provided by your retailer or contact Lysee customer service. Keep your proof of purchase for warranty claims.
Note: Specific warranty terms may vary by region and retailer.