1. Introduction
This manual provides essential information for the safe and efficient operation of your IBELL 40LGDLX Convection Oven Toaster Grill (OTG). Please read all instructions carefully before using the appliance and retain this manual for future reference.
The IBELL 40LGDLX OTG is designed for versatile cooking, featuring an 1800W power output, convection technology for even heat distribution, and a motorized rotisserie. Its 40-liter capacity accommodates various dishes, making it suitable for a range of culinary tasks.
2. Product Components and Accessories
Familiarize yourself with the parts of your IBELL 40LGDLX OTG and its included accessories.
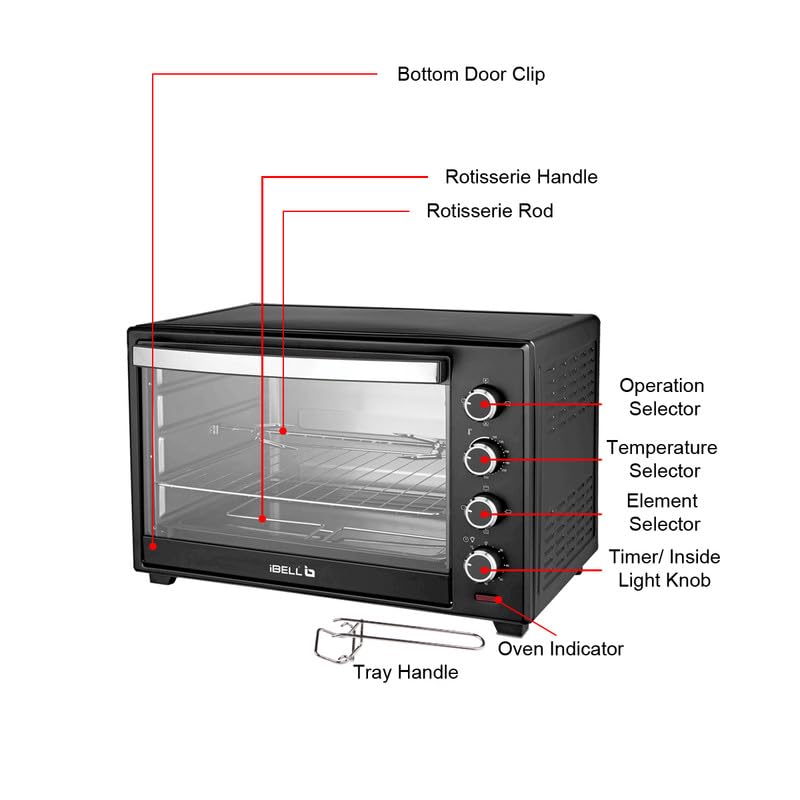
Figure 2.1: Main Components of the IBELL 40LGDLX OTG. This diagram illustrates the key external and internal parts, including the control knobs, rotisserie rod, and oven indicator light.
- Operation Selector: Used to choose the cooking mode.
- Temperature Selector: Adjusts the desired cooking temperature.
- Element Selector: Controls which heating elements (top, bottom, or both) are active.
- Timer/Inside Light Knob: Sets the cooking time and activates the internal oven light.
- Oven Indicator: Light that illuminates when the oven is heating.
- Rotisserie Handle: Used to insert and remove the rotisserie rod.
- Rotisserie Rod: For roasting whole poultry or large cuts of meat.
- Tray Handle: For safely handling hot trays and racks.
- Bottom Door Clip: Secures the oven door.
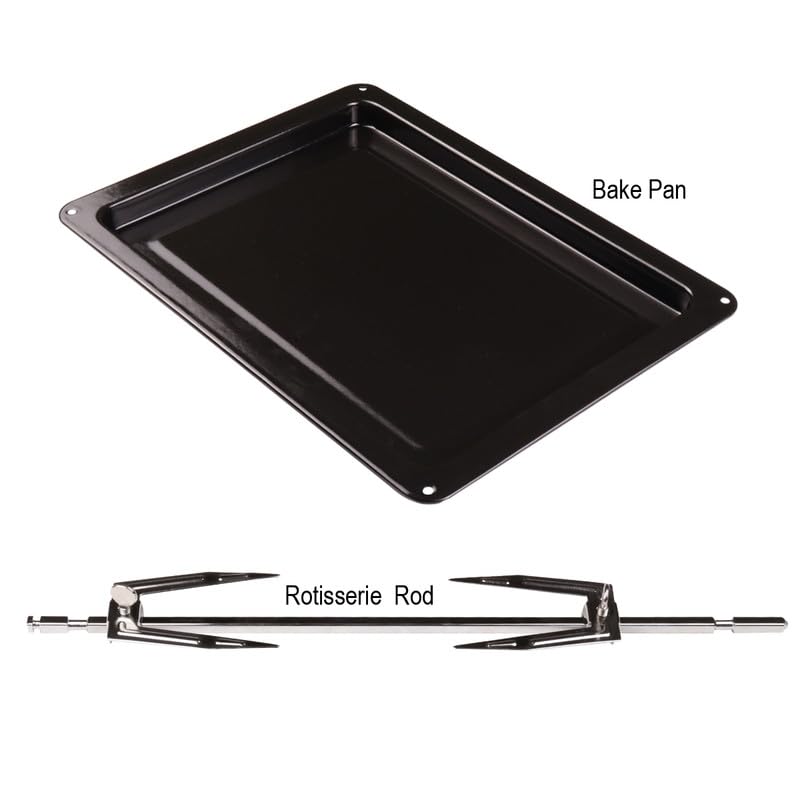
Figure 2.2: Bake Pan and Rotisserie Rod. The bake pan is used for baking and collecting drips, while the rotisserie rod is for spit-roasting.
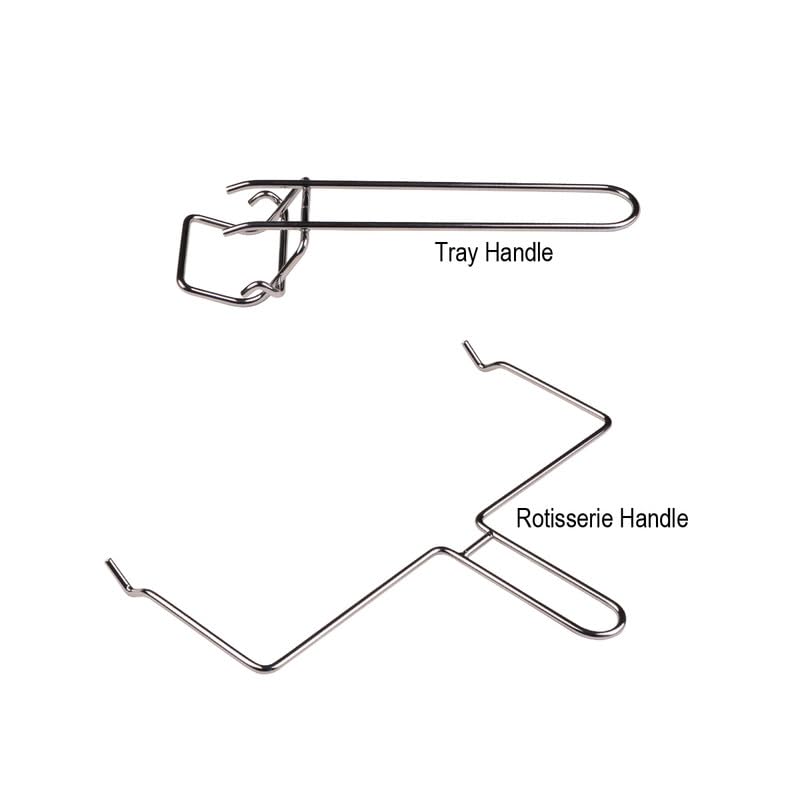
Figure 2.3: Tray Handle and Rotisserie Handle. These tools ensure safe handling of hot accessories during and after cooking.
3. Initial Setup
- Unpacking: Carefully remove the OTG and all accessories from the packaging. Remove any protective films or stickers.
- Placement: Place the oven on a stable, heat-resistant, and level surface. Ensure there is adequate ventilation around the appliance (at least 10-15 cm clearance on all sides). Do not place it near flammable materials or under cabinets.
- First Use (Burn-in): Before cooking food, operate the oven empty for approximately 15 minutes at the maximum temperature setting (250°C) with both top and bottom heating elements active. This helps to burn off any manufacturing residues and odors. A slight smoke or odor during this process is normal. Ensure the area is well-ventilated.
- Cleaning: After the burn-in, allow the oven to cool completely. Wipe the interior with a damp cloth. Wash all accessories (bake pan, wire rack, rotisserie rod, handles) with warm, soapy water, rinse, and dry thoroughly.
4. Operating Instructions
This section details how to use the control panel and various cooking functions.

Figure 4.1: Control Panel. The four knobs on the right side control operation, temperature, heating elements, and timer/light.
4.1. Control Panel Functions
- Operation Selector (Top Knob): Selects the primary cooking function (e.g., Bake, Grill, Toast, Convection).
- Temperature Selector (Second Knob from Top): Adjusts the oven temperature from 100°C to 250°C.
- Element Selector (Third Knob from Top): Choose heating elements:
- Top heating element only.
- Bottom heating element only.
- Both top and bottom heating elements.
- Convection fan with selected heating elements.
- Timer/Inside Light Knob (Bottom Knob): Sets the cooking time up to 60 minutes. Turning this knob counter-clockwise activates the internal oven light for continuous illumination.
4.2. General Operation Steps
- Place food on the appropriate accessory (wire rack, bake pan) and insert it into the desired rack position.
- Close the oven door securely.
- Set the Operation Selector to the desired cooking mode.
- Adjust the Temperature Selector to the required temperature.
- Choose the appropriate heating elements using the Element Selector.
- Turn the Timer/Inside Light Knob clockwise to set the cooking time. The oven will begin heating, and the oven indicator light will illuminate.
- When the set time elapses, a bell will ring, and the oven will automatically turn off.
- To stop cooking before the timer finishes, turn the Timer/Inside Light Knob counter-clockwise to the 'OFF' position.
- Use the tray handle or rotisserie handle to safely remove hot food and accessories.
4.3. Using the Rotisserie Function
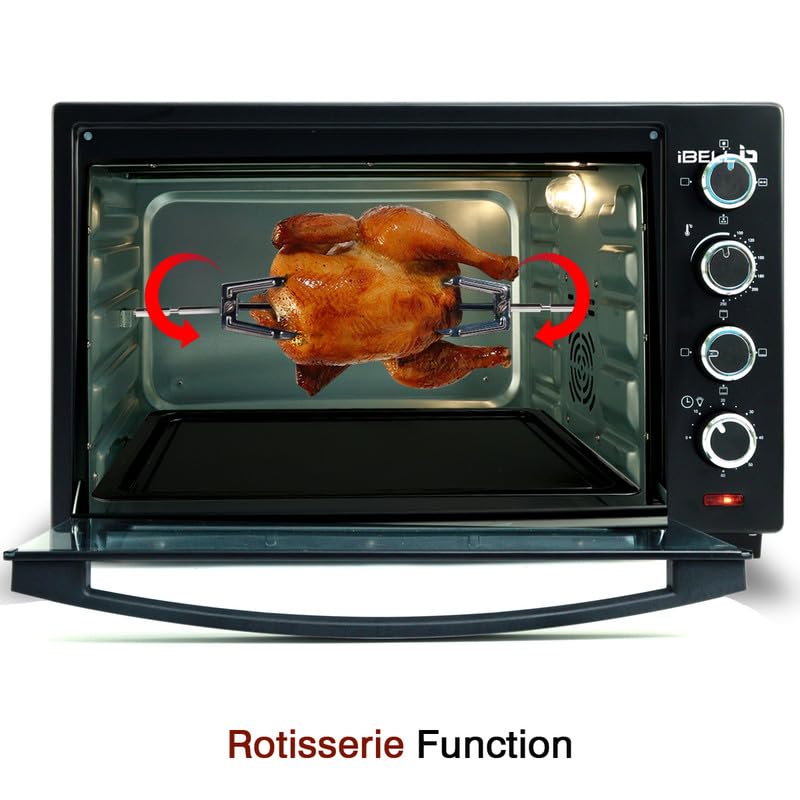
Figure 4.2: Rotisserie Function in Use. The motorized rotisserie ensures even roasting and browning of food.
- Secure the food (e.g., chicken) onto the rotisserie rod using the forks. Ensure the food is centered and balanced to prevent uneven rotation.
- Insert the pointed end of the rotisserie rod into the drive socket on the right side of the oven interior.
- Rest the square end of the rod onto the support on the left side.
- Place the drip tray (bake pan) on the bottom rack to catch drippings.
- Set the Operation Selector to the rotisserie function.
- Set the Temperature Selector and Element Selector as required for roasting.
- Set the Timer/Inside Light Knob to begin cooking.
- Monitor cooking progress through the glass door. Use the rotisserie handle to remove the hot rod and food once cooked.
5. Care and Cleaning
Regular cleaning ensures optimal performance and extends the life of your OTG.
- Always unplug the appliance from the power outlet and allow it to cool completely before cleaning.
- Exterior: Wipe the exterior surfaces with a soft, damp cloth. Do not use abrasive cleaners or scouring pads, as they may damage the finish.
- Interior: Wipe the interior walls with a damp cloth and mild detergent. For stubborn stains, a non-abrasive oven cleaner designed for conventional ovens can be used, following the product instructions. Ensure all cleaner residue is removed.
- Glass Door: Clean the glass door with a glass cleaner or a damp cloth. Avoid harsh chemicals that could scratch or damage the glass.
- Accessories: Wash the wire rack, bake pan, rotisserie rod, and handles in warm, soapy water. Rinse thoroughly and dry completely before storing or reusing. All accessories are not dishwasher safe unless specified.
- Never immerse the main unit, cord, or plug in water or any other liquid.
6. Troubleshooting Guide
Refer to this guide for common issues and their solutions.
| Problem | Possible Cause | Solution |
|---|---|---|
| Oven does not heat up. | Not plugged in; power outage; timer not set; temperature not set. | Ensure the appliance is plugged in. Check power supply. Set the timer and temperature correctly. |
| Rotisserie rod does not turn. | Food is too heavy or unbalanced; rotisserie function not selected; rod not properly seated. | Ensure food is balanced and within weight limits. Select the rotisserie function. Verify the rod is correctly inserted into the drive socket and support. |
| Uneven cooking. | Incorrect rack position; overcrowding; heating elements not correctly selected. | Use the recommended rack position. Avoid overcrowding the oven. Ensure the correct heating elements (top/bottom/both) are selected for the recipe. Utilize the convection fan for more even heat. |
| Smoke or odor during operation. | First use burn-off; food spills; excessive grease. | Normal during first use (see Initial Setup). Clean the oven interior and accessories thoroughly to remove food residue or grease. |
If the problem persists after attempting these solutions, please contact customer support.
7. Technical Specifications
Key technical details for the IBELL 40LGDLX OTG.
- Brand: IBELL
- Model: 40LGDLX
- Colour: Black
- Product Dimensions (D x W x H): 33D x 53W x 33H Centimeters
- Capacity: 40 Litres
- Wattage: 1800 Watts
- Special Feature: Temperature Control, Motorized Rotisserie, Convection Function, Illuminated Chamber
- Control Type: Knob
- Power Source Type: Electric
- Item Weight: 9.1 Kilograms
- Material Type: Iron (Body), Tempered Glass (Door)
- Manufacturer: Innovative Technologies
8. Warranty and Customer Support
Your IBELL 40LGDLX OTG comes with a comprehensive warranty and dedicated customer support.
8.1. Warranty Information
The product includes a 1 Year standard warranty. An additional 1 Year warranty is available upon registration. Registration must be completed within 30 days from the date of purchase to avail the extended warranty.
8.2. Customer Support
For any queries, assistance, or service requests, please contact:
- Manufacturer: Innovative Technologies, Fida's Building, Thottumugham P.O, Aluva, Kerala - 683105
- Phone: 1800 2020 260
- Email: connect@ibellstore.com