Introduction
Thank you for choosing the HOME VISION Heavy Duty Tilt TV Wall Mount. This manual provides detailed instructions for the safe and proper installation, operation, and maintenance of your new TV wall mount. Please read this manual thoroughly before installation and keep it for future reference. This mount is designed to securely hold most 32-84 inch flat/curved LED LCD OLED TVs, with a maximum VESA of 600x400mm and a loading capacity of up to 165 lbs.

Image: The HOME VISION Heavy Duty Tilt TV Wall Mount, showcasing its robust design and integrated level.
Safety Information
WARNING: Failure to read and follow all instructions may result in personal injury, property damage, or voiding of the warranty. If you do not understand these instructions or have doubts about the safety of the installation, please contact customer support.
- Do not install on drywall alone. This mount is designed for installation on 16-18-24 inch wooden studs or concrete/brick walls.
- Ensure the wall structure can safely support the combined weight of the mount and the TV.
- Do not exceed the maximum weight capacity of 165 lbs (75 kg).
- Verify VESA compatibility (Max VESA 600x400mm, Min VESA 100x100mm) and TV size (32-84 inches) before installation.
- Use appropriate safety gear during installation, including eye protection.
- Two people are recommended for installation to ensure safety and ease of handling.
- Keep all small parts away from children.
Package Contents
Please check the package contents against the list below to ensure all parts are present and undamaged. If any parts are missing or damaged, contact customer support immediately.
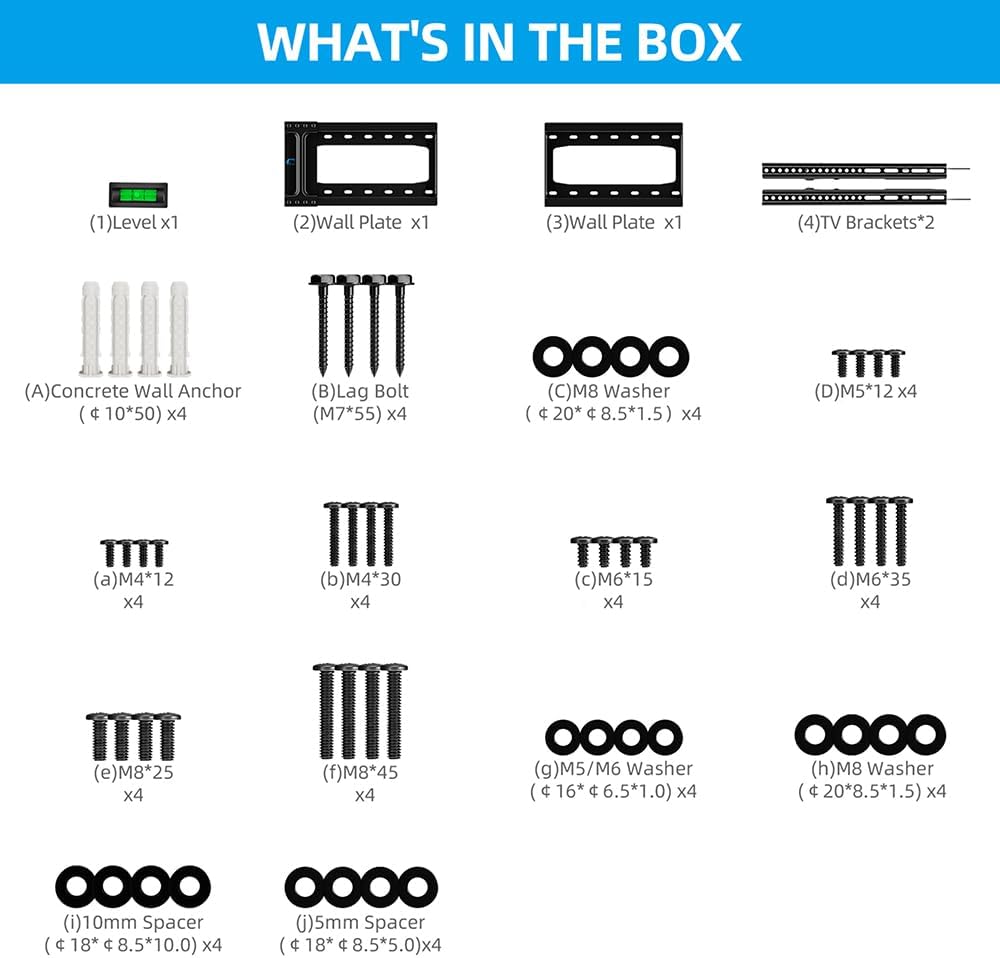
Image: A visual representation of all components included in the HOME VISION TV Wall Mount package, including the wall plate, TV brackets, various screws, washers, spacers, lag bolts, concrete wall anchors, and a small level.
Hardware List:
| Part No. | Description | Quantity |
|---|---|---|
| (1) | Level | x1 |
| (2) | Wall Plate | x1 |
| (3) | Wall Plate | x1 |
| (4) | TV Brackets | x2 |
| (A) | Concrete Wall Anchor (Φ 10*50) | x4 |
| (B) | Lag Bolt (M7*55) | x4 |
| (C) | M8 Washer (Φ 20*Φ 8.5*1.5) | x4 |
| (D) | M5*12 | x4 |
| (a) | M4*12 | x4 |
| (b) | M4*30 | x4 |
| (c) | M6*15 | x4 |
| (d) | M6*35 | x4 |
| (e) | M8*25 | x4 |
| (f) | M8*45 | x4 |
| (g) | M5/M6 Washer (Φ 16*Φ 6.5*1.0) | x4 |
| (h) | M8 Washer (Φ 20*Φ 8.5*1.5) | x4 |
| (i) | 10mm Spacer | x4 |
| (j) | 5mm Spacer | x4 |
Product Overview and Features
The HOME VISION HV9601 TV wall mount is engineered for strength and ease of use, providing a secure and aesthetically pleasing solution for mounting your television.
- Robust Compatibility: Fits most 32-84 inch flat/curved LED LCD OLED TVs, weighing up to 165 lbs, max VESA 600 x 400mm.
- Anti-Glare Tilt: Offers 0-10 degree tilt (max 15° depending on TV size) to reduce glare and optimize viewing angles.
- Low Profile Design: Minimum 1.5" clearance to the wall for a sleek, modern appearance.
- Quick Release Mechanism: For convenient removal or locking of your TV.
- Durable Construction: Made with wider and thicker alloy steel for enhanced stability.

Image: Detailed view of the mount's features, highlighting the anti-drop frame, easy TV centering, low 1.5-inch profile, and quick lock & release mechanism.

Image: Illustration demonstrating the strength testing of the mount, confirming its 165 lbs capacity, and highlighting features such as the dual hook design, anti-drop frame, and pull security lock for enhanced safety.
Setup and Installation
Before you begin, ensure you have all necessary tools and have reviewed the safety information. Installation typically takes about 12 minutes with two people.
Pre-Installation Checks:
- TV Compatibility:
- Check your TV's VESA pattern (mounting holes on the back). This mount supports VESA from 100x100mm to 600x400mm.
- Ensure your TV size is between 32 and 84 inches.
- Confirm your TV's weight does not exceed 165 lbs (75 kg).
- Wall Type: This mount is suitable for 16"/18"/24" wood studs, solid concrete, or brick walls. DO NOT mount on drywall alone.
- Cable Outlet: Check for potential cable blockage behind your TV once mounted.
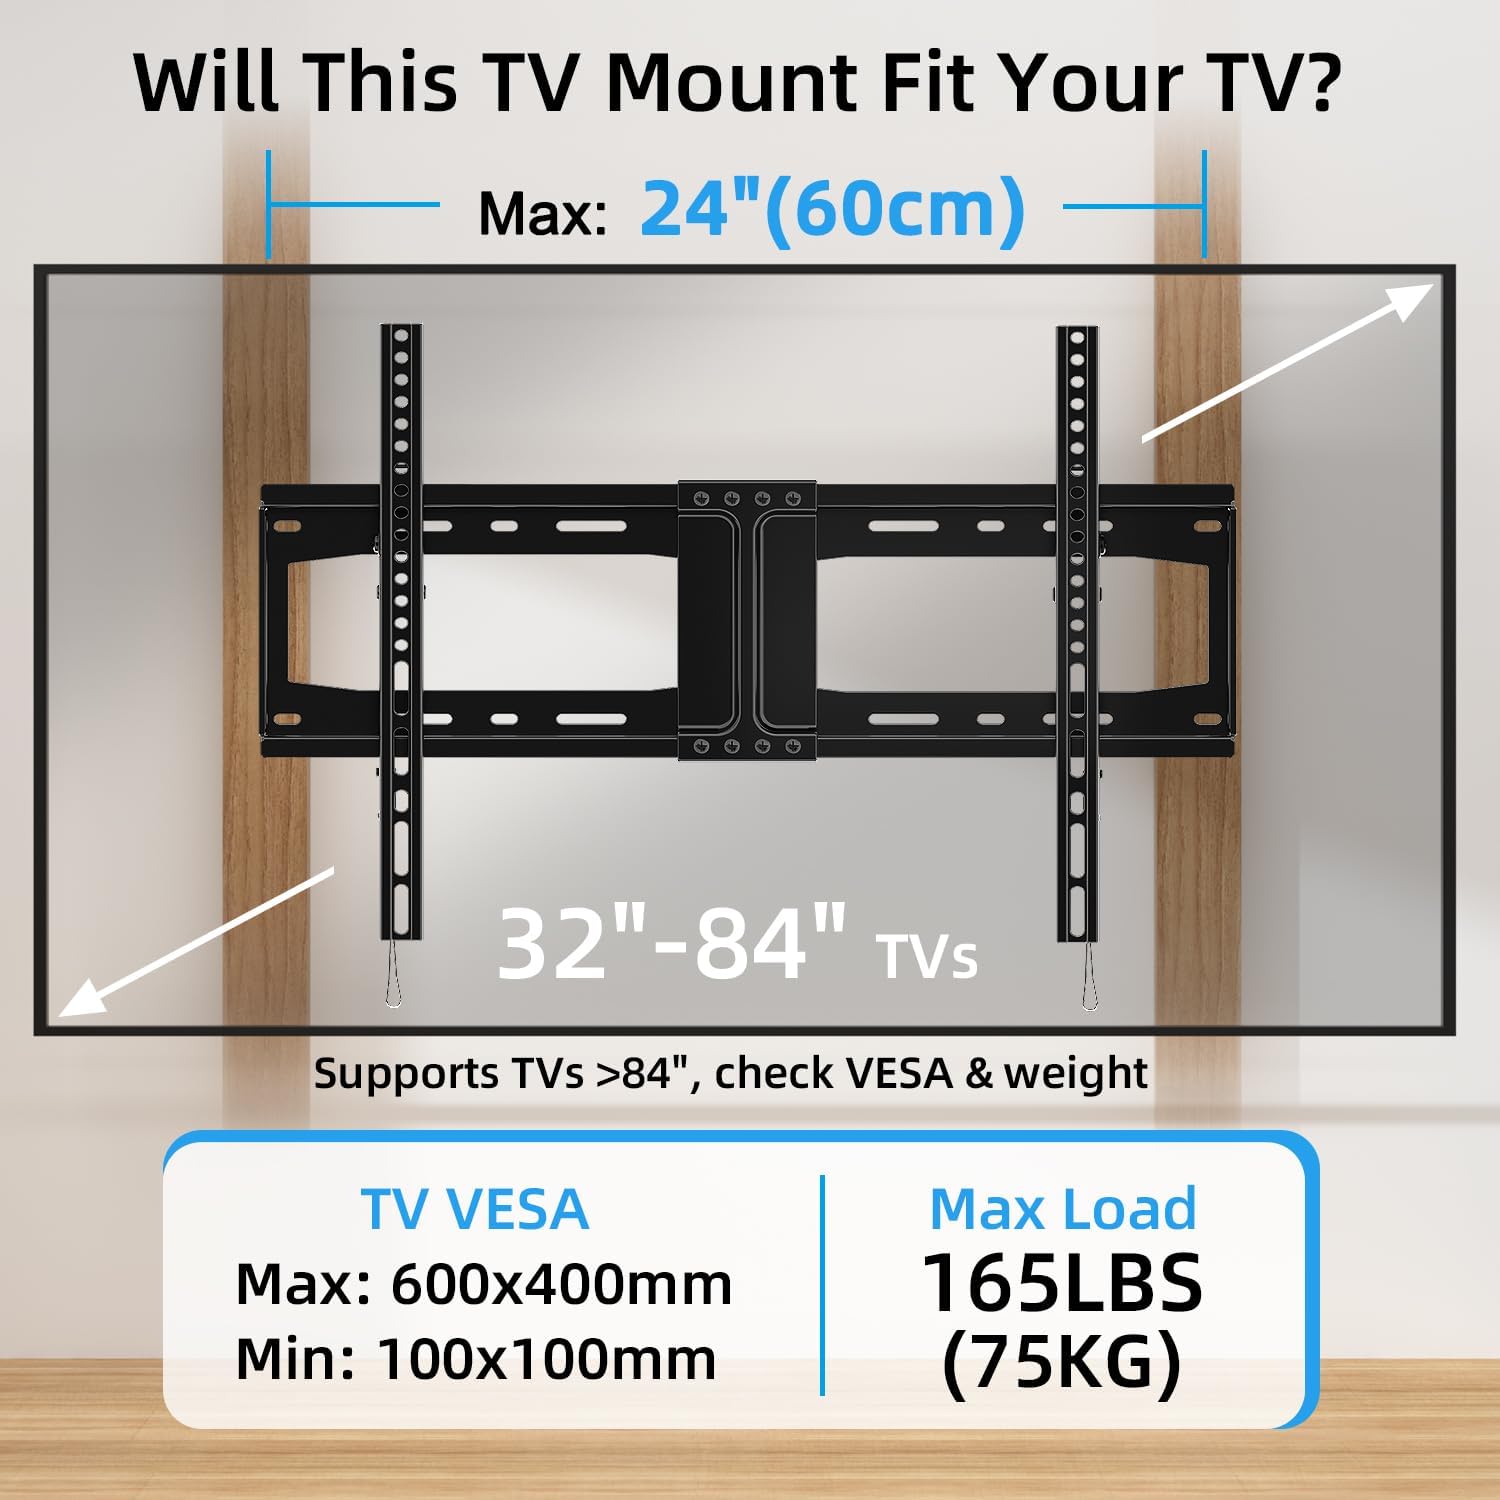
Image: A diagram illustrating how to check if your TV is compatible with the mount, detailing VESA patterns (max 600x400mm, min 100x100mm), maximum load capacity (165 LBS / 75KG), and supported TV sizes (32"-84").

Image: A comprehensive compatibility guide for the TV mount, detailing suitable wall types (wood studs, concrete/brick), TV specifications (32"-84" TVs, max 165LBS), VESA compatibility (Min: 100x100mm, Max: 600x400mm), and the importance of avoiding potential cable blockage.
Tools Required (Not Included):
- Pencil
- Stud Finder (for wood stud installation)
- Drill with appropriate drill bits (e.g., 7/32" (5.5mm) for wood studs, 3/8" (10mm) for concrete/brick)
- Socket Wrench or adjustable wrench
- Hammer (for concrete anchors)
- Measuring Tape
- Phillips Head Screwdriver
Installation Steps:
Follow these general steps. Refer to the detailed diagrams for specific measurements and hardware usage.

Image: A detailed diagram illustrating the installation process for different wall types: wood studs, solid concrete, and brick walls, including the required anchors and VESA dimensions (Max: 600mm, Min: 100mm for horizontal; Max: 400mm, Min: 100mm for vertical).
- Step 1: Attach TV Brackets to TV
Carefully place your TV face down on a soft, clean surface. Attach the two TV brackets (4) to the back of your TV using the appropriate screws, washers, and spacers from the hardware kit. Ensure the brackets are centered and securely fastened to the VESA mounting holes. The pull straps should hang freely below the TV.

Image: Step 1 of the installation process, showing how to mount the TV brackets onto the back of the television.
- Step 2: Assemble and Install the Wall Plate
Assemble the two wall plate sections (2) and (3) if they are separate. Determine the desired height for your TV. Use a stud finder to locate the center of your wood studs, or mark your drill points for concrete/brick. Use the wall plate as a template to mark the drill holes. Drill pilot holes at the marked locations. For concrete/brick walls, insert concrete anchors (A) into the drilled holes. Secure the wall plate to the wall using the lag bolts (B) and M8 washers (C). Use the included level (1) to ensure the wall plate is perfectly horizontal.
Image: Step 2 of the installation process, showing how to assemble and install the wall plate onto the wall.
- Step 3: Hang up the TV
With assistance, carefully lift the TV with the attached brackets. Align the hooks on the TV brackets with the top edge of the wall plate. Gently lower the TV until the brackets rest securely on the wall plate. The dual hook design ensures stability. Pull down the quick-release straps to lock the TV onto the mount. Ensure both sides are securely locked.

Image: Visual guide for easy and fast installation, demonstrating the double hook design for hanging the TV and pulling down the straps to securely lock the TV onto the wall mount.
Image: Step 3 of the installation process, showing how to safely hang the television onto the installed wall plate.
Operating Instructions
This tilt TV wall mount allows for easy adjustment of your viewing angle.
Adjusting Tilt Angle:
The mount offers a tilt range of 0-10 degrees (up to 15 degrees depending on TV size). To adjust the tilt, gently push or pull the bottom of your TV to achieve the desired angle. This feature is particularly useful for reducing glare from windows or lights, and for optimizing viewing from different seating positions.

Image: A woman relaxing on a rug, watching a TV that is tilted downwards, illustrating the anti-glare feature of the HOME VISION TV wall mount and its 0-10 degree tilt capability.

Image: A visual demonstrating comfortable viewing angles achieved with the HOME VISION TV mount, highlighting its 0-10 degree tilt range suitable for 32-84 inch TVs, designed to reduce glare and window reflection.
Maintenance
Regular maintenance ensures the longevity and safe operation of your TV wall mount.
- Cleaning: Dust the mount periodically with a soft, dry cloth. Avoid using abrasive cleaners or solvents.
- Inspection: Annually check all screws and bolts to ensure they are tight and secure. Over time, vibrations or minor shifts can loosen fasteners.
- Damage Check: Inspect the mount for any signs of damage, wear, or corrosion. If any issues are found, contact customer support and do not use the mount until it is repaired or replaced.
Troubleshooting
Here are some common issues and their potential solutions:
| Problem | Possible Cause | Solution |
|---|---|---|
| TV is not level after installation. | Wall plate not installed level. | Remove TV, loosen wall plate bolts slightly, adjust with a level, and re-tighten. Ensure to use a reliable level, not just the small one provided. |
| TV feels unstable or wobbly. | Screws not fully tightened; incorrect hardware used; wall structure not adequate. | Ensure all screws (TV brackets to TV, wall plate to wall) are securely tightened. Verify correct hardware for your TV and wall type. If the wall is inadequate, consult a professional. |
| Cannot tilt the TV. | Tilt mechanism is too tight or obstructed. | Check for any obstructions. The tilt mechanism is designed to be firm but adjustable. Apply gentle, even pressure. |
| TV does not fit the mount. | Incorrect VESA pattern or TV size/weight. | Double-check your TV's VESA pattern, size, and weight against the mount's specifications. This mount supports VESA 100x100mm to 600x400mm, 32-84 inch TVs, up to 165 lbs. |
Specifications
- Product Dimensions: 10.43 x 1.57 x 16.73 inches
- Item Weight: 3.8 pounds
- Item Model Number: HV9601
- Manufacturer: HOME VISION
- Mounting Type: Wall Mount
- Movement Type: Tilt
- Material: Alloy Steel
- Maximum Compatible Size: 84 Inches
- Color: Black
- Minimum Compatible Size: 32 Inches
- Compatible Devices: Monitor, Television
- Maximum Tilt Angle: 15 Degrees (varies depending on TV size)
- EU Spare Part Availability Duration: 10 Years
Official Product Video
Watch this video for an overview of HOME VISION's commitment to quality and product design.
Video: "Perfect craftsmanship to create perfect products" - This video showcases the manufacturing process and design philosophy behind HOME VISION products, emphasizing precision and quality in creating smart home solutions.
Warranty and Customer Support
HOME VISION is committed to providing high-quality products and excellent customer service. This product is designed with wider and thicker construction, reflecting our decade-long focus on TV wall mount innovation and production.
If you have any questions, encounter issues during installation, or require assistance with your product, please do not hesitate to contact our professional support team. We are dedicated to providing you with a total solution every day.
For support, please refer to the contact information provided on the product packaging or the official HOME VISION website.
EU Spare Part Availability: Spare parts for this product are available for 10 years from the date of purchase.