Midea MWD2N2B
Midea MWD2N2B Bottom-Load Water Dispenser User Manual
Model: MWD2N2B
1. Important Safety Information
Please read all instructions carefully before using this appliance to ensure safe operation and to prevent injury or damage. Keep this manual for future reference.
- Electrical Safety: Ensure the dispenser is plugged into a grounded 115V/60Hz outlet. Do not use extension cords.
- Hot Water Safety: The hot water function can reach temperatures of ≥85℃. Exercise extreme caution. This unit includes a child safety lock for the hot water faucet.
- Placement: Place the dispenser on a firm, level surface away from direct sunlight and heat sources. Ensure adequate ventilation around the unit.
- Water Quality: Use only potable water. Do not use any other liquids in the dispenser.
- Cleaning: Unplug the unit before cleaning. Be gentle when cleaning the exterior as the surface can scratch easily.
- Overheating Protection: The dispenser is equipped with a double safety element to prevent overheating.
2. Product Overview
The Midea MWD2N2B is a sleek, bottom-load water dispenser designed for convenience and efficiency, providing cold, warm, and hot water on demand.

Key Features:
- Bottom-load design for easy water bottle replacement.
- Three temperature settings: Cold, Warm, and Hot.
- LED night light for visibility in low light conditions.
- Touch controls with LED indicators for various functions.
- Self-cleaning function activated by a switch.
- Indicators for self-cleaning, cold water, and power.
- High-power cooling compressor: cools water from 25℃ to 10℃ in 25-30 minutes.
- Hot water capacity: 4 liters per hour (≥85℃).
- Cold water capacity: 2.5 liters per hour (≤10℃).
- Child lock for hot water faucet.
- Stainless steel water tank.
- Water bottle change indicator.
3. Setup Guide
3.1 Unpacking and Placement
- Carefully remove the dispenser from its packaging.
- Place the dispenser on a flat, stable, and level surface. Ensure there is at least 10 cm (4 inches) of space from the back and sides of the unit to allow for proper ventilation.
- Avoid placing the dispenser in direct sunlight or near heat-generating appliances.
3.2 Installing the Water Bottle
- Open the lower cabinet door of the dispenser.
- Remove the cap from a new 19-liter (5-gallon) water bottle.
- Insert the probe from the dispenser into the opening of the water bottle.
- Slide the water bottle into the lower cabinet. Ensure the bottle is seated correctly and the probe is fully inserted.
- Close the cabinet door. The water bottle change indicator light will turn off once the bottle is correctly installed and water begins to fill the internal tanks.
3.3 Initial Startup
- Before plugging in the unit, ensure water has filled the internal tanks. You may hear gurgling sounds as the tanks fill.
- Once the tanks are full, plug the dispenser into a grounded 115V/60Hz electrical outlet.
- Turn on the hot and cold water switches located on the back of the unit.
- Allow approximately 15-30 minutes for the water to reach optimal temperatures.
4. Operating Instructions
4.1 Dispensing Water
- Cold Water: Place your cup under the cold water faucet. Press the cold water button on the touch panel. The cold water indicator light will illuminate. Release the button to stop dispensing.
- Warm Water: Place your cup under the warm water faucet. Press the warm water button on the touch panel. Release the button to stop dispensing.
- Hot Water: For safety, the hot water faucet has a child lock. First, slide or press the child safety lock button (refer to the diagram on the control panel). While holding the lock, press the hot water button. The hot water indicator light will illuminate. Release both to stop dispensing.
4.2 LED Night Light
The dispenser features an LED night light for easy visibility in low-light conditions. This light can be activated or deactivated via a dedicated button on the control panel.
4.3 Self-Cleaning Function
The self-cleaning function helps maintain the hygiene of the internal water tanks. To activate:
- Ensure a water bottle is installed.
- Press the self-cleaning switch/button on the control panel. The self-cleaning indicator light will illuminate.
- The cycle will run automatically. Do not dispense water during this process.
- Once the cycle is complete, the indicator light will turn off.
5. Maintenance
Regular maintenance ensures the longevity and hygienic operation of your Midea water dispenser.
5.1 Cleaning the Exterior
- Unplug the dispenser before cleaning.
- Wipe the exterior surfaces with a soft, damp cloth.
- Caution: The surface can scratch easily. Avoid abrasive cleaners or harsh scrubbing pads.
- Dry thoroughly with a clean, soft cloth.
5.2 Cleaning the Drip Tray
- The drip tray should be emptied and cleaned regularly to prevent overflow and bacterial growth.
- Remove the drip tray from its slot.
- Empty any accumulated water and wash the tray with mild soap and water.
- Rinse thoroughly and dry before replacing.
5.3 Internal Cleaning (Self-Cleaning Function)
Utilize the built-in self-cleaning function periodically as described in Section 4.3 to sanitize the internal water paths and tanks.
5.4 Descaling (Recommended Annually)
Over time, mineral deposits can build up inside the hot water tank. To descale:
- Unplug the dispenser and drain all water from the hot and cold tanks.
- Prepare a descaling solution (e.g., a mixture of water and food-grade citric acid or white vinegar, following product instructions).
- Pour the solution into the hot water tank (usually accessed from the top or back, refer to specific diagrams if available).
- Allow the solution to sit for 30 minutes to an hour.
- Drain the solution completely.
- Rinse the tanks thoroughly with clean water multiple times to remove any residue.
- Refill with fresh water and resume normal operation.
6. Troubleshooting
Before contacting customer service, please check the following common issues and solutions:
| Problem | Possible Cause | Solution |
|---|---|---|
| No water dispensing. | Water bottle empty or not installed correctly. Unit not plugged in or power switch off. | Replace water bottle or ensure it's properly seated. Check power connection and switches. |
| Water not cold/hot enough. | Hot/cold switch off. Insufficient time for cooling/heating. Poor ventilation. | Ensure hot/cold switches are on. Allow 15-30 minutes for temperature stabilization. Ensure adequate space around the unit. |
| Leaking from dispenser. | Drip tray full. Water bottle cracked or seal faulty. | Empty and clean drip tray. Inspect water bottle for damage; replace if necessary. |
| Unusual noise. | Compressor operating (normal). Unit not level. | Some noise from the compressor is normal. Ensure the unit is on a level surface. |
| Self-cleaning light stays on. | Self-cleaning cycle in progress. | Wait for the cycle to complete. Do not dispense water during this time. |
7. Specifications
| Feature | Detail |
|---|---|
| Brand | Midea |
| Model | MWD2N2B |
| Color | Black |
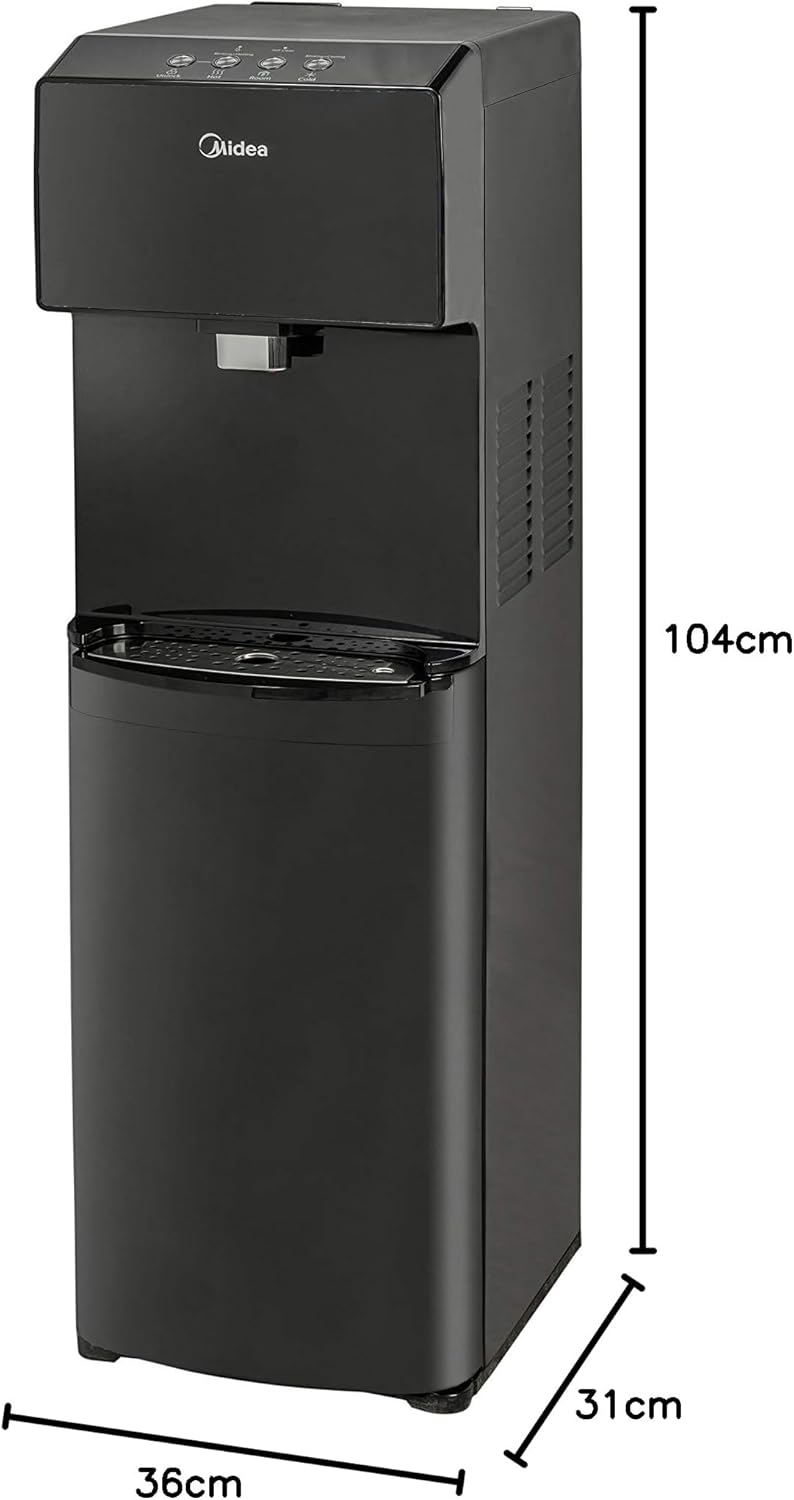
| Dimensions (D x W x H) | 31 cm x 36 cm x 104 cm (approx. 12.2 in x 14.2 in x 40.9 in) |
| Weight | 17 kg (approx. 37.5 lbs) |
| Voltage | 115 Volts |
| Frequency | 60 Hz |
| Material | Stainless Steel (tank) |
| Hot Water Temperature | ≥85℃ (≥185°F) |
| Hot Water Capacity | 4 Liters per hour |
| Cold Water Temperature | ≤10℃ (≤50°F) |
| Cold Water Capacity | 2.5 Liters per hour |
| Cooling Performance | Cools from 25℃ to 10℃ in 25-30 minutes |
| Installation Type | Freestanding |
8. Warranty and Support
Midea is committed to providing high-quality products. If you are not satisfied with the performance of your Midea product, you may contact the Midea contact center within 60 days of product delivery to your home to request an exchange.
For further assistance, technical support, or warranty claims, please refer to the contact information provided with your purchase or visit the official Midea website.
Please retain your proof of purchase for any warranty-related inquiries.
Related Documents - MWD2N2B
 |
Igloo Hot & Cold Bottom Load Self-Cleaning Water Dispenser - User Manual User manual and instructions for the Igloo Hot & Cold Bottom Load Self-Cleaning Water Dispenser (Model IWCBL50SCLD1CHBKS) from Nostalgia Products LLC. Covers safety, operation, maintenance, and warranty. |
 |
Vitapur VWD1006W/VWD1006BLP High Efficiency Bottom Load Water Dispenser Use & Care Guide Comprehensive use and care guide for the Vitapur VWD1006W and VWD1006BLP high efficiency bottom load water dispensers. Includes setup, operation, cleaning, maintenance, troubleshooting, and warranty information. |
 |
IGLOO IWCBL50SCEC1CHBKS Hot, Cold & Room Temperature Bottom Load Self-Cleaning Water Dispenser User Manual User manual for the IGLOO IWCBL50SCEC1CHBKS Hot, Cold & Room Temperature Bottom Load Self-Cleaning Water Dispenser. Includes safety instructions, operation guide, cleaning, maintenance, and warranty information. |
 |
Igloo IWCBL353CRHBKS Bottom Load Water Dispenser User Manual Comprehensive user manual for the Igloo IWCBL353CRHBKS Bottom Load Water Dispenser, covering safety, operation, maintenance, and warranty information. |
 |
Igloo Retro Hot, Cold & Room Temperature Bottom Load Water Dispenser User Manual Comprehensive user manual for the Igloo Retro Hot, Cold & Room Temperature Bottom Load Water Dispenser (Model IRTRWCBL353CRH SERIES). Includes safety instructions, operation guide, assembly, maintenance, troubleshooting, and warranty information. |
 |
IGLOO Retro Hot & Cold Bottom Load Water Dispenser User Manual User manual for the IGLOO Retro Hot & Cold Bottom Load Water Dispenser (model IRTRWCBL353CRH), including safety instructions, operation, maintenance, and warranty information. |
Ask a question about this manual
Ask about setup, troubleshooting, compatibility, parts, safety, or missing instructions. Manuals+ will review the question and use this page’s manual context to help answer it.