Introduction
Thank you for purchasing the Power Dynamics PV240BT 4-Zone HiFi Stereo Amplifier. This manual provides essential information for the safe and efficient operation of your amplifier. Please read this manual thoroughly before using the device to ensure proper setup and to maximize its performance. Keep this manual for future reference.
Safety Instructions
Always observe the following safety precautions to avoid electric shock, fire, or damage to the unit.
- Do not expose the unit to rain or moisture.
- Do not open the casing. There are no user-serviceable parts inside. Refer all servicing to qualified personnel.
- Ensure proper ventilation around the unit. Do not block ventilation openings.
- Place the unit on a stable, level surface.
- Disconnect the power cord from the mains before cleaning or when not in use for extended periods.
- Use only the specified power supply.
- Keep the unit away from heat sources, direct sunlight, and excessive dust.
Package Contents
Upon unpacking, please ensure all items listed below are present and in good condition:
- Power Dynamics PV240BT Amplifier Unit
- Instruction Manual
- Remote Control
- Power Cable
Product Features
The Power Dynamics PV240BT amplifier offers a range of features designed for versatile audio applications:
- Multi-zone HiFi stereo amplifier with 4x 100W output across four separate zones, each with independent volume control.
- Built-in Bluetooth 4.2 receiver for reliable wireless audio streaming from smartphones, tablets, or laptops.
- Integrated USB/SD MP3 player and FM radio with digital LCD display.
- AUX input for connecting external audio devices.
- Dual microphone inputs with separate volume dials and echo effect, plus talkover function.
- Optical/coaxial ports, dual RCA in/out, and subwoofer output for comprehensive connectivity.
- Includes a remote control for convenient operation.
Product Overview

Figure 1: Front view of the Power Dynamics PV240BT amplifier, showcasing its controls and display.

Figure 2: The 400W amplifier features four independent zones, each with its own volume control for multiroom audio distribution.
Setup
1. Placement
Place the amplifier on a flat, stable surface with adequate ventilation. Ensure there is enough space around the unit for heat dissipation. Avoid placing it near heat sources or in direct sunlight.
2. Power Connection
Connect the supplied power cable to the AC IN socket on the rear panel of the amplifier and then to a suitable mains power outlet. Ensure the power switch on the front panel is in the OFF position before connecting.
3. Speaker Connections
Connect your speakers to the corresponding speaker terminals on the rear panel. The PV240BT features four speaker output zones. Ensure correct polarity (+ to + and - to -) for each speaker. Use appropriate gauge speaker wire for optimal performance.

Figure 3: Overview of the amplifier's front and back panels, highlighting various input and output connections including speaker terminals.
Operating Instructions
1. Power On/Off
Press the POWER button on the front panel to turn the amplifier on or off. The display will illuminate when the unit is powered on.
2. Input Source Selection
Use the MODE button on the front panel or remote control to cycle through available input sources: Bluetooth, USB, SD, FM, AUX, Optical, Coaxial.
3. Volume Control
The amplifier features independent volume controls for each of the four zones (VOLUME 1-4). Adjust these knobs to set the desired output level for each connected speaker zone. The main MUSIC VOL knob controls the overall music volume.
4. Tone Control
Adjust the BASS and TREBLE knobs to fine-tune the low and high frequencies of your audio output. The ECHO knob controls the echo effect for microphone inputs.

Figure 4: Close-up of the tone control section, showing knobs for Treble, Bass, Music Volume, and Echo.
5. Bluetooth Streaming
To connect via Bluetooth:
- Select "Bluetooth" as the input source using the MODE button.
- On your Bluetooth-enabled device (smartphone, tablet, etc.), search for available devices.
- Select "PV240BT" from the list to pair. Once paired, you can stream audio wirelessly.

Figure 5: The amplifier supports Bluetooth 4.2 for seamless wireless audio streaming from compatible devices.
6. USB/SD Media Player
Insert a USB drive or SD card into the respective slot on the front panel. The amplifier will automatically switch to USB/SD mode and begin playing compatible audio files (e.g., MP3). Use the playback controls (PLAY/PAUSE, PREV, NEXT) to navigate your media.

Figure 6: The integrated media player features USB and SD card slots for direct playback of audio files.
7. FM Radio
Select "FM" as the input source. Use the PREV and NEXT buttons to tune to radio stations. The digital LCD display will show the current frequency.
8. Microphone Inputs
Connect microphones to the MIC 1 or MIC 2 inputs. Adjust the individual MIC VOL knobs for each microphone. The TALKOVER function automatically lowers the music volume when a microphone is in use.
Maintenance
To ensure the longevity and optimal performance of your amplifier, follow these maintenance guidelines:
- Cleaning: Disconnect the power before cleaning. Use a soft, dry cloth to wipe the exterior of the unit. Do not use liquid cleaners or aerosols.
- Ventilation: Regularly check that the ventilation openings are clear of dust and debris to prevent overheating.
- Storage: If storing the unit for an extended period, disconnect it from power and store it in a cool, dry place, away from direct sunlight and extreme temperatures.
Troubleshooting
If you encounter issues with your amplifier, refer to the following table for common problems and their solutions:
| Problem | Possible Cause | Solution |
|---|---|---|
| No power | Power cable not connected; Power switch off; Power outlet faulty. | Ensure power cable is securely connected. Turn power switch ON. Test power outlet with another device. |
| No sound output | Incorrect input source selected; Volume too low; Speakers not connected or faulty; Mute function active. | Select correct input source. Increase master and zone volumes. Check speaker connections and ensure speakers are functional. Deactivate mute if applicable. |
| Bluetooth not connecting | Amplifier not in Bluetooth mode; Device too far; Device already connected to another unit. | Ensure amplifier is in Bluetooth mode. Move device closer to amplifier. Disconnect from other Bluetooth devices. |
| USB/SD not playing | Incorrect file format; USB/SD card faulty or empty; Amplifier not in USB/SD mode. | Ensure files are compatible (e.g., MP3). Try another USB/SD card. Select USB/SD input mode. |
| Distorted sound | Volume too high; Incorrect impedance speakers; Poor cable connections. | Reduce volume. Ensure speakers match amplifier impedance. Check all audio cable connections. |
If the problem persists after trying these solutions, please contact customer support.
Specifications
| Feature | Detail |
|---|---|
| Model Number | PV240BT |
| Output Power | 4 x 100W (400W total) |
| Zones | 4 independent zones with volume control |
| Bluetooth Version | 4.2 |
| Media Player | USB/SD MP3 player, FM Radio |
| Inputs | AUX/RCA, Optical, Coaxial, 2x Microphone (6.3mm jack) |
| Outputs | RCA Line Out, Subwoofer Out, Speaker Terminals (4 zones) |
| Dimensions (L x W x H) | 38.5 x 30.6 x 14 cm |
| Weight | 4.6 kg |
| Power Supply | 220-240VAC 50Hz |
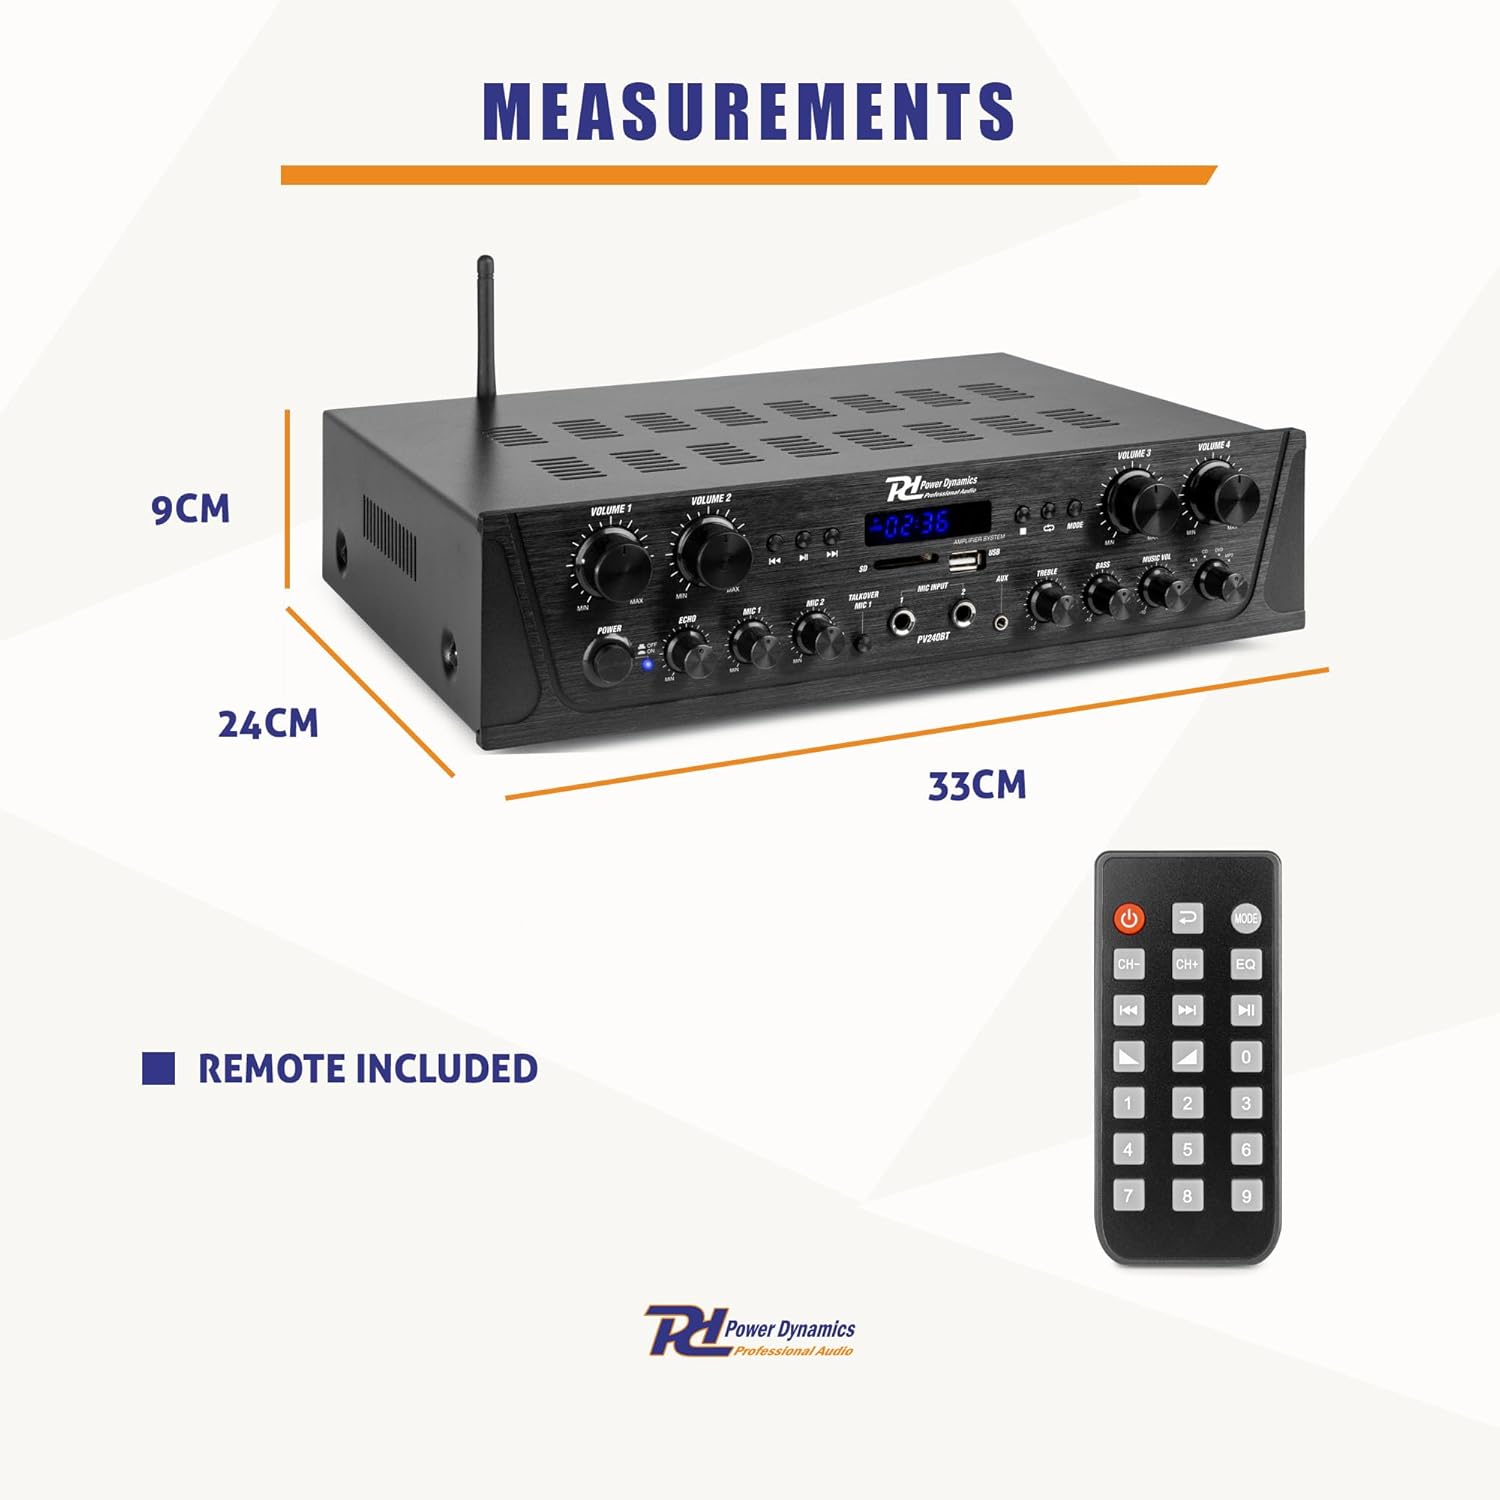
Figure 7: Physical dimensions of the amplifier and the included remote control.
Warranty and Support
This Power Dynamics PV240BT amplifier comes with a standard manufacturer's warranty. Please refer to the warranty card included in your package for specific terms and conditions. For technical support, service, or warranty claims, please contact your retailer or the Power Dynamics customer service department. Keep your proof of purchase for warranty validation.
For further assistance, visit the official Power Dynamics website or contact their support channels.