MOUNT PRO PR1009
MOUNT PRO Dual Monitor Stand User Manual
Model: PR1009
Introduction
This user manual provides detailed instructions for the assembly, operation, and maintenance of your MOUNT PRO Dual Monitor Stand. Designed for ergonomic comfort and enhanced productivity, this free-standing desk mount supports two screens up to 27 inches each, with a maximum weight capacity of 17.6 lbs per arm. It offers extensive adjustability including tilt, swivel, rotation, and height adjustment to help you achieve an optimal viewing angle.
Package Contents
Please verify that all components are present before beginning assembly. If any parts are missing or damaged, please contact customer support.
- Base Plate
- Main Pole
- Dual Monitor Arm Assembly
- VESA Mounting Plates (2x)
- Cable Management Clips
- Hardware Kit (screws, washers, spacers)
- Allen Wrenches (various sizes)

Image: All components of the MOUNT PRO Dual Monitor Stand, including the base, pole, arms, VESA plates, and hardware.
Specifications
| Feature | Detail |
|---|---|
| Product Dimensions | 17.6 x 12.01 x 4.33 inches |
| Item Weight | 8.47 pounds |
| Item Model Number | PR1009 |
| Mounting Type | Tabletop Mount (Free-Standing) |
| Movement Type | Rotate, Swivel, Tilt, Articulating |
| Brand | MOUNT PRO |
| Material | Aluminum, Alloy Steel |
| Maximum Compatible Size | 27 Inches (per screen) |
| Minimum Compatible Size | 13 Inches (per screen) |
| Maximum Load Capacity | 17.6 lbs per arm |
| VESA Compatibility | 75x75 mm, 100x100 mm |
Setup and Installation
Follow these steps carefully for proper assembly. It is recommended to have assistance when mounting monitors to prevent tipping.
1. Pole Installation
Attach the main pole to the base plate using the provided screws and Allen wrench. Ensure it is securely tightened for stability.
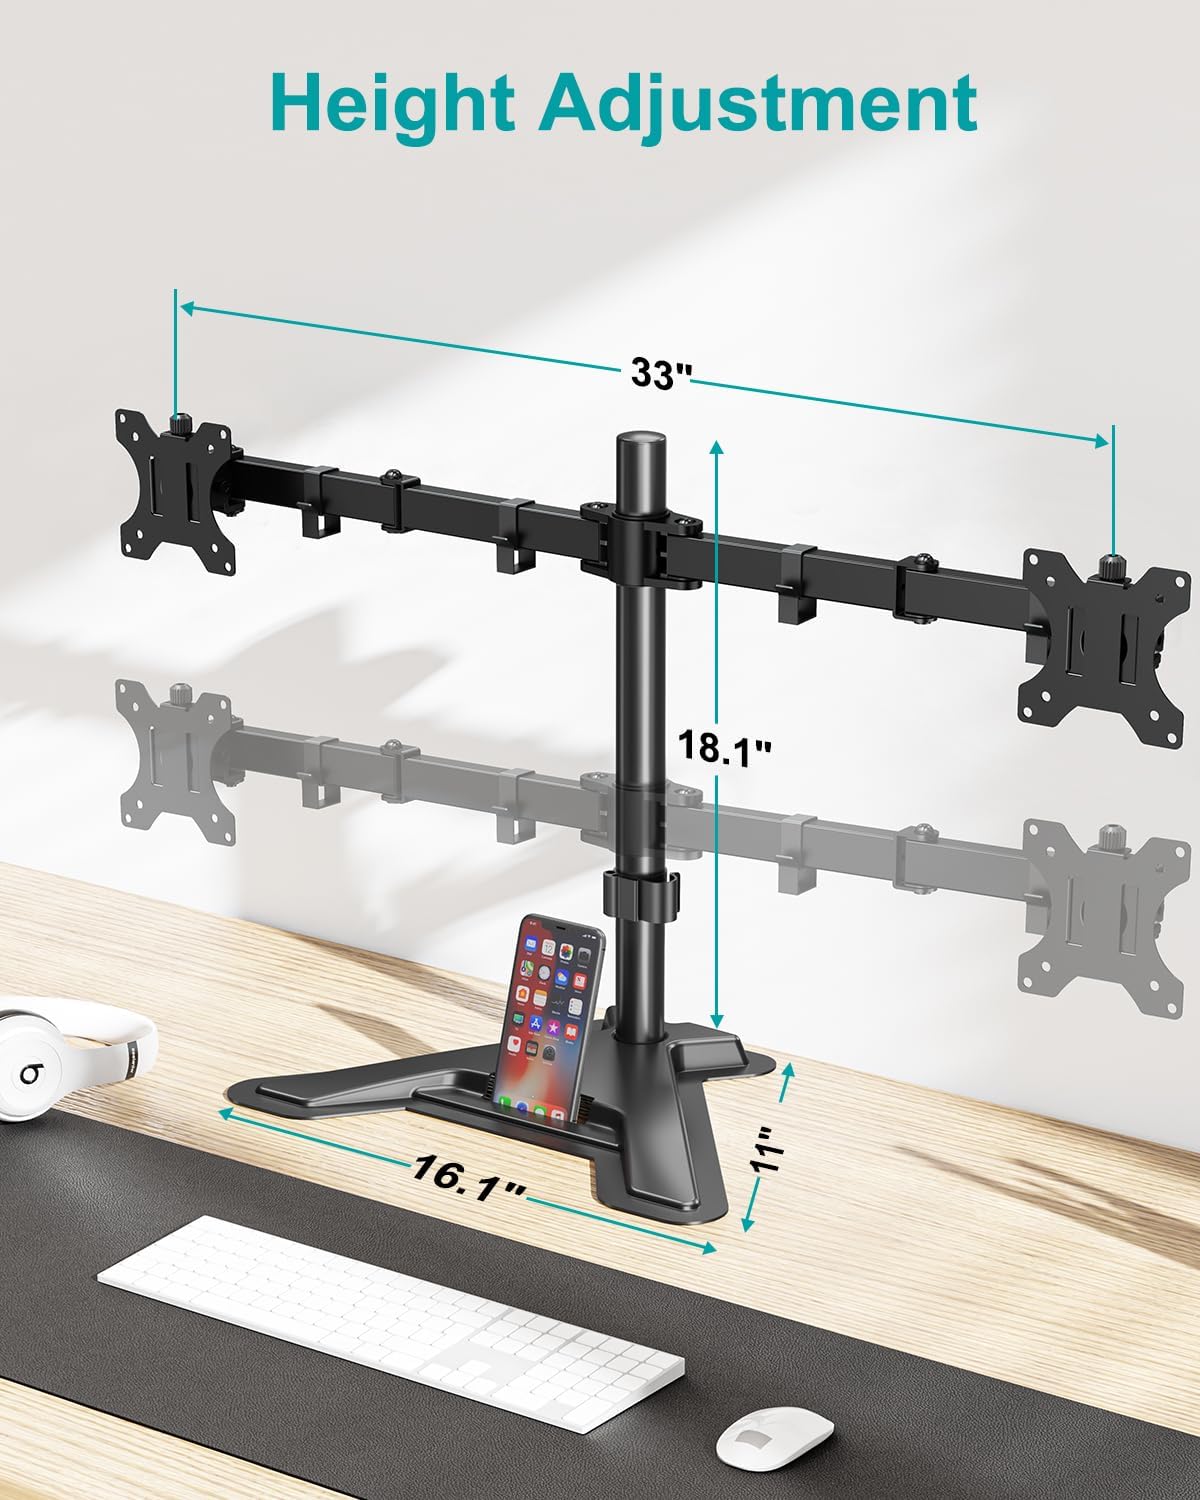
Image: The main pole attached to the sturdy V-shaped base, illustrating the overall dimensions and height adjustment range.
2. Arm Installation
Slide the dual monitor arm assembly onto the main pole. Position it at your desired height and secure it using the locking mechanism. The arm should be placed with the screw facing backwards for optimal adjustment.
3. Attaching VESA Plate to Monitor
Attach a VESA mounting plate to the back of each monitor using the appropriate screws from the hardware kit. Ensure the screws are tightened securely but do not overtighten.

Image: Illustration of VESA 75x75 mm and 100x100 mm mounting patterns on the back of a monitor, demonstrating compatibility.
4. Mounting Monitors
Attention: When installing monitors, please hang both monitors onto the arm at the same time to prevent the danger of tipping. Ensure the two arms are balanced during use.
Carefully slide the monitors (with VESA plates attached) onto the ends of the monitor arms. Secure them with the provided cap nuts or screws.
5. Cable Management
Utilize the integrated cable management clips along the arms and pole to route your power and AV cables. This helps maintain a clean and organized workspace.

Image: Rear view of the dual monitor stand showing cables neatly organized using the integrated cable management clips along the arms and central pole.
Installation Video Guide
Video: A step-by-step guide on how to install the MOUNT PRO Dual Monitor Stand, demonstrating each assembly phase.
Operating Instructions and Adjustments
The MOUNT PRO Dual Monitor Stand offers a variety of adjustments to customize your viewing experience and promote ergonomic posture.
Height Adjustment
Adjust the height of the monitor arms along the main pole to achieve your preferred eye-level viewing. The stand allows for height adjustment up to 18.1 inches.

Image: A user demonstrating a comfortable ergonomic position with monitors adjusted to an optimal height using the stand.
Tilt Adjustment
Each monitor can be tilted from -90° to +70° to reduce glare and optimize viewing angles. Loosen the tilt knob, adjust, and then re-tighten.

Image: Visual representation of the monitor stand's ability to rotate 360 degrees and tilt from -90 to +70 degrees.
Swivel Adjustment
Swivel your monitors from -90° to +90° to share your screen with others or adjust for different tasks.

Image: A demonstration of the monitor stand's swivel capability, allowing monitors to be angled up to 90 degrees in either direction.
Rotation
Rotate your monitors 360° to switch between landscape and portrait orientations effortlessly.

Image: Various screen configurations possible with the dual monitor stand, including horizontal-horizontal, vertical-vertical, and mixed orientations.
Feature Overview Video
Video: An overview of the MOUNT PRO Dual Monitor Stand's full motion capabilities, including tilt, swivel, and rotation.
Maintenance
To ensure the longevity and optimal performance of your MOUNT PRO Dual Monitor Stand, follow these maintenance guidelines:
- Cleaning: Wipe down the stand regularly with a soft, damp cloth. Avoid using abrasive cleaners or solvents, as they may damage the finish.
- Tightness Check: Periodically check all screws and connections to ensure they remain tight. Re-tighten if necessary to maintain stability and prevent wobbling.
- Lubrication: The articulating joints are designed for smooth movement and generally do not require lubrication. If movement becomes stiff, a small amount of silicone-based lubricant can be applied to the pivot points.
- Weight Capacity: Do not exceed the maximum weight capacity of 17.6 lbs per arm. Overloading can cause damage to the stand and monitors.
- Monitor Balance: Always ensure that the weight of the monitors is evenly distributed across the arms to maintain balance and prevent tipping.
Troubleshooting
If you encounter any issues with your MOUNT PRO Dual Monitor Stand, please refer to the following common problems and solutions:
- Stand is Wobbly:
- Ensure the main pole is securely attached to the base plate.
- Verify that the monitor arms are tightly clamped to the main pole.
- Check that the monitors are properly balanced on the arms.
- Confirm that your desk surface is stable and level.
- Monitors are Tipping Forward/Backward:
- Tighten the tilt adjustment knob on the VESA mounting plate.
- Ensure the monitor weight does not exceed 17.6 lbs per arm.
- Difficulty Adjusting Height/Swivel/Tilt:
- Loosen the corresponding adjustment screws or knobs slightly before attempting to move, then re-tighten once in position.
- Do not force adjustments. If a joint is stuck, check for obstructions or consult the user manual for specific adjustment points.
- Monitors are Not Level:
- Adjust the height of each arm independently on the main pole until both monitors are level.
- Ensure the VESA plates are mounted straight on the back of the monitors.
If the issue persists, please contact MOUNT PRO customer support for further assistance.
Safety Information
Please read and understand all safety warnings before installation and use of this product. Failure to do so may result in property damage, serious injury, or death.
- Do not install this product if you cannot clearly understand the instructions.
- Ensure the mounting surface can safely support the combined weight of the stand and monitors.
- Do not exceed the maximum load capacity of 17.6 lbs per arm.
- Keep small parts away from children to prevent choking hazards.
- Use only the provided hardware. Do not use damaged parts.
- Always ensure monitors are securely attached to the VESA plates and arms before releasing them.
- When adjusting, hold the monitor firmly to prevent accidental drops.
- Avoid extending the arms too far forward or backward without proper balance, as this may cause the stand to tip.
Warranty and Support
For detailed warranty information and customer support, please refer to the official MOUNT PRO website or the full user manual PDF.
You can download the official User Manual (PDF) here.
For additional support or inquiries, please visit the MOUNT PRO Store on Amazon.
Ask a question about this manual
Ask about setup, troubleshooting, compatibility, parts, safety, or missing instructions. Manuals+ will review the question and use this page’s manual context to help answer it.