1. Introduction
This manual provides essential instructions for the safe and effective use, maintenance, and troubleshooting of your Beeman 1357 PCP Underlever Air Rifle. Please read this manual thoroughly before operating the air rifle to ensure proper handling and to prevent injury or damage.
2. Safety Information
WARNING: Air rifles are not toys. Mishandling can cause serious injury or death. Always treat an air rifle with the same respect as a firearm.
- Always point the muzzle in a safe direction.
- Keep your finger off the trigger until ready to shoot.
- Keep the air rifle unloaded until ready to use.
- Be sure of your target and what is beyond it.
- Wear appropriate eye protection when handling or shooting.
- Store the air rifle and ammunition separately and securely, out of reach of children and unauthorized users.
- Never attempt to modify the air rifle.
- Always check the air pressure before and during use.
- Do not expose the air rifle to extreme temperatures or direct sunlight for prolonged periods.
3. Product Overview
The Beeman 1357 is a Pre-Charged Pneumatic (PCP) air rifle featuring an underlever cocking mechanism. It is designed for precision and consistent performance.

Figure 3.1: Overall view of the Beeman 1357 PCP Underlever Air Rifle. This image displays the full rifle with its wooden stock, barrel, scope mounted on the rail, and the pressure gauge visible on the side.
Key Components:
- Barrel: The component through which the pellet is propelled.
- PCP Air Reservoir: Stores compressed air for propulsion.
- Underlever: Used to cock the rifle and cycle the action.
- Trigger: Activates the firing mechanism.
- Safety: Mechanism to prevent accidental discharge.
- Pressure Gauge: Indicates the current air pressure in the reservoir.
- Fill Port: Connection point for refilling the air reservoir.
- Magazine: Holds multiple pellets for rapid firing.
- Scope Rail: Provides a mounting point for optical sights.

Figure 3.2: Close-up view of the underlever cocking mechanism. This image highlights the lever located beneath the barrel, used for cocking the rifle and advancing the pellet.

Figure 3.3: Detail of the PCP fill port. This image shows the threaded port at the front of the air reservoir where the air tank or pump connects for refilling.
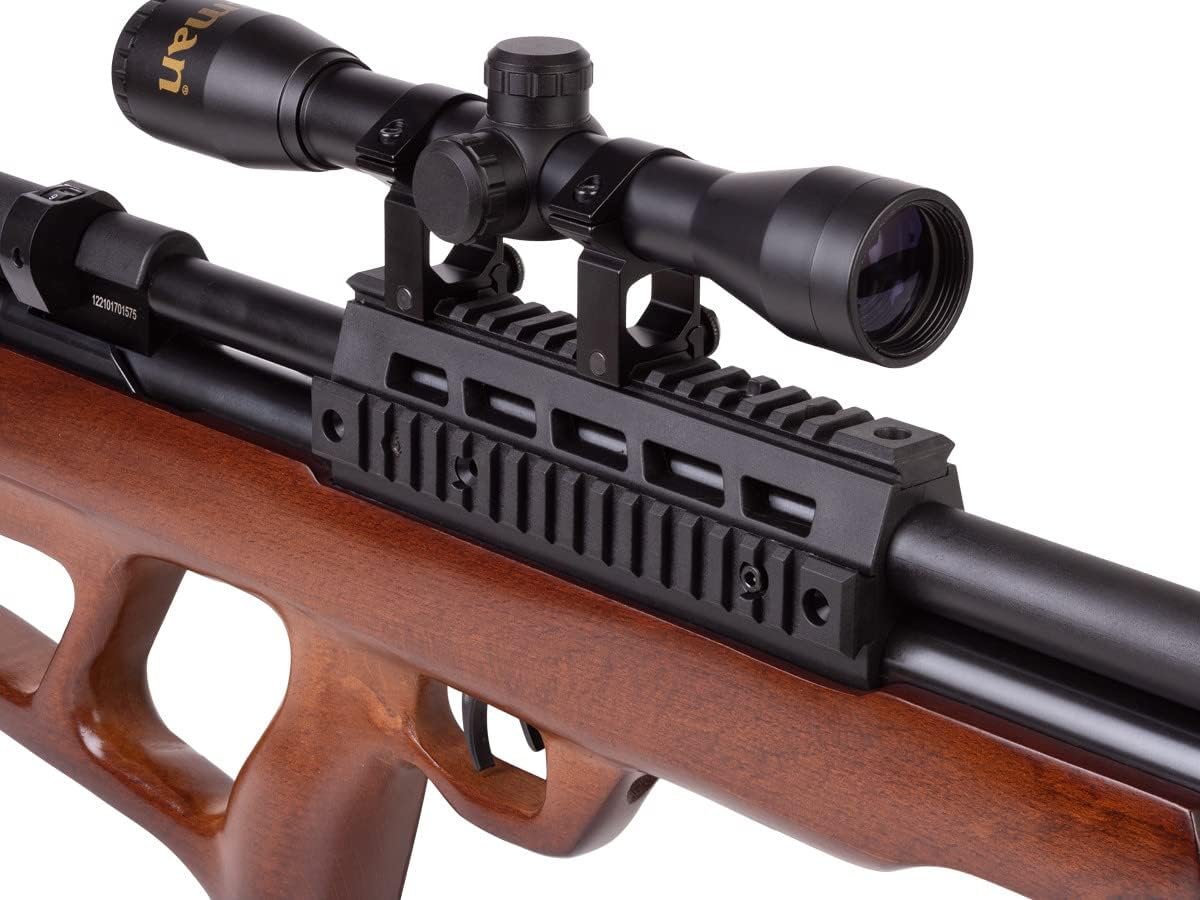
Figure 3.4: View of the mounted scope and picatinny rail. This image illustrates the scope securely attached to the rifle's top rail, providing an aiming aid.

Figure 3.5: The rotary magazine for pellets. This image shows the circular magazine designed to hold multiple pellets, ready for sequential loading into the breach.
4. Setup
4.1 Unpacking and Initial Inspection
- Carefully remove all components from the packaging.
- Inspect the air rifle for any signs of damage during shipping. Contact your retailer immediately if any damage is found.
- Familiarize yourself with all parts as described in the Product Overview section.
4.2 Filling the PCP Air Reservoir
The Beeman 1357 is a PCP air rifle and requires an external air source (e.g., high-pressure hand pump, scuba tank, or compressor) to fill its air reservoir.
- Ensure the air rifle is unloaded and the safety is engaged.
- Locate the fill port (refer to Figure 3.3).
- Connect your chosen air source to the fill port using the appropriate adapter.
- Slowly fill the reservoir to the recommended pressure, typically indicated on the rifle's pressure gauge or in supplementary documentation. Do not overfill.
- Once filled, disconnect the air source. Check for any leaks.
4.3 Loading the Magazine
The rifle uses a rotary magazine for pellets.
- Remove the magazine from the rifle.
- Rotate the clear cover of the magazine counter-clockwise until it stops.
- Insert a pellet into the first chamber, skirt first, ensuring it is flush. This will hold the spring tension.
- Load pellets into the remaining chambers, head first, until the magazine is full (12 rounds).
- Insert the loaded magazine back into the rifle until it clicks securely into place.
4.4 Mounting a Scope (Optional)
If using an optical sight, mount it onto the integrated scope rail (refer to Figure 3.4) using appropriate scope rings. Ensure the scope is level and securely fastened according to the scope manufacturer's instructions.
5. Operating Instructions
5.1 Engaging the Safety
Always ensure the safety mechanism is engaged until you are ready to fire. Consult the rifle's specific safety lever position for "Safe" and "Fire" settings.
5.2 Cocking the Rifle
- With the rifle pointed in a safe direction, grasp the underlever (refer to Figure 3.2).
- Pull the underlever downwards and fully to the rear until it locks into place. This action cocks the hammer and indexes a pellet from the magazine into the breach.
- Return the underlever to its original closed position.
5.3 Firing the Rifle
- Ensure you are in a safe shooting environment and have a clear target and backstop.
- Disengage the safety.
- Aim carefully at your target.
- Gently squeeze the trigger to fire.
- After firing, re-engage the safety if you are not immediately taking another shot.
6. Maintenance
6.1 Cleaning the Barrel
Regular barrel cleaning helps maintain accuracy. Use a suitable cleaning kit for air rifle barrels. Avoid harsh solvents that can damage seals.
- Ensure the rifle is unloaded and degassed (if possible and safe to do so).
- Pass a cleaning patch soaked in airgun-specific cleaning oil through the barrel from the breach end to the muzzle.
- Repeat with clean patches until they emerge clean.
- Lightly oil the barrel with a final patch.
6.2 Lubrication
Apply a small amount of silicone-based lubricant to moving parts such as the underlever pivot points and magazine indexing mechanism. Avoid petroleum-based oils on seals, as they can cause degradation.
6.3 Storage
Store the air rifle in a cool, dry place, away from direct sunlight and extreme temperatures. It is recommended to store it in a padded case to prevent damage. Ensure it is unloaded and the safety is engaged before storage.
7. Troubleshooting
| Problem | Possible Cause | Solution |
|---|---|---|
| Loss of Air Pressure | Leaking seals, loose fill port cap. | Check fill port cap for tightness. Inspect O-rings and seals for damage; replace if necessary. Consult a qualified technician if leaks persist. |
| Pellet Not Loading | Magazine improperly seated, deformed pellet, underlever not fully cycled. | Ensure magazine is fully inserted. Use only undamaged, correctly sized pellets. Fully cycle the underlever until it locks. |
| Inconsistent Accuracy | Dirty barrel, inconsistent air pressure, loose scope, incorrect pellet choice. | Clean the barrel. Ensure consistent air pressure. Check scope mounts for tightness. Experiment with different pellet brands/weights. |
| Rifle Does Not Cock | Underlever not fully operated, internal mechanism issue. | Ensure the underlever is pulled fully back until it locks. If the issue persists, seek professional assistance. |
8. Specifications
| Feature | Detail |
|---|---|
| Brand | Beeman |
| Model Name | 1357 |
| Air Gun Power Type | PCP (Pre-Charged Pneumatic) |
| Rounds Capacity | 12 |
| Item Weight | 8 Pounds (approx. 3.63 kg) |
| Product Dimensions (LxWxH) | 1"L x 1"W x 1"H (Note: These dimensions appear to be placeholder values from the source data and may not reflect actual rifle dimensions.) |
| Barrel Material Type | Metal |
| Frame Material | Wood, Metal, Polymer |
| Hand Orientation | Ambidextrous |
| UPC | 026785013578 |
9. Warranty Information
Beeman products are manufactured to high standards. For specific warranty terms and conditions, please refer to the warranty card included with your product or visit the official Beeman website. Keep your proof of purchase for any warranty claims.
10. Support
If you require further assistance, have questions not covered in this manual, or need to order replacement parts, please contact Beeman customer support. Contact details can typically be found on the product packaging or the official Beeman website.
Website: www.beeman.com (Example link, actual link may vary)