1. Introduction
This user manual provides detailed instructions for the proper installation, operation, and maintenance of your ANYSECU AnyTone AT-778UV Dual Band Mobile Radio. To ensure optimal performance and safety, please read this manual thoroughly before using the device and retain it for future reference.
2. Safety Information
- Do not operate the radio in explosive atmospheres (e.g., near flammable gas, dust particles, metallic powders, etc.).
- Ensure the radio is connected to a stable 13.8V DC power source. Incorrect voltage can damage the unit.
- Avoid prolonged exposure to direct sunlight or extreme temperatures.
- Do not disassemble or modify the radio. Repairs should only be performed by qualified technicians.
- Maintain a safe distance from the antenna during transmission to avoid exposure to RF energy.
- The radio's heat sink can become hot during prolonged transmission. Avoid direct contact.
3. Package Contents
Verify that all items listed below are included in your package. If any items are missing or damaged, please contact your dealer.
- ANYSECU AnyTone AT-778UV Mobile Radio Unit
- Lighted Keypad Microphone
- DC Power Cable with Fuse Holder
- Mounting Bracket
- Screw Pack
- User Manual

4. Product Overview
The ANYSECU AnyTone AT-778UV is a compact dual-band VHF/UHF mobile radio transceiver designed for reliable communication. It features a color LCD display, DTMF and 5Tone functions, and a rotatable display for flexible installation.
4.1 Radio Unit Features

- Power On/Off/Mute: Controls the radio's power and mute function.
- Microphone Jack: Connects the hand microphone.
- P1-P6 (Self-Define Keys): Programmable function keys.
- FUNC (Function Key): Accesses various radio functions.
- Channel Switch/Push Button/Key Lock: Used for channel selection, menu navigation, and locking controls.
- LCD Display: Shows frequency, channel, and status information.
4.2 Hand Microphone Features

- UP/DOWN Buttons: Adjust frequency, channel, or menu options.
- PTT (Push-To-Talk): Activates transmission.
- Number Keypad: For direct frequency entry or DTMF tones.
- A/B Band: Switches between main and sub-bands.
- Band Indicator: Shows the currently active band.
- TX/RX Indicator: Illuminates during transmit (TX) or receive (RX).
- MIC: Microphone input.
- Speaker: Built-in speaker for audio output.
- Lock UP/DOWN: Locks the UP/DOWN buttons.
4.3 Dimensions

5. Setup
Follow these steps to set up your AT-778UV mobile radio.
5.1 Power Connection
Connect the supplied DC power cable to the radio's power input. Ensure correct polarity (red to positive, black to negative) and connect to a stable 13.8V DC power source capable of supplying sufficient current (e.g., a car battery or regulated power supply).
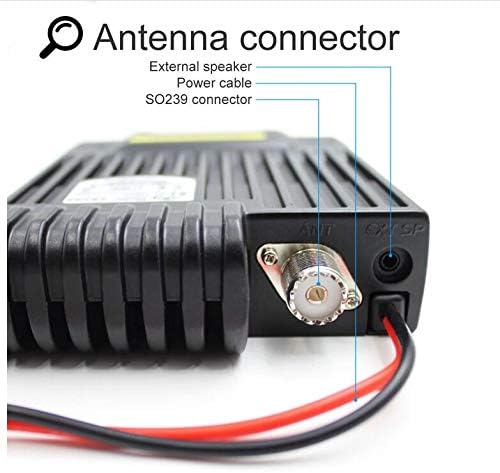
5.2 Antenna Connection
Connect a suitable dual-band VHF/UHF antenna to the SO239 antenna connector on the rear of the radio. Ensure the connection is secure to prevent signal loss and potential damage.
5.3 Microphone Connection
Plug the hand microphone's RJ45 connector into the microphone jack on the front panel of the radio. Ensure it clicks into place securely.
5.4 Initial Power-On
After connecting power, antenna, and microphone, press the power button on the radio's front panel to turn on the unit. The LCD display will illuminate, showing the current frequency and status.
6. Operating Instructions
This section covers the basic operation of your AT-778UV mobile radio.
6.1 Power On/Off and Volume Control
- To power on/off, press the Power button on the front panel.
- Rotate the Channel Switch/Push Button to adjust the volume.
6.2 Frequency and Channel Selection
- Use the UP/DOWN buttons on the microphone or rotate the Channel Switch on the radio to change frequencies or channels.
- Press the A/B button on the microphone to switch between the main (VHF) and sub (UHF) bands.
- The radio supports 200 channels.
6.3 Transmission (PTT)
To transmit, press and hold the PTT button on the left side of the microphone. Speak clearly into the microphone. Release the PTT button to receive.
6.4 Advanced Functions
- The radio supports CTCSS, DCS, DTMF, and 5Tone functions. Refer to the full user manual for detailed programming and usage of these features.
- Programmable keys (P1-P6) can be customized for quick access to frequently used functions.
- Programming software is available for advanced configuration. Please refer to the official AnyTone website for software downloads and instructions.
7. Maintenance
Proper maintenance ensures the longevity and reliable operation of your radio.
- Cleaning: Use a soft, damp cloth to clean the radio's exterior. Do not use harsh chemicals or abrasive cleaners.
- Storage: When not in use for extended periods, store the radio in a dry, cool place away from direct sunlight and extreme temperatures.
- Antenna: Regularly check the antenna connection for corrosion or damage.
- Power Cable: Inspect the power cable and fuse holder for any signs of wear or damage.
8. Troubleshooting
If you encounter issues with your radio, refer to the following common problems and solutions:
| Problem | Possible Cause | Solution |
|---|---|---|
| Radio does not power on. | No power, incorrect wiring, blown fuse. | Check power cable connections, ensure correct polarity, inspect fuse. |
| No audio from speaker. | Volume too low, squelch too high, external speaker connected. | Increase volume, adjust squelch level, check external speaker connection. |
| Cannot transmit or receive. | Incorrect frequency/channel, antenna issue, power output setting. | Verify frequency/channel, check antenna connection, ensure power output is set correctly. |
| Display is blank or erratic. | Loose connection, internal fault. | Power cycle the radio. If problem persists, contact support. |
For more complex issues, consult the full user manual or contact customer support.
9. Specifications
Key technical specifications for the ANYSECU AnyTone AT-778UV Mobile Radio:
- Brand: ANYSECU
- Model Number: AT 778UV
- Frequency Range: VHF: 136-174 MHz, UHF: 400-480 MHz
- Number of Channels: 200
- Output Power: 25W/15W/5W (selectable)
- Voltage: 13.8 Volts DC
- Special Features: DTMF, 5Tone, CTCSS, DCS, Color LCD, 180-degree rotatable TFT LCD display, Lighted keypad mic, Built-in speakers (radio & mic), Built-in cooling fan
- Item Weight: 1.12 Pounds (approximately 508g)
- Water Resistance Level: Water Resistant
- FCC ID: T4K-778UV
10. Warranty and Support
For warranty information and technical support, please refer to the documentation included with your product or visit the official ANYSECU website. Keep your purchase receipt as proof of purchase for warranty claims.
Manufacturer: Anytone