1. Introduction
This manual provides detailed instructions for the BGS Technic 68510 workshop trolley insert, a comprehensive set of measurement tools designed for professional and DIY use. This insert occupies 1/3 of a standard workshop trolley drawer and includes a variety of precision instruments for accurate measurements in various applications.
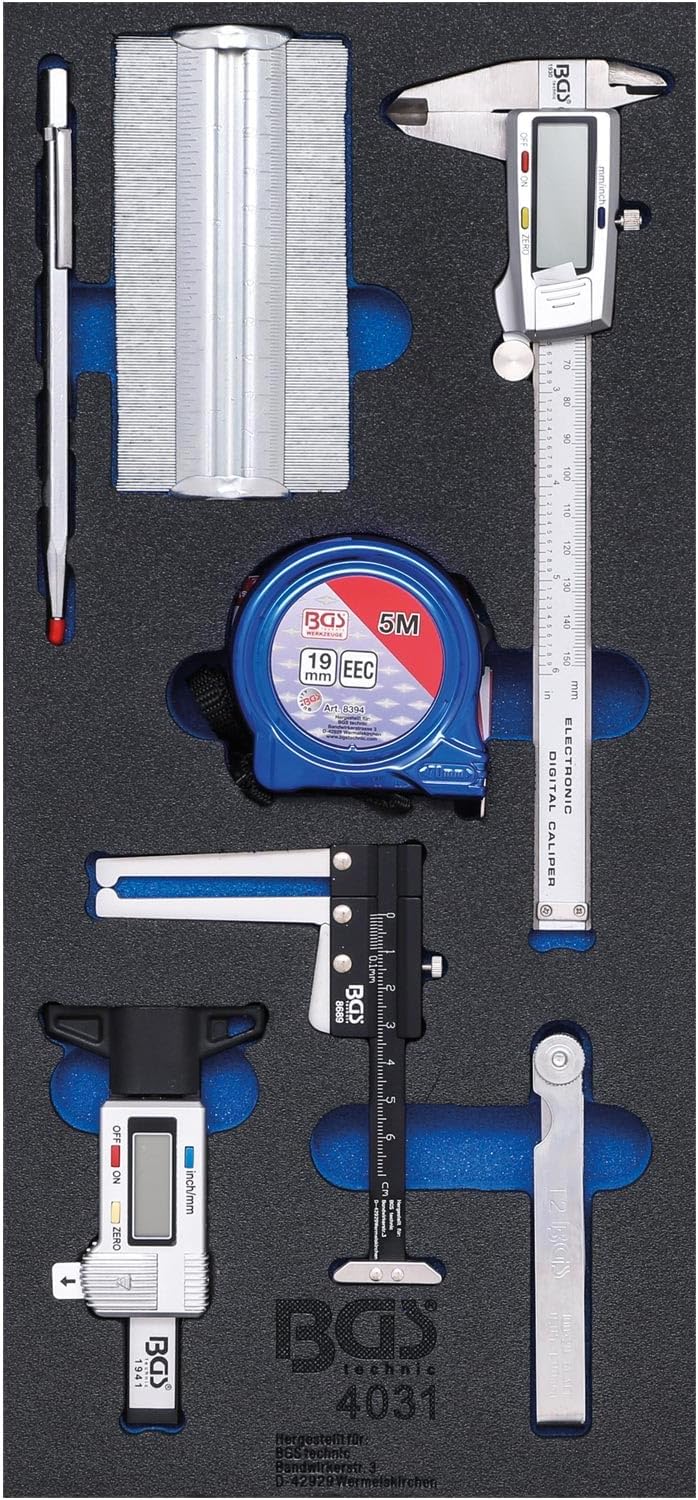
Figure 1: The BGS Technic 68510 workshop trolley insert, showcasing all included measurement tools neatly organized within its robust foam tray.
2. Components Overview
The BGS Technic 68510 insert includes the following precision measurement tools:
- Digital Caliper (150 mm): For precise external, internal, depth, and step measurements.
- Precision Feeler Gauge (20 blades): Used for measuring small gaps and clearances.
- Metal Contour Gauge (125 mm): For duplicating shapes and profiles.
- Tape Measure (19 mm x 5 m): A standard retractable tape measure for linear measurements.
- Carbide Scriber (150 mm): For marking lines on various materials.
- Digital Tire Tread Depth Gauge (0-28 mm): Specifically designed for measuring tire tread wear.
- Aluminum Brake Disc Caliper (max. 60 mm depth): For measuring brake disc thickness and other depths.
3. Setup
The BGS Technic 68510 measurement tool insert is designed for immediate use within a workshop trolley. No assembly is required for the insert itself.
3.1 Placing the Insert
- Ensure your workshop trolley drawer is clean and free of debris.
- Carefully place the foam insert into the designated 1/3 section of the trolley drawer. The robust foam is designed to securely hold each tool in place.
- Verify that all tools are seated correctly within their respective cutouts to prevent movement during transport or drawer operation.
4. Operating Instructions
Each tool in the BGS Technic 68510 set is designed for specific measurement tasks. Familiarize yourself with the operation of each instrument before use.
4.1 Digital Caliper (150 mm)

Figure 2: The 150 mm digital caliper, featuring an extra-large display for clear readings.
- Power On/Off: Press the 'ON/OFF' button to activate or deactivate the caliper.
- Zero Setting: Close the jaws completely and press the 'ZERO' button to set the display to zero at any point.
- Unit Conversion: Press the 'mm/inch' button to switch between metric and imperial units.
- Measurement: Open the jaws, position the object between them (for external measurement) or use the internal jaws (for internal measurement), or the depth rod (for depth measurement). Read the value on the extra-large digital display.
4.2 Precision Feeler Gauge (20 Blades)

Figure 3: The 20-blade precision feeler gauge, used for measuring small gaps.
- Selection: Identify the blade with the desired thickness (ranging from 0.05 mm to 1.0 mm).
- Measurement: Insert the selected blade into the gap or clearance to be measured. The blade should fit snugly without forcing. If multiple blades are needed, stack them carefully.
4.3 Metal Contour Gauge (125 mm)
- Duplication: Press the contour gauge against the object whose profile you wish to duplicate. The fine metal pins will conform to the shape.
- Transfer: Carefully remove the gauge and transfer the duplicated contour onto a workpiece for cutting or marking.
4.4 Tape Measure (19 mm x 5 m)
- Extension: Pull the tape out to the desired length.
- Locking: Use the tape lock mechanism to hold the tape at a specific length for accurate reading or marking.
- Retraction: Release the lock and gently guide the tape back into the housing.
4.5 Carbide Scriber (150 mm)
- Marking: Hold the scriber firmly and draw its hard metal tip along the surface of the material to create a precise, permanent line.
- Safety: Always use appropriate safety measures, such as eye protection, when marking materials.
4.6 Digital Tire Tread Depth Gauge (0-28 mm)

Figure 4: The digital tire tread depth gauge, showing a measurement on its display.
- Power On/Off: Press the 'ON/OFF' button.
- Zero Setting: Place the gauge on a flat surface and press 'ZERO' to calibrate.
- Unit Conversion: Use the 'mm/inch' button to switch units.
- Measurement: Insert the measuring pin into the deepest part of a tire tread groove. Press the base of the gauge firmly against the tire surface. Read the depth on the digital display.
4.7 Aluminum Brake Disc Caliper (max. 60 mm depth)

Figure 5: The aluminum brake disc caliper, designed for measuring brake disc thickness and similar depths.
- Positioning: Place the caliper over the edge of the brake disc or other component to be measured.
- Reading: Read the measurement directly from the scale. This tool is also suitable for measuring tire tread depth and other similar applications up to 60 mm.
5. Maintenance and Care
Proper maintenance ensures the longevity and accuracy of your measurement tools.
- Cleaning: After each use, wipe down all tools with a clean, dry cloth to remove dirt, oil, or moisture. For digital tools, avoid excessive moisture.
- Storage: Always return tools to their designated cutouts in the foam insert. Store the insert in a dry, temperate environment to prevent corrosion and damage.
- Battery Replacement (Digital Tools): If the digital display on the caliper or tire tread depth gauge becomes dim or unresponsive, replace the battery according to the instructions provided with the individual tool. Typically, this involves opening a small battery compartment and inserting a new button cell battery.
- Calibration: Periodically check the accuracy of your tools against known standards. If a tool appears inaccurate, it may require professional calibration or replacement.
6. Troubleshooting
Most issues with these tools are minor and can be resolved with simple checks.
- Digital Display Not Working: Check the battery. Ensure it is correctly inserted and has sufficient charge. Replace if necessary.
- Inaccurate Readings (Digital Tools): Ensure the 'ZERO' function has been properly applied before measurement. Clean the measuring surfaces to remove any debris.
- Sticking Blades/Pins: For feeler gauges or contour gauges, ensure they are clean and free of foreign material. A light application of dry lubricant may help if movement is stiff.
- Tape Measure Not Retracting: Check for any obstructions in the tape's path. Ensure the lock mechanism is fully disengaged.
7. Specifications
| Component | Specification |
|---|---|
| Insert Dimensions | 189 x 408 x 32 mm |
| Digital Caliper | 150 mm, mm/inch, 1/100 mm vernier, extra-large display |
| Precision Feeler Gauge | 20 blades, 100 mm length, 0.05 - 1.0 mm range |
| Metal Contour Gauge | 125 mm length, max. 30 mm measuring depth |
| Tape Measure | 19 mm x 5 m, with tape lock and belt clip, CEE compliant |
| Carbide Scriber | 150 mm length, hard metal tip |
| Digital Tire Tread Depth Gauge | 0 - 28 mm measuring range, metric/inch display |
| Aluminum Brake Disc Caliper | Max. 60 mm measuring depth, 182 x 115 x 13 mm |
| Material | Metal, Aluminum (for caliper), Robust Foam (insert) |
| Model Number | 68510 |
| Manufacturer | OC-PRO |
8. Warranty and Support
For warranty information, technical support, or replacement parts, please contact the manufacturer, OC-PRO, or your authorized retailer. Keep your purchase receipt as proof of purchase.
Manufacturer: OC-PRO
Model Reference: 68510


