1. Introduction
This manual provides detailed instructions for the installation, operation, and maintenance of your VLAND LED Dual Beam Projector Headlights. Please read this manual thoroughly before installation and use to ensure proper function and safety. Keep this manual for future reference.
2. Product Overview
The VLAND LED Dual Beam Projector Headlights are designed to enhance visibility and the aesthetic appeal of your vehicle. Key features include:
- LED Dual Beam Projectors: Provides both low and high beam functionality from a single projector lens.
- Sequential Turn Signals: Dynamic amber LED turn indicators for improved signaling visibility.
- Daytime Running Lights (DRL): Bright white LED DRLs for increased daytime visibility.
- Demon Eye Style: Unique red accent lighting for a distinctive appearance.
- Durable Construction: Designed with superior sealing for waterproof and moisture-proof performance (IP67 rated).
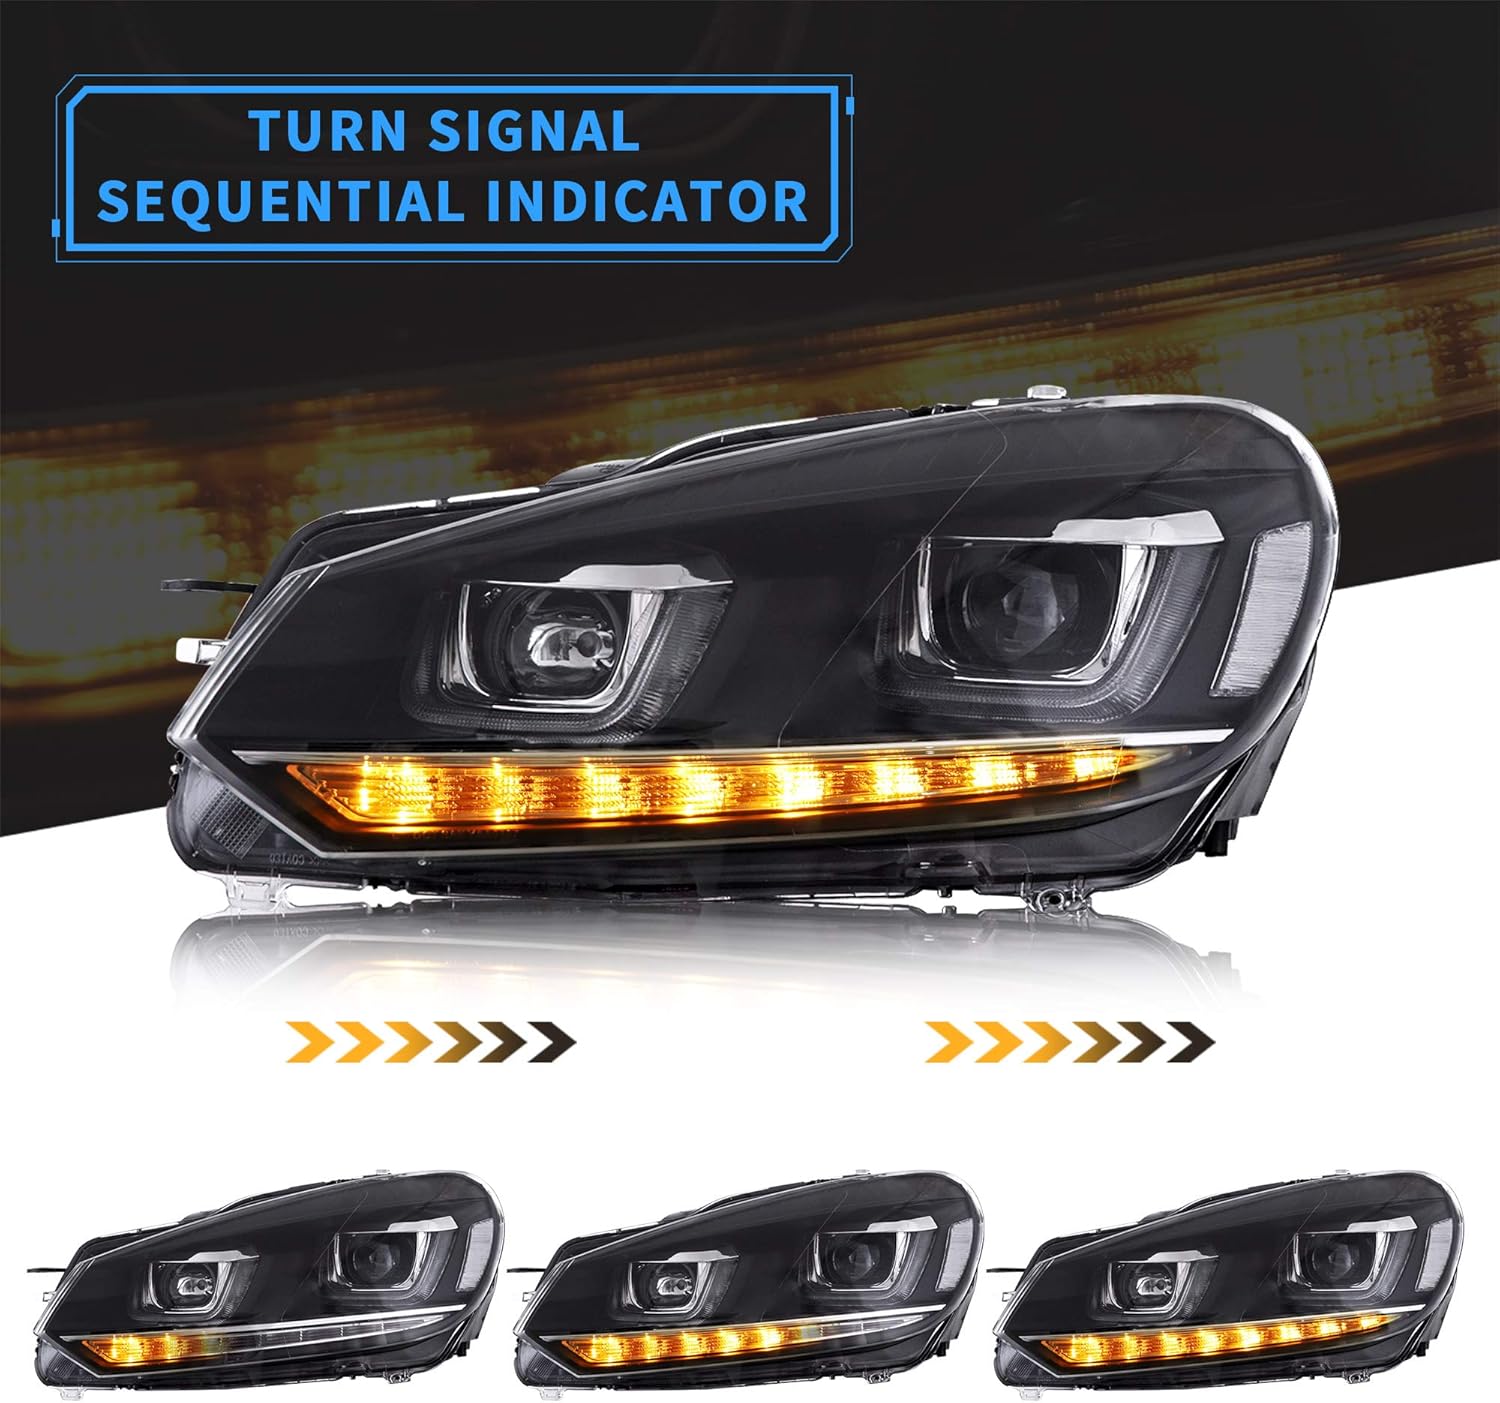
Figure 2.1: Illustration of VLAND Headlight functions including DRL, Running Light, Dual Beam Lens, and Turn Signal.

Figure 2.2: Detailed functions of Normal Style and Demon Eye Style VLAND headlights.
3. Compatibility
These headlights are compatible with:
- Volkswagen Golf 6 / MK6 models from 2010 to 2014.
Important Note: These headlights are NOT compatible with GTR, Factory Projector TDI, or Factory Projector Models.
4. Safety Information
Always prioritize safety during installation and operation. Failure to follow these guidelines may result in injury or damage to your vehicle.
- Disconnect the vehicle's battery before beginning any electrical work.
- Wear appropriate personal protective equipment, including gloves and eye protection.
- Ensure all connections are secure and properly insulated to prevent short circuits.
- If you are unsure about any step, seek professional installation assistance.
- Do not touch the bulb glass with bare hands, as oils can reduce bulb lifespan.
5. Installation
Professional installation is recommended for optimal performance and to avoid potential damage. The headlights are designed for OEM direct fitment, requiring no vehicle modifications. D2H HID bulbs with ballast and decoder are recommended for the low beam (not included).
5.1 General Installation Steps:
- Preparation: Ensure the vehicle is turned off and the battery is disconnected.
- Remove Old Headlights: Carefully remove the existing factory headlights. This typically involves unscrewing mounting bolts and disconnecting wiring harnesses.
- Install HID Bulbs (if applicable): If using D2H HID bulbs for the low beam, install them into the projector housing. Ensure the ballast and decoder are properly connected and secured.
- Connect Wiring: Connect the new headlight's wiring harness to the vehicle's electrical system. Ensure all connections are secure and match the vehicle's original wiring.
- Mount New Headlights: Secure the new VLAND headlights into position using the original mounting points.
- Reconnect Battery: Reconnect the vehicle's battery.
- Test Functionality: Test all light functions (DRL, low beam, high beam, turn signals) before driving.
- Aim Headlights: Properly aim the headlights to ensure correct beam pattern and avoid blinding oncoming traffic.

Figure 5.1: Rear view of the headlight assembly, highlighting the harness, high beam lens, dual beam lens, and adjustment screws.
5.2 HID Bulb Installation Video:
For visual guidance on installing HID bulbs into a projector headlight, please refer to the following video:
Video 5.1: Installation guide for Hella Projector with HID bulbs. This video demonstrates the general process for installing HID bulbs into a projector headlight assembly.
6. Operation
Your VLAND headlights feature multiple lighting functions:
- Daytime Running Lights (DRL): These lights illuminate automatically when the vehicle is started, providing enhanced visibility during daylight hours.
- Low Beam: Activates the primary illumination for night driving, providing a focused beam pattern.
- High Beam: Provides maximum illumination for driving in dark conditions, typically activated by a separate switch.
- Sequential Turn Signal: When the turn signal is activated, the amber LEDs will illuminate in a sequential pattern, clearly indicating your turning intention.
- Demon Eye: This unique red accent lighting is part of the DRL/running light system, providing a distinct visual signature.

Figure 6.1: Demonstration of the sequential switchback turn signal function.
7. Maintenance
To ensure the longevity and optimal performance of your VLAND headlights, follow these maintenance tips:
- Regularly clean the headlight lenses with a soft cloth and mild soap to remove dirt and debris. Avoid abrasive cleaners.
- Inspect wiring and connections periodically for any signs of wear or damage.
- Ensure the headlight housing is free from cracks or damage that could allow moisture ingress.
7.1 Addressing Moisture Inside Headlights:
Condensation inside headlight assemblies can occur due to temperature changes. This is often a temporary condition and does not necessarily indicate a defect. Here are ways to address it:
- Apply Heat: Use a hairdryer or heat gun (on a low setting, from a safe distance) to gently warm the assemblies, helping the condensation evaporate.
- Sunlight Exposure: Remove the headlight bulbs and dust caps, then park the vehicle in direct sunlight. The natural heat can help dry out the moisture.
- Keep Dry: If possible, park your vehicle in a dry area. Avoid prolonged exposure to rain or damp conditions. After a car wash, allow headlights to dry thoroughly.

Figure 7.1: Explanation of common reasons for moisture inside headlight assemblies.

Figure 7.2: Methods to clear foggy headlights or taillights.
8. Troubleshooting
If you encounter issues with your VLAND headlights, consider the following:
- Lights Not Working: Check all electrical connections, fuses, and ensure the vehicle's battery is properly connected and charged. Verify bulbs are correctly seated.
- Flickering Lights: This can sometimes be caused by loose connections or an incompatible ballast/decoder for HID bulbs. Recheck connections or consult with a professional.
- Incorrect Beam Pattern: Ensure headlights are properly aimed. Refer to your vehicle's service manual or a professional for correct aiming procedures.
- Persistent Moisture: If moisture persists after attempting the solutions in Section 7.1, inspect the housing for damage or improper sealing.
For further assistance, please contact VLAND customer support.
9. Specifications
| Feature | Specification |
|---|---|
| Brand | VLAND |
| Model Number | YAA-GEF-0197A-H |
| Compatible Vehicle | VW Golf 6/MK6 (2010-2014) |
| Bulb Type (Recommended Low Beam) | D2H HID with ballast and decoder (not included) |
| Light Source Type | LED |
| Special Features | Amber Switchback Turn Signal, Plug and Play, Waterproof |
| Voltage | 12 Volts |
| Wattage | 55 Watts |
| Position | Front |
| Item Weight | 8.24 kg |
10. Warranty and Support
Please retain all original packaging, labels, and this user manual. In the event that merchandise is damaged, becomes defective, or needs to be returned, please contact VLAND CA customer support. Provide the product label, video, and picture proof that clearly shows the defect for efficient processing.
For further inquiries or technical support, please visit the VLAND Store on Amazon.


