Introduction
Thank you for choosing the Outsunny 10' x 10' Patio Gazebo. This manual provides essential information for the safe assembly, operation, and maintenance of your new outdoor shelter. Please read all instructions carefully before beginning assembly and retain this manual for future reference.

Image: The Outsunny 10' x 10' Patio Gazebo, featuring a brown double-tiered canopy and full mesh netting for insect protection.
Important Safety Information
WARNING: This product contains chemicals known to the State of California to cause cancer and birth defects or other reproductive harm. For more information, visit www.P65Warnings.ca.gov.
- Always assemble the gazebo on a flat, level surface.
- Ensure all connections are secure before use.
- Do not use the gazebo in strong winds, heavy rain, or snow. Disassemble and store the canopy during severe weather conditions to prevent damage.
- Keep children and pets away from the assembly area.
- Do not hang heavy objects from the frame.
- Regularly inspect the gazebo for any signs of wear or damage. Replace worn or damaged parts immediately.
Package Contents
Before assembly, verify that all components listed below are present and undamaged. If any parts are missing or damaged, please contact customer support.
- Powder-Coated Steel Frame Components (legs, beams, connectors)
- 180 g/m² Polyester Canopy with PA Coating (main roof and top tier)
- Mesh Netting Sidewalls with Zippers
- Corner Frame Shelves
- Ground Stakes and Ropes (for securing)
- Assembly Hardware (bolts, nuts, washers)
- Assembly Tools (wrench, hex key)
Assembly Instructions
Assembly typically requires two or more adults. Follow the steps carefully to ensure proper and safe construction.
Step 1: Unpack and Identify Parts
Carefully unpack all components and lay them out. Refer to the parts list to identify each piece. Familiarize yourself with the different frame sections and hardware.
Step 2: Assemble the Base Frame
Connect the horizontal base beams to the vertical leg posts. Ensure all connections are finger-tight before fully tightening. Pay attention to the orientation of the posts, especially those with corner shelves.

Image: Detail of the gazebo's base frame corner, showing the sturdy alloy steel construction and integrated ground stakes for stability.
Step 3: Install Corner Shelves and Decorative Elements
Attach the corner frame shelves to the designated leg posts. These shelves provide both structural support and decorative appeal. Secure any decorative arrow-tip motifs to the top of the frame sections as indicated in the diagrams.
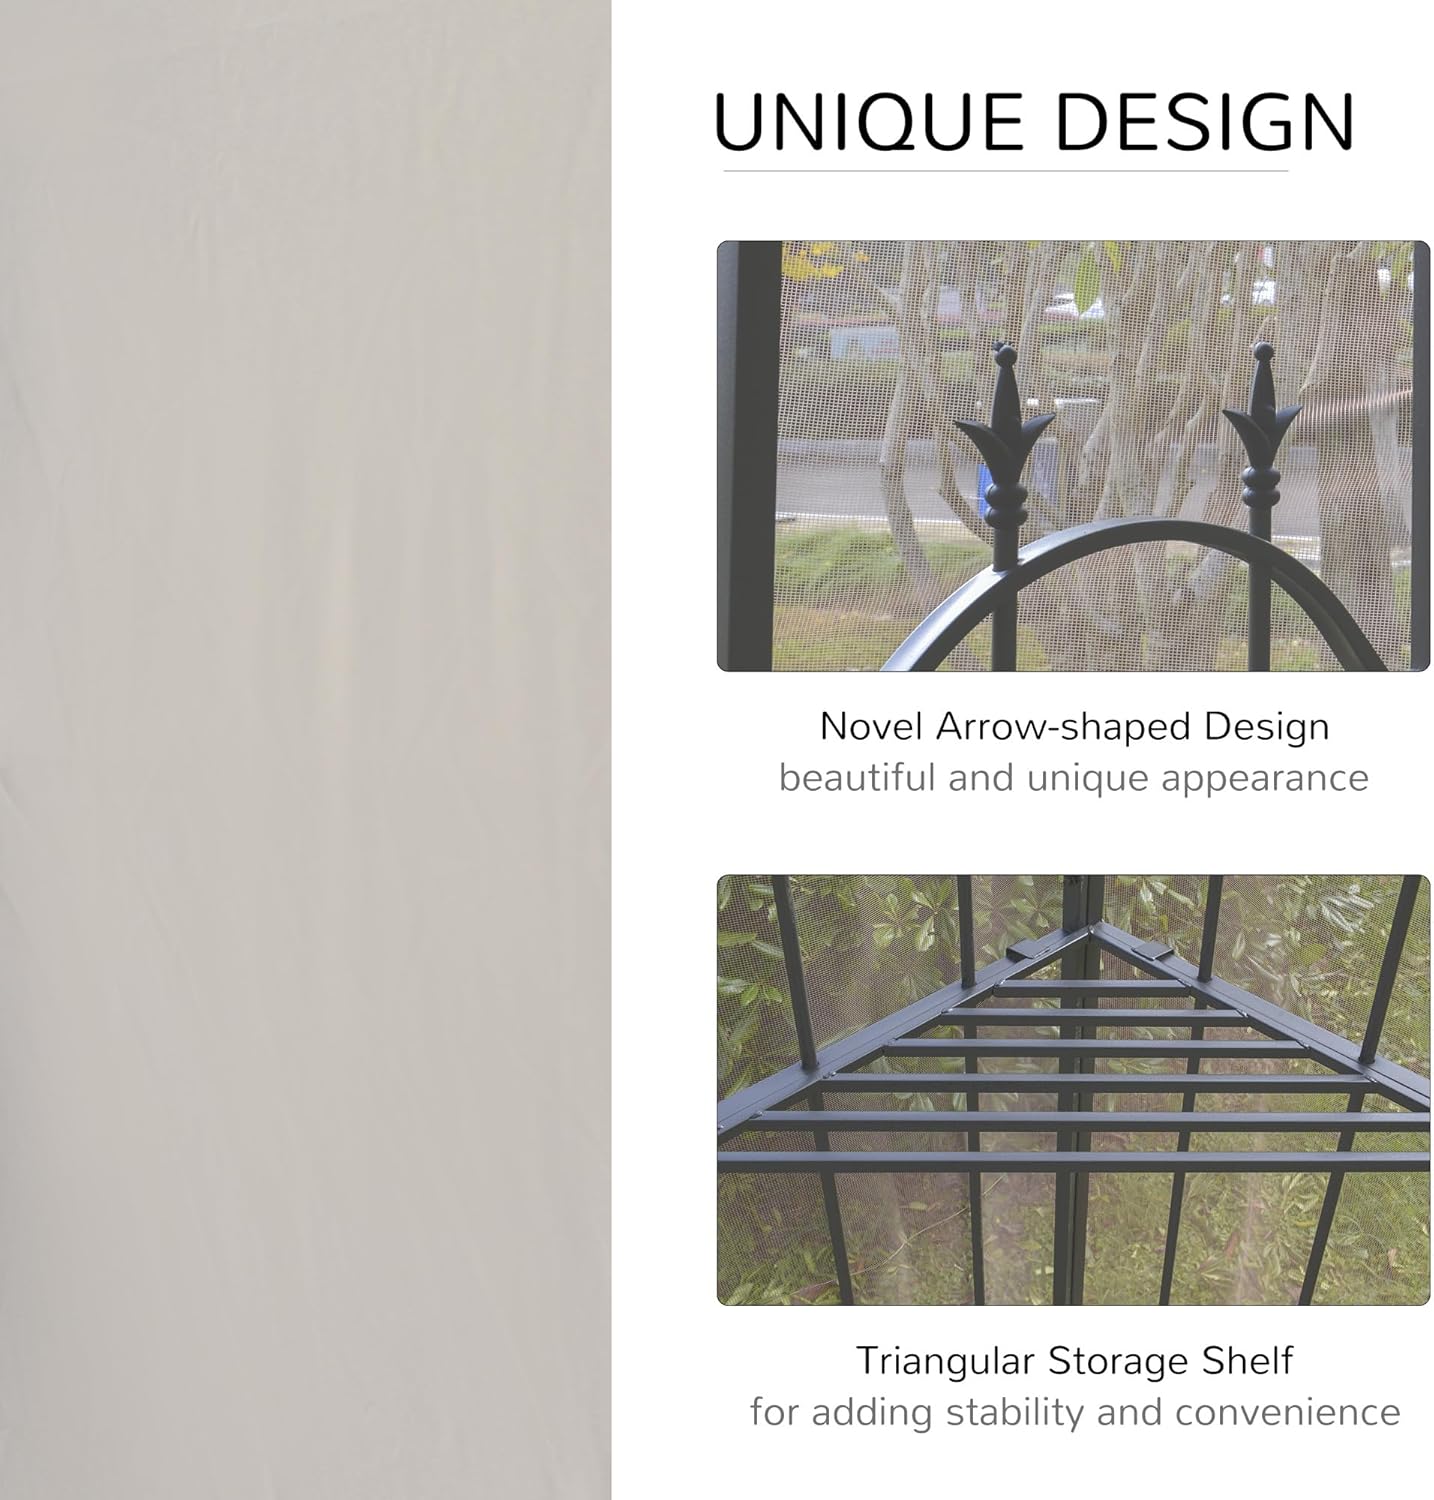
Image: Close-up illustrating the novel arrow-shaped design at the top of the frame and the triangular storage shelf at the corner, enhancing both aesthetics and functionality.
Step 4: Construct the Roof Frame
Assemble the upper roof frame components. This includes the main roof beams and the smaller frame for the double-tier vent. Ensure all parts are correctly aligned before securing.
Step 5: Attach the Canopy and Netting
Drape the main canopy over the assembled roof frame. Secure it using the provided fasteners or ties. Then, attach the mesh netting sidewalls to the frame. The netting features zippers for easy access and can be tied back when not in use.
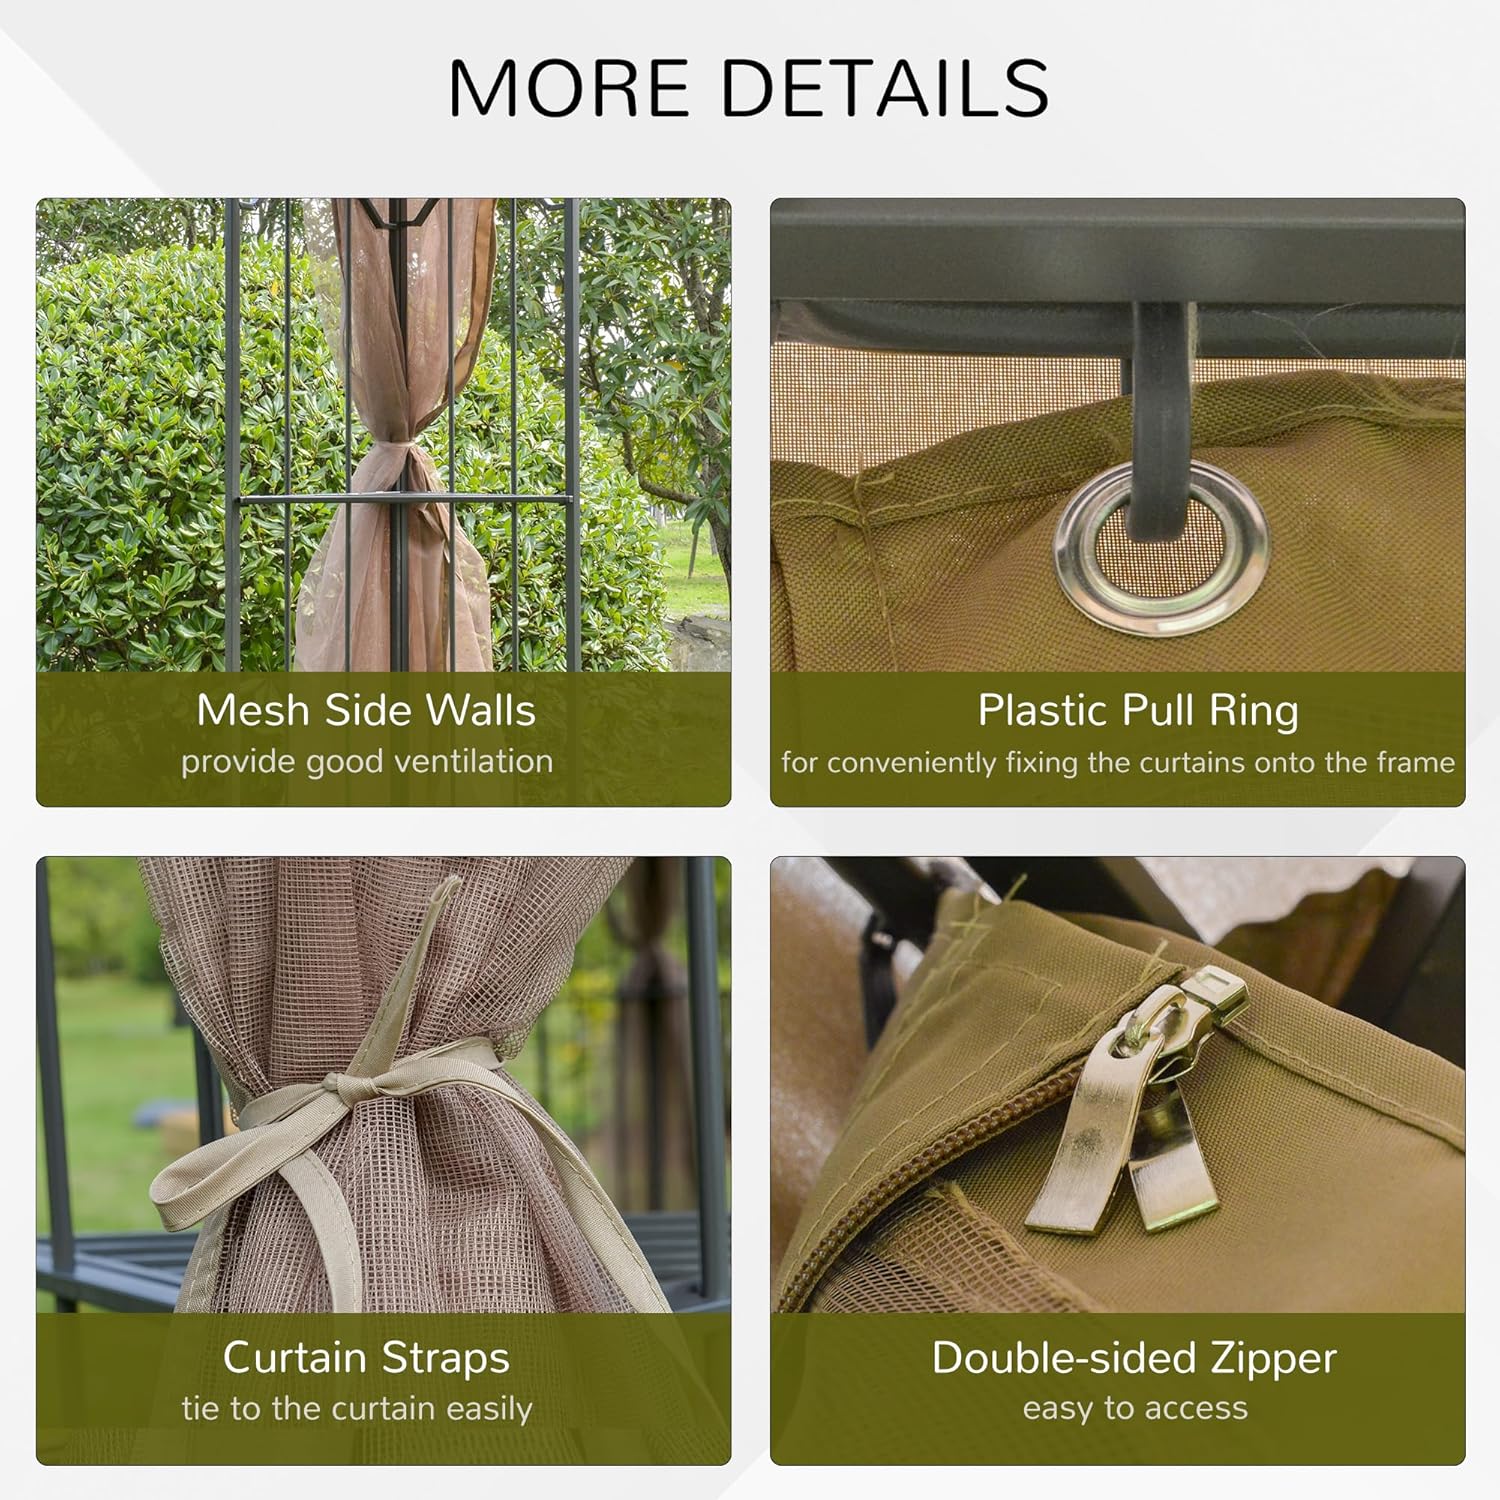
Image: This composite image highlights key features: the breathable mesh sidewalls, plastic pull rings for securing curtains, convenient curtain straps, and durable double-sided zippers for easy access.

Image: A close-up shot of the curtain strap, demonstrating how the mesh netting can be neatly tied back to the gazebo frame.
Step 6: Secure the Gazebo
Once fully assembled, use the included ground stakes and ropes to firmly anchor the gazebo to the ground. This is crucial for stability, especially in moderate wind conditions.
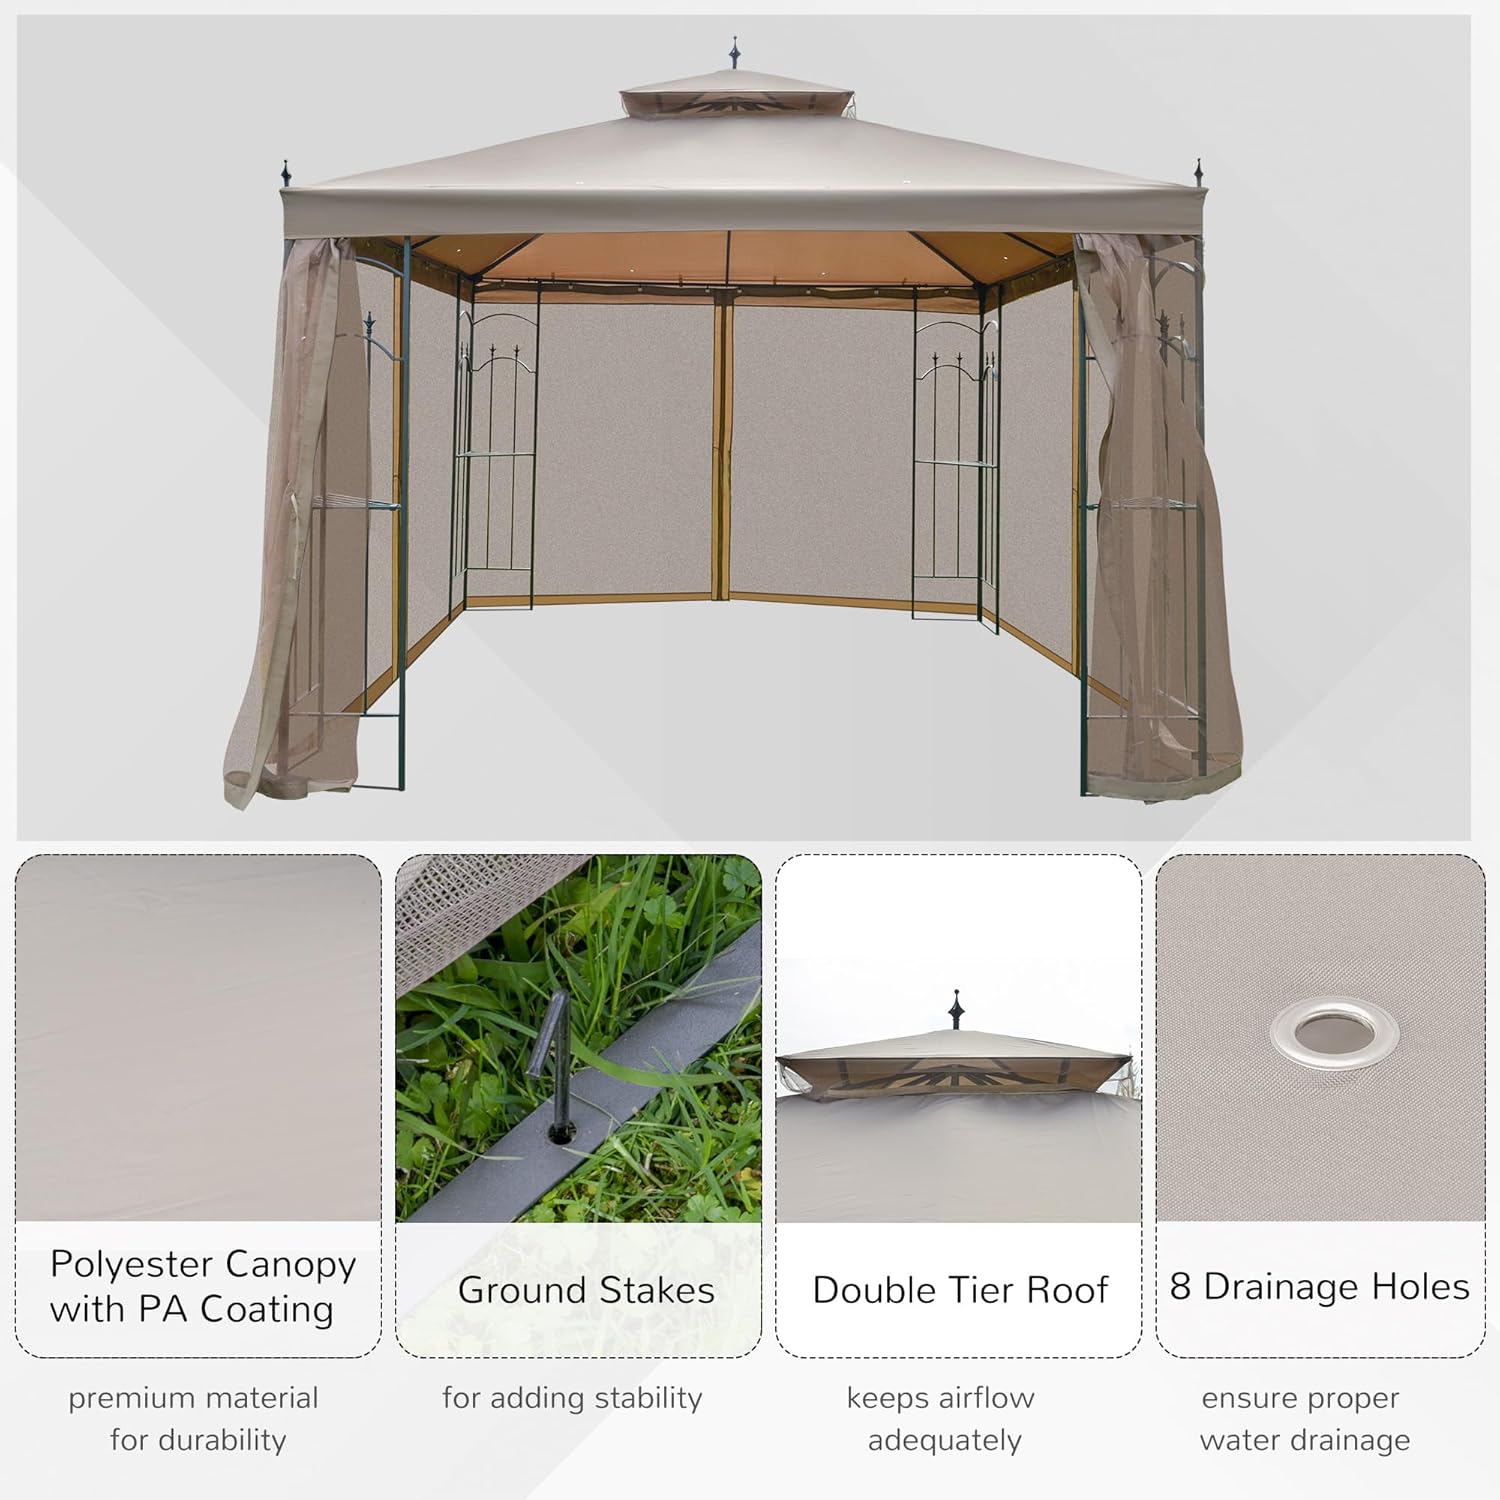
Image: An overview of the canopy's construction, showing the durable polyester fabric, the ground stakes for stability, the double-tier roof design for airflow, and the eight drainage holes to prevent water accumulation.
Operating Your Gazebo
The Outsunny Gazebo is designed for versatile outdoor use. The mesh netting sidewalls can be zipped closed to provide protection from insects while allowing airflow. When not needed, the netting can be tied back to the frame using the integrated straps for an open-air experience.

Image: The Outsunny gazebo providing a shaded and protected area in a garden setting, suitable for outdoor dining or relaxation.
Care and Maintenance
- Cleaning: Clean the canopy and netting with mild soap and water. Do not use harsh chemicals or abrasive cleaners. Rinse thoroughly and allow to air dry completely before storage.
- Frame Care: Wipe the steel frame with a damp cloth. If rust spots appear, clean them and apply a rust-inhibiting paint.
- Weather Protection: While the canopy is water-resistant, it is not waterproof. In heavy rain, water may accumulate. The integrated grommets help with drainage, but it is recommended to remove the canopy during prolonged heavy rainfall or strong winds to prevent damage.
- Storage: For prolonged periods of non-use or during winter months, disassemble the canopy and netting and store them in a dry, protected area. The frame can remain outdoors if properly maintained, but storing it indoors will extend its lifespan.
Troubleshooting
| Problem | Possible Cause | Solution |
|---|---|---|
| Gazebo is unstable or wobbly. | Not properly anchored; loose connections. | Ensure all ground stakes are firmly in place. Tighten all bolts and connections on the frame. |
| Water pooling on canopy. | Canopy not taut enough; excessive rainfall. | Ensure canopy is stretched tightly across the frame. Clear any debris from the canopy. Consider removing canopy during heavy rain. |
| Mesh netting not closing properly. | Zipper misalignment; netting caught. | Check for any fabric caught in the zipper. Ensure the netting is properly aligned on its tracks or rings. |
| Parts do not fit during assembly. | Incorrect part orientation; manufacturing defect. | Double-check the instruction diagrams for correct part orientation. If still an issue, contact customer support. |
Product Specifications
| Feature | Specification |
|---|---|
| Brand | Outsunny |
| Model Number | 84C-028BN |
| Product Dimensions | 118"L x 118"W x 108.5"H (10' x 10' x 9' approx.) |
| Item Weight | 69.08 Pounds |
| Frame Material | Alloy Steel (Powder-Coated) |
| Canopy Material | 180 g/m² Polyester with PA Coating |
| Water Resistance Level | Water Resistant |
| Shape | Square |
| UV Protection | Yes |
| Assembly Required | Yes |
| Occupancy | 6 Person |
| Color | Brown |
| Floor Area | 96.9 Square Feet |

Image: A visual representation of the gazebo's dimensions, indicating a 9.8 ft by 9.8 ft base and a total height of 9 ft.
Warranty and Support
For specific warranty information, replacement parts, or technical support, please contact Outsunny customer service directly. Refer to your purchase documentation for contact details or visit the official Outsunny website.
Manufacturer: Aosom LLC


