Introduction
Thank you for choosing the Bestier AK-AJ-18167 Silver Crystal Raindrop Pendant Chandelier. This manual provides detailed instructions for the safe installation, operation, and maintenance of your new lighting fixture. Please read all instructions carefully before beginning installation and retain this manual for future reference.
This elegant chandelier features a unique crystal glass design that will enhance the aesthetic of any room. It is designed for indoor use only and requires six E12 bulbs (not included).
Safety Information
- WARNING: To avoid the risk of electric shock, always disconnect power at the main circuit breaker or fuse box before beginning installation or performing any maintenance.
- All electrical connections must be in accordance with local codes, ordinances, or the National Electric Code (NEC). Consult a qualified electrician if you are unfamiliar with proper electrical wiring installations.
- Wear safety glasses and gloves during installation.
- Ensure the mounting surface is capable of supporting the weight of the fixture.
- Do not connect this fixture to an ungrounded electrical system.
- Handle crystal components with care to prevent breakage or injury.
- Use only E12 base bulbs, maximum 40 watts per bulb (240 watts total). Dimmable bulbs are compatible if connected to a compatible dimmer switch (not included).
Package Contents
Verify that all components are present and undamaged before proceeding with installation.
- Chandelier Frame (Main Light Body)
- Adjustable Hanging Chain
- Ceiling Canopy and Mounting Hardware
- Crystal Raindrop Pendants (various sizes)
- Small Metal Rings for Crystal Attachment
- Instruction Manual
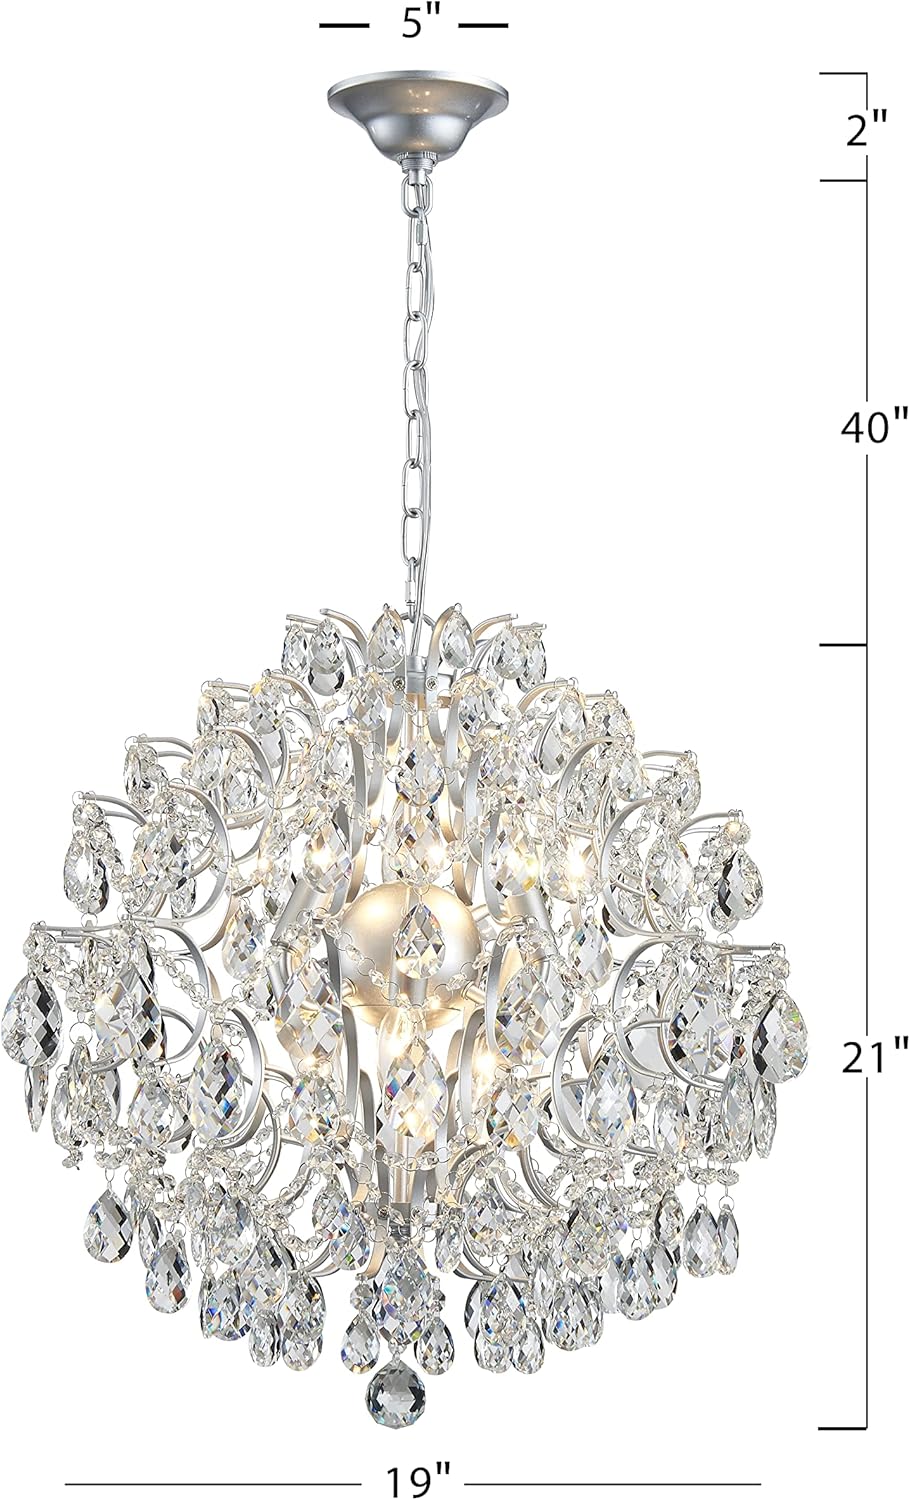
Figure 1: Chandelier Dimensions. The fixture has a diameter of 19 inches and a height of 21 inches. The adjustable hanging chain provides up to 40 inches of additional length.
Installation Instructions
Note: Assembly of the crystal components can be time-consuming. It is highly recommended to assemble the chandelier frame and attach all crystal pieces before hanging the fixture from the ceiling. This will simplify the process and reduce strain.
Step 1: Prepare for Installation
- Turn off power at the circuit breaker.
- Carefully unpack all components and lay them out on a clean, soft surface to prevent scratches or damage.
- Identify the main chandelier frame, hanging chain, ceiling canopy, and all crystal pieces.
Step 2: Assemble the Chandelier Frame
- Attach the arms to the central light body. Ensure all connections are secure.
- If applicable, ensure any welded or soldered seams on the arms face upwards for a cleaner appearance.
Step 3: Attach Crystal Pendants
This step requires patience. The crystal pendants attach using small metal rings, similar to a keychain. Using needle-nose pliers may assist in opening and closing these rings.
- Refer to the provided diagram (if any) for the correct placement of different crystal sizes. Typically, larger crystals are placed lower or at key points.
- Carefully open each metal ring, attach it to a crystal pendant, and then secure it to the designated hook on the chandelier frame.
- Repeat this process for all crystal pendants.

Figure 2: Detail of Crystal Attachment. Each crystal pendant is secured to the frame using small metal rings.
Step 4: Mount the Ceiling Canopy
- Attach the mounting bracket to the electrical box in the ceiling using the provided screws.
- Thread the fixture wires through the center hole of the mounting bracket and ceiling canopy.
Step 5: Adjust Hanging Chain and Wire Connections
- Determine the desired hanging length for your chandelier. Use pliers to open and remove excess chain links if necessary.
- Connect the fixture's ground wire (usually bare copper or green) to the house supply ground wire.
- Connect the fixture's hot wire (usually black or smooth) to the house supply hot wire (usually black).
- Connect the fixture's neutral wire (usually white or ribbed) to the house supply neutral wire (usually white).
- Secure all wire connections with wire nuts and wrap with electrical tape for added security.
Step 6: Secure the Chandelier
- Carefully lift the assembled chandelier and attach the hanging chain to the mounting bracket.
- Push the ceiling canopy up against the ceiling, covering the electrical box, and secure it with the decorative nuts or screws.
Step 7: Install Bulbs
- Screw six E12 base bulbs (not included) into the sockets. Do not exceed 40 watts per bulb.
- Restore power at the circuit breaker and test the fixture.

Figure 3: Fully installed Bestier Chandelier.
Operating Instructions
The Bestier AK-AJ-18167 Chandelier operates like a standard lighting fixture. Once properly installed and wired, it can be controlled via a wall switch.
- On/Off: Use the wall switch connected to the fixture to turn the light on or off.
- Dimming (Optional): If dimmable E12 bulbs are installed and the fixture is connected to a compatible dimmer switch (purchased separately), you can adjust the light intensity using the dimmer control.
Maintenance
Regular cleaning and proper care will help maintain the appearance and longevity of your chandelier.
- Cleaning: Turn off power before cleaning. Use a soft, dry, or slightly damp cloth to wipe the metal frame. For crystal components, use a soft, lint-free cloth and a mild glass cleaner (avoid spraying directly onto electrical components).
- Bulb Replacement: Always turn off power before replacing bulbs. Allow bulbs to cool completely before handling. Replace with E12 base bulbs, maximum 40 watts.
- Inspection: Periodically check all connections and hanging components for tightness and wear.
Troubleshooting
| Problem | Possible Cause | Solution |
|---|---|---|
| Light does not turn on. | Power is off; loose wiring; faulty bulb. | Check circuit breaker; ensure all wiring is secure; replace bulb. |
| Light flickers. | Loose bulb; loose wiring; incompatible dimmer. | Tighten bulb; check wiring connections; ensure dimmer is compatible with bulbs. |
| Crystals appear dull. | Dust or residue buildup. | Clean crystals with a soft, lint-free cloth and mild glass cleaner. |
Specifications
- Brand: Bestier
- Model Number: AK-AJ-18167
- Dimensions: 19" Diameter x 21" Height (Fixture), Max 40" Adjustable Chain Length
- Color: Silver
- Material: Glass, Metal
- Bulb Base: E12
- Number of Lights: 6
- Max Wattage per Bulb: 40W (240W Total)
- Power Source: AC
- Installation Type: Hardware-mounted
- Special Feature: Dimmable (with compatible bulbs and dimmer switch)
- Indoor/Outdoor Usage: Indoor Only
- Item Weight: Approximately 20.4 pounds (9.29 kg)
Warranty and Customer Support
For warranty information or technical assistance, please contact Bestier customer support through your original purchase platform or visit the official Bestier website. Please have your model number (AK-AJ-18167) and purchase date available when contacting support.
Online Support: Bestier Contact Us