
Fit Choice GLA-1006A
Fit Choice 12.7 Quart 10-in-1 XLarge Capacity Air Fryer Oven User Manual
Model: GLA-1006A
Brand: Fit Choice
Introduction
This manual provides essential information for the safe and efficient operation of your Fit Choice 12.7 Quart 10-in-1 XLarge Capacity Air Fryer Oven, Model GLA-1006A. This appliance utilizes hot-air circulation technology for cooking with minimal oil, offering a versatile solution for various culinary tasks including air frying, broiling, roasting, grilling, searing, baking, reheating, and dehydrating. Please read all instructions thoroughly before first use and retain this manual for future reference.
Important Safety Information
Always follow basic safety precautions when using electrical appliances to reduce the risk of fire, electric shock, and injury.
- Do not immerse the main unit in water or other liquids.
- Ensure the appliance is placed on a stable, heat-resistant surface.
- Keep children and pets away from the appliance during operation.
- Do not block any ventilation openings.
- Unplug the appliance from the outlet when not in use and before cleaning.
- Allow the appliance to cool completely before handling or cleaning.
- Do not operate the appliance if the cord or plug is damaged, or if the appliance malfunctions or has been damaged in any way.
- Use only accessories recommended by the manufacturer.
- Exercise extreme caution when removing hot oil or other hot liquids.
- The appliance operates at high temperatures; avoid direct contact with hot surfaces.
Package Contents
Your Fit Choice Air Fryer Oven comes with the following accessories:
- Main Air Fryer Oven Unit
- Crisper Trays (Steel)
- Drip Tray
- Round Basket
- Rotisserie Shaft
- Skewers Racks
- Rotisserie Spit Assembly & Insertion
- Rotisserie Fetch Tool
- Fry Basket Handle
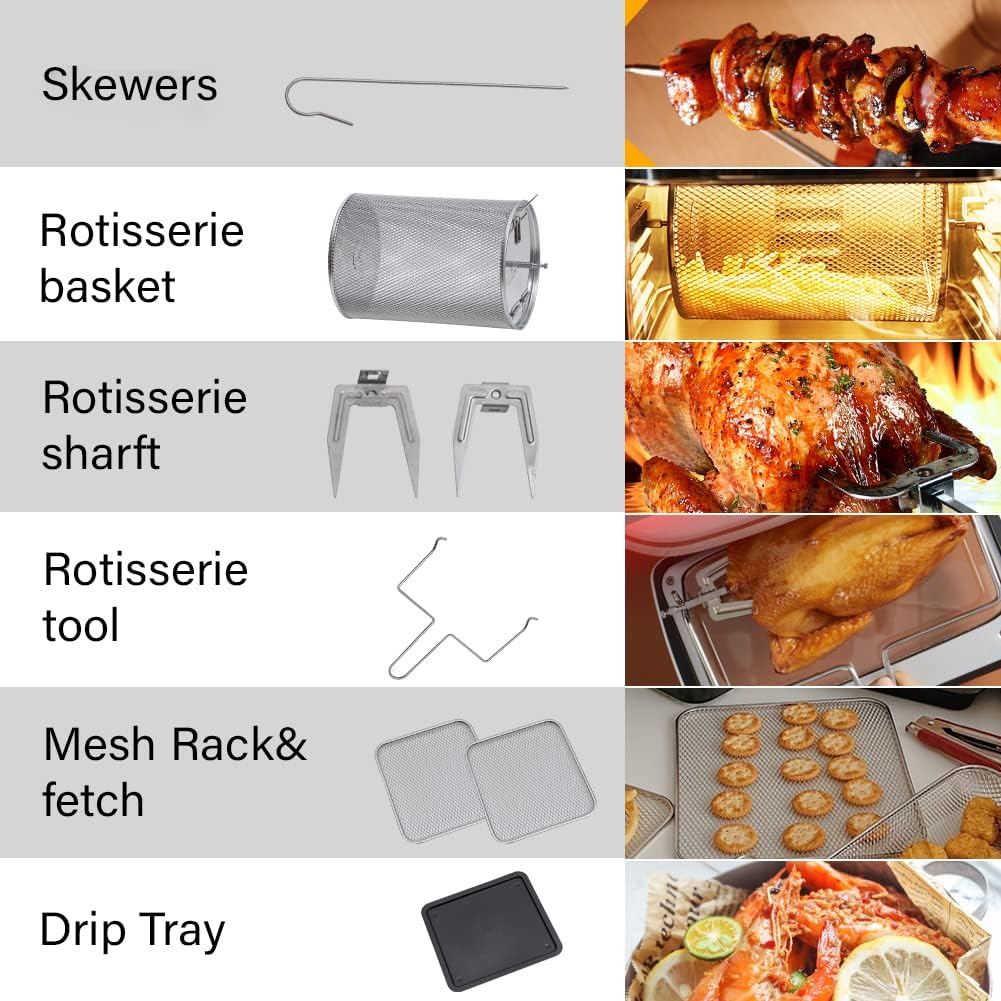
Image: Included accessories for the Fit Choice Air Fryer Oven.
Product Overview
The Fit Choice Air Fryer Oven features a sleek design with a digital touch screen control panel and a transparent viewing window to monitor cooking progress. Its large capacity allows for preparing family-sized meals.

Image: Front view of the Fit Choice Air Fryer Oven, showcasing the digital control panel and viewing window.

Image: Detailed view of the digital touch screen control panel with 10 cooking presets.

Image: Dimensions of the Fit Choice Air Fryer Oven.
Setup
Before first use, ensure all packaging materials are removed. Clean all accessories and the interior of the appliance with a damp cloth and mild detergent. Dry thoroughly.
- Place the appliance on a stable, level, heat-resistant surface, ensuring adequate clearance (at least 4 inches) on all sides for proper ventilation.
- Insert the Drip Tray at the bottom of the oven cavity to collect any excess oil or crumbs.
- Plug the power cord into a grounded electrical outlet (120V, 60Hz).
- It is recommended to run the air fryer empty for about 10-15 minutes at 350°F (175°C) during the first use to eliminate any manufacturing odors. A slight odor may be present, which is normal.
Operating Instructions
General Operation
- Press the Power button to turn on the appliance. The digital display will illuminate.
- Select a cooking preset or manually adjust the temperature and time.
- The temperature range is 180°F to 400°F (82°C to 204°C).
- Press the Start/Pause button to begin cooking.
- The internal light can be turned on/off to monitor cooking progress through the viewing window.
Using Presets
The appliance features 10 easy presets for common dishes. Simply select the desired preset icon on the touch screen, and the oven will automatically set the optimal time and temperature.
Image: The 10 cooking presets available on the digital control panel.
Rotisserie Function
The rotisserie function is ideal for cooking whole chickens or other large cuts of meat, ensuring even cooking and browning.
- Assemble the Rotisserie Shaft with the Skewers Racks or attach the Rotisserie Spit Assembly to your food item.
- Using the Rotisserie Fetch Tool, carefully insert the assembled rotisserie into the designated slots inside the oven cavity.
- Select the appropriate cooking preset or manually set time and temperature. Activate the rotisserie rotation function.
- Monitor cooking through the viewing window.
- Once cooking is complete, use the Rotisserie Fetch Tool to safely remove the hot rotisserie assembly from the oven.

Image: Example of a rotisserie chicken being cooked in the air fryer oven.
Cleaning and Maintenance
Regular cleaning ensures optimal performance and extends the life of your appliance. Always unplug the air fryer and allow it to cool completely before cleaning.
- Main Unit: Wipe the exterior with a damp cloth. Do not use abrasive cleaners or immerse the unit in water.
- Accessories: All included accessories (Crisper Trays, Drip Tray, Round Basket, Rotisserie Shaft, Skewers Racks, etc.) are made of high-quality stainless steel and are dishwasher safe for easy cleaning. For stubborn food residue, soak in warm, soapy water before washing.
- Interior: Wipe the interior walls with a damp cloth and mild detergent. For baked-on food, a non-abrasive sponge can be used.
- Ensure all parts are thoroughly dry before reassembling or storing the appliance.
Troubleshooting
If you encounter issues with your air fryer, consult the following table before contacting customer support.
| Problem | Possible Cause | Solution |
|---|---|---|
| Appliance does not turn on. | Not plugged in; power outlet malfunction; main unit not properly closed. | Ensure power cord is securely plugged in. Check the power outlet with another appliance. Ensure the door is fully closed. |
| Food is not cooked evenly. | Overcrowding the basket/trays; incorrect temperature/time setting. | Cook food in smaller batches. Shake or flip food halfway through cooking. Adjust temperature and time as needed. |
| White smoke coming from the appliance. | Excess oil/grease from food dripping onto the heating element; food with high fat content. | Ensure the Drip Tray is in place and clean. Remove excess oil from food before cooking. This is usually harmless. |
| Appliance emits a burning smell. | Food residue or grease buildup inside the oven. | Unplug and allow to cool. Clean the interior and accessories thoroughly. |
Specifications
| Feature | Specification |
|---|---|
| Model Name | GLA-1006A |
| Capacity | 12.7 Quarts |
| Rated Power | 1700 Watts |
| Supply Power | 120V, 60HZ |
| Temperature Range | 180°F - 400°F |
| Control Method | Touch Control |
| Material | Stainless Steel |
| Dishwasher Safe Parts | Yes (Accessories) |
| Item Weight | 20 pounds |
| Package Dimensions | 18.27 x 15.2 x 14.92 inches |
| ETL Approved | Yes |
Warranty and Support
This product comes with a manufacturer's warranty. Please refer to the warranty card included in your product packaging for specific terms and conditions. For technical support, replacement parts, or any inquiries not covered in this manual, please contact Fit Choice customer service through the contact information provided on the product packaging or their official website.
Ask a question about this manual
Ask about setup, troubleshooting, compatibility, parts, safety, or missing instructions. Manuals+ will review the question and use this page’s manual context to help answer it.