1. Introduction
This manual provides detailed instructions for the safe and effective use of the HGV TOOLS HGV 0008 Injector & Valve Spring Compressor Tool Kit. This specialized tool is designed for the removal and installation of injectors and valve springs on PACCAR MX13 engines (CF 85, Euro 4/5, engine codes 410/460).
Safety First:
- Always wear appropriate personal protective equipment (PPE) including safety glasses and gloves.
- Ensure the engine is cool and depressurized before beginning any work.
- Refer to the vehicle manufacturer's service manual for specific engine procedures and torque specifications.
- Keep the work area clean and well-lit.
2. Product Components
The HGV TOOLS HGV 0008 kit includes the following main components:
- Injector Removal Tool (Slide Hammer Puller)
- Valve Spring Compressor Tool

Figure 1: Overview of the HGV TOOLS Injector and Valve Spring Compressor Tool Kit, showing the injector removal tool (slide hammer puller) and the valve spring compressor.
3. Setup and Preparation
- Prepare the Cylinder Head: Place the cylinder head on a flat and clean surface. Ensure the surface is protected to prevent scratches during valve removal.
- Identify Components: Familiarize yourself with the engine's injector and valve spring locations.
- Gather Necessary Tools: In addition to this kit, you may need basic hand tools, a torque wrench, and a marked rack for organizing removed valves and springs.
4. Operation
4.1 Injector Removal
- Install Press Tool: Insert the injector removal tool (slide hammer puller) into the unit injector hole.
- Secure Tool: Screw the tool into the unit injector retainer screw hole until it is firmly seated.
- Remove Injector: Use the slide hammer action to carefully pull the injector from its seating.

Figure 2: The injector removal tool (slide hammer) being used to extract an injector from the engine block.
Note: The injector shown in Figure 4 (Injector genuine no: 1905001) is compatible with this tool.
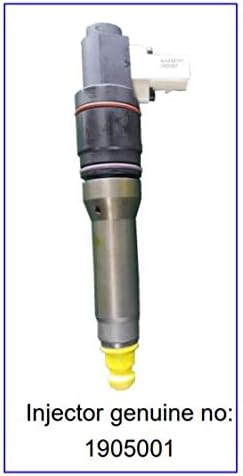
Figure 3: A PACCAR MX13 injector, identified by genuine part number 1905001. This type of injector is compatible with the removal tool.
4.2 Valve Spring Compression and Removal
- Position Compressor: Place the moving part of the valve spring compressor tool directly above the valve spring to be removed.
- Compress Spring: Turn down the tool's "wing nut" (or equivalent compression mechanism) until the valve disc is pressed down sufficiently to expose the valve collets.
- Remove Collets: Carefully remove the valve collets.
- Release Spring: Slowly release the compression on the valve spring and remove the spring and valve disc.
- Organize Components: Place removed valves and springs in a marked rack to ensure they can be reinstalled in their original positions within the cylinder head. This facilitates proper reassembly.
- Repeat: Remove any remaining valves following the same procedure.
- Remove Oil Seals: After all valves and springs are removed, proceed to remove the oil seals from the valve guides.
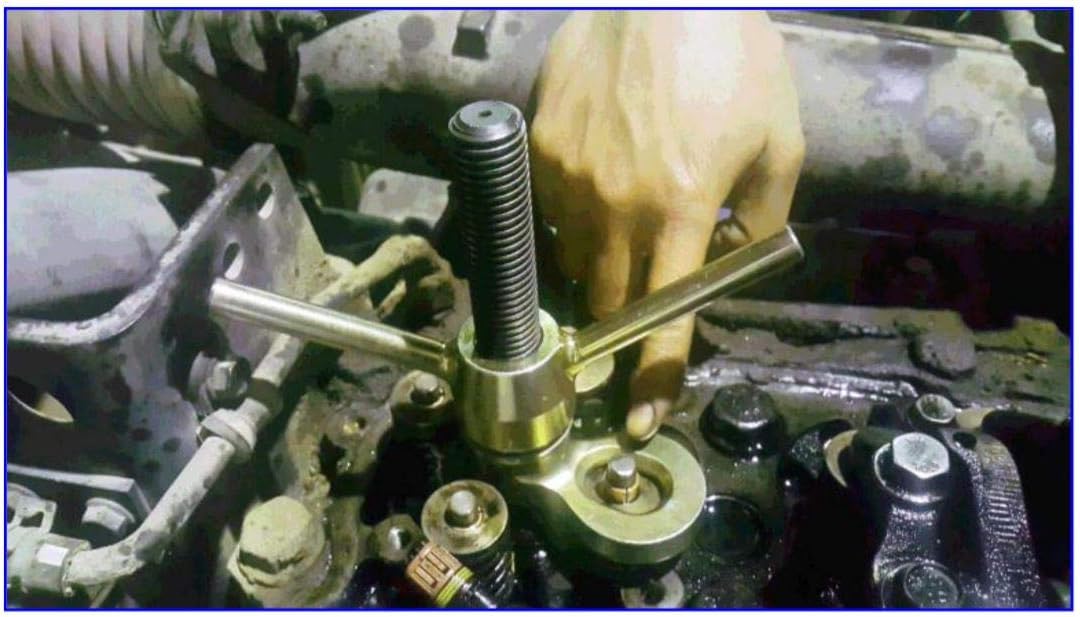
Figure 4: The valve spring compressor tool positioned on a cylinder head, compressing a valve spring to allow for collet removal.
5. Maintenance
- Cleaning: After each use, clean the tools thoroughly to remove any oil, grease, or debris.
- Lubrication: Apply a light coat of oil to threaded parts and moving components to prevent rust and ensure smooth operation.
- Storage: Store the tool kit in a dry, clean environment to protect it from corrosion and damage.
- Inspection: Periodically inspect the tools for any signs of wear, damage, or deformation. Do not use damaged tools.
6. Troubleshooting
This section addresses common issues that may arise during the use of the tool kit.
- Tool not engaging injector: Ensure the tool is correctly threaded into the injector retainer screw hole. Check for any obstructions.
- Difficulty compressing valve spring: Verify the tool is properly seated on the valve spring. Ensure the "wing nut" mechanism is clean and lubricated.
- Valve collets difficult to remove: Ensure the valve spring is compressed sufficiently to fully expose the collets.
If you encounter persistent issues, consult a professional mechanic or contact HGV TOOLS customer support.
7. Specifications
| Brand | HGV TOOLS |
| Model Number | HGV 0008 |
| Application | PACCAR MX13 Engines (CF 85) (Euro 4/5) |
| Engine Codes | 410 / 460 |
| Compatible Injector No. | 1905001 |
| Item Weight | 6.85 pounds |
| Package Dimensions | 14.96 x 12.2 x 2.68 inches |
8. Warranty and Support
For warranty information or technical support, please contact HGV TOOLS directly through their official channels. Keep your purchase receipt as proof of purchase.
For further assistance, you may visit the HGV TOOLS Store on Amazon.