1. Introduction
The Andonstar AD407 is a high-definition digital microscope designed for detailed observation and analysis of small objects. Featuring a 7-inch adjustable LCD display, 4MP HD sensor, and industrial-grade lens, it provides clear images and high-quality video recording. Its versatile output options and ergonomic design make it suitable for various applications, including PCB inspection, phone repair, DIY electronics, and SMD/SMT/BGA work.

Figure 1: Andonstar AD407 Digital Microscope overview.
2. Key Features
- 7-inch Adjustable LCD Display: Provides enhanced viewing experience by displaying magnified images directly on the screen. The screen can be adjusted up to 270 degrees for optimal viewing angles.
- 4MP HD Sensor & Industrial Lens: Equipped with a high-definition sensor and industrial-grade lens for capturing clear images with deep depth of field and recording high-quality video.
- Multiple Output Options: Supports HDMI output for connection to external monitors (real-time display without recording), USB output, and memory card output for storage.
- Built-in Adjustable LED Lights: Ensures sufficient illumination of the object for clear imaging.
- IR Remote Control: Allows for remote operation, minimizing screen shake during adjustments and enhancing user convenience.
- Ergonomically-Designed Stand: The adjustable stand can be moved backward and forward, providing ample working space for soldering and other tasks.
- UV Filter: Protects the lens from heat, dust, oil, or smoke, particularly useful during soldering operations, extending the microscope's lifespan.
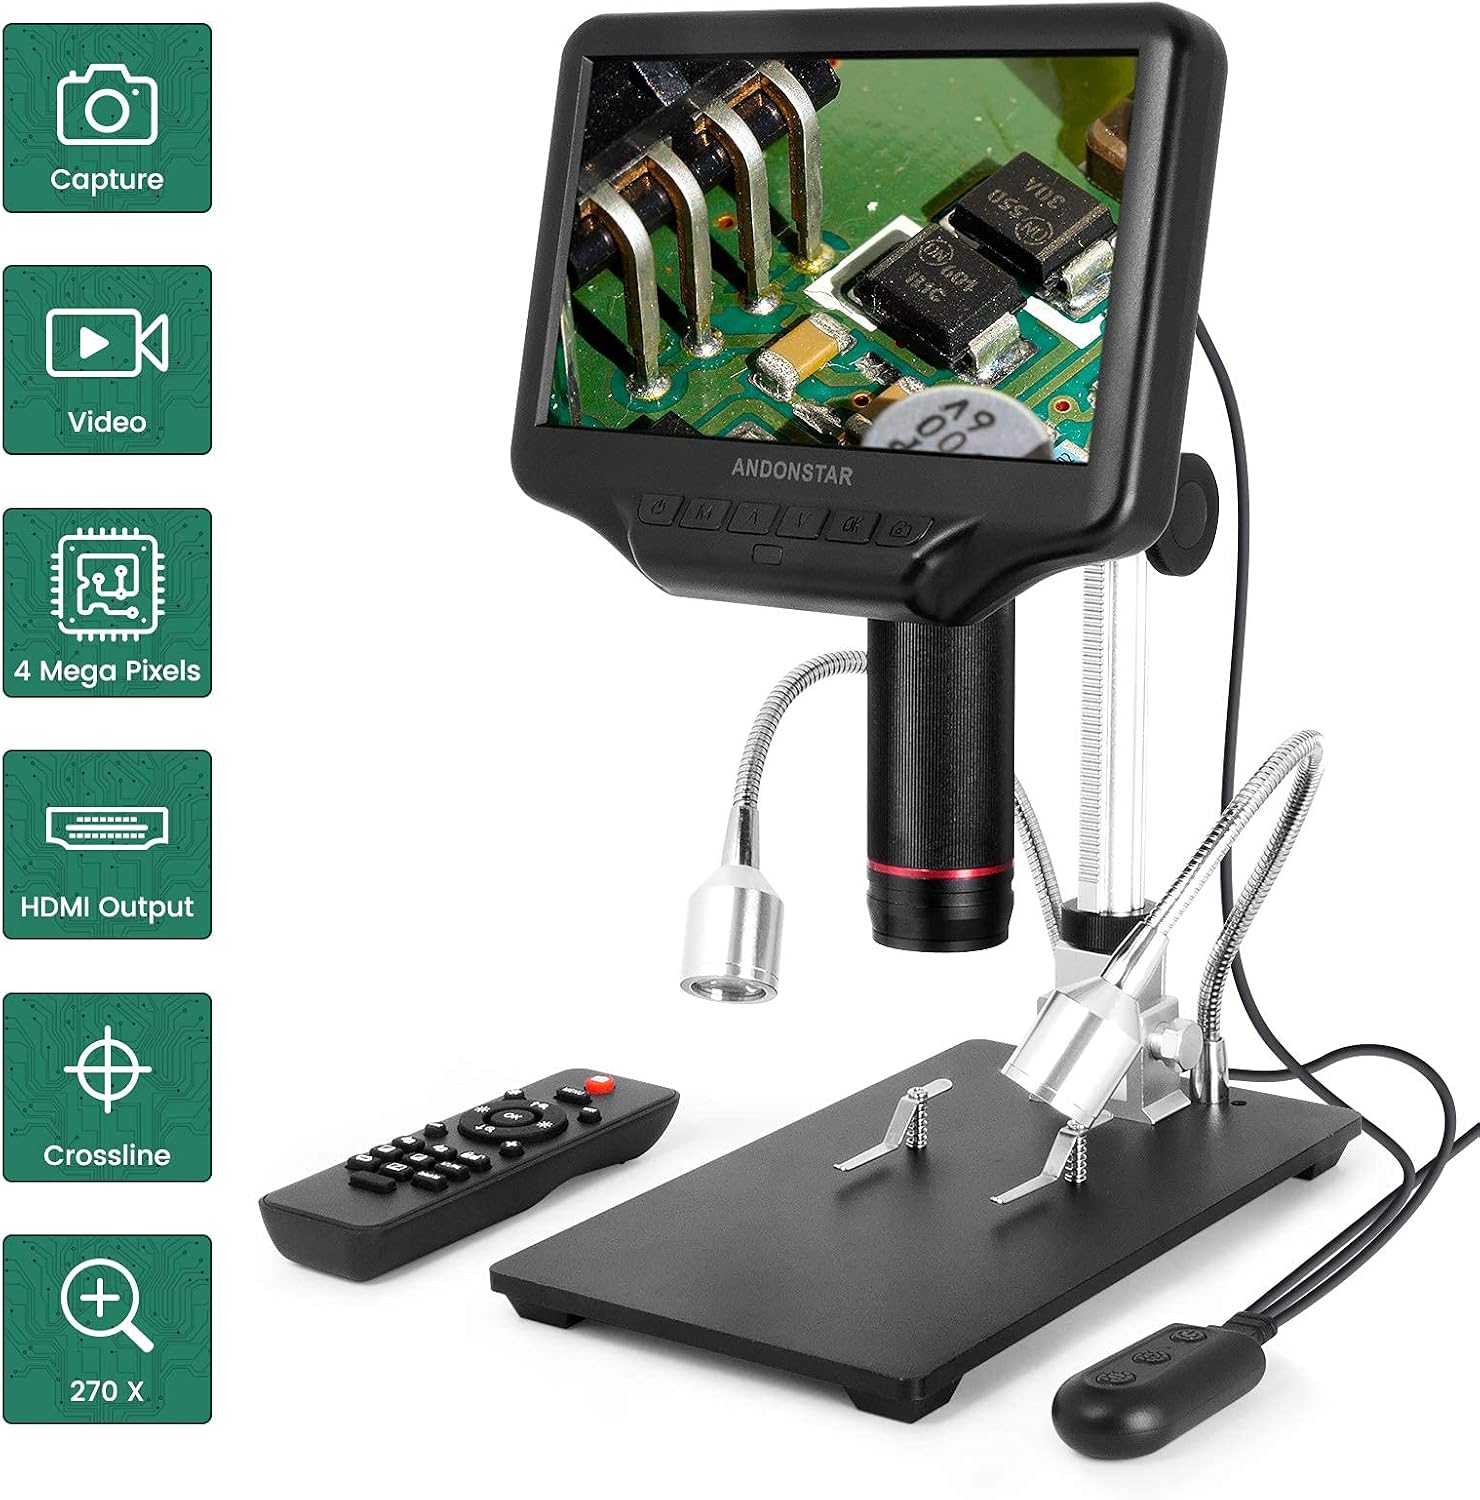
Figure 2: Key features of the AD407, including remote control and various outputs.
3. Setup Guide
Follow these steps to assemble and set up your Andonstar AD407 Digital Microscope:
- Attach the Stand: Fasten the screws to the back of the base plate to secure the main stand assembly.
- Adjust Optical Bracket: Adjust and tighten the direction of the optical bracket on the stand.
- Insert Microscope Unit: Loosen the thumbscrews on the optical bracket and carefully slide the microscope unit (optical stack) into the ring of the bracket. Tighten the thumbscrews to secure it.
- Connect Power: Plug the power adapter into the microscope and then into a power outlet.
- Position Lighting: Adjust the flexible gooseneck LED lights to illuminate your working area effectively. The brightness can be controlled via the inline remote on the light cable.
- Install UV Filter: Screw the UV filter onto the lens of the microscope to protect it from heat, smoke, and dust, especially during soldering.

Figure 3: Assembled AD407 microscope showing the adjustable stand.
Setup Overview Video
Video 1: This video provides a visual guide to the assembly and key features of the Andonstar AD407 Digital Microscope.
4. Operating Instructions
4.1 Power On/Off and Display
Press the power button on the microscope's display unit to turn it on or off. The 7-inch LCD screen will display the live view from the microscope camera. The screen can be tilted and rotated for comfortable viewing.

Figure 4: The AD407 features a 270-degree adjustable screen for flexible viewing.
4.2 Focusing and Magnification
Adjust the focus by rotating the focusing tube on the microscope unit. The ergonomic stand allows for precise height adjustments to achieve optimal magnification and clarity for your subject. The microscope offers up to 270X magnification.

Figure 5: The adjustable stand provides flexibility for various working distances and angles.
4.3 Lighting Adjustment
The two flexible gooseneck LED lights provide adjustable illumination. Use the inline remote control on the light cable to turn the lights on/off and adjust their brightness to eliminate shadows and ensure clear visibility of your subject.
4.4 Image and Video Capture
The microscope can capture still images and record videos. Insert a memory card (not included) into the designated slot for storage. Use the buttons on the display unit or the IR remote control to initiate capture or recording.
4.5 HDMI Output
Connect the microscope to an external monitor or TV via the HDMI port for a larger display. This allows for real-time viewing without recording to the memory card. The HDMI display is not included with the microscope.

Figure 6: Connecting the AD407 to an external display via HDMI for a larger view.
4.6 Remote Control Functions
The included IR remote control provides convenient access to various functions, including capturing images, recording videos, adjusting brightness, zooming, and navigating menus. This helps to avoid shaking the microscope during operation.
4.7 Application Examples
The AD407 is ideal for detailed inspection of electronic components, such as PCBs, SMD/SMT/BGA parts, and for intricate tasks like phone repair. It also excels at observing fine mechanical movements, like those in watches.
Observing PCB Printed Circuit Boards
Video 2: Demonstration of the AD407 observing components on a PCB.
Observing Small Capacitors on PCB
Video 3: Close-up view of 0201 and 0402 capacitors on a PCB using the AD407.
Observing Watch Movements
Video 4: Detailed observation of watch internal mechanisms with the AD407.
5. Maintenance
- Cleaning the Lens: Use a soft, lint-free cloth and a specialized lens cleaning solution to gently wipe the lens. Avoid abrasive materials that could scratch the lens.
- UV Filter Care: Regularly check and clean the UV filter. This filter is designed to protect the main lens from contaminants like smoke and dust, especially during soldering. Replace if damaged.
- General Cleaning: Wipe the microscope body and stand with a dry or slightly damp cloth. Do not use harsh chemicals or solvents.
- Storage: When not in use, store the microscope in a clean, dry place, away from direct sunlight and extreme temperatures. Consider using a dust cover.
Figure 7: The industrial metal lens with UV filter for protection.
6. Troubleshooting
| Problem | Possible Cause | Solution |
|---|---|---|
| No image on screen. |
|
|
| Image is blurry or out of focus. |
|
|
| Cannot record images/videos. |
|
|
| Remote control not responding. |
|
|
7. Specifications
| Feature | Detail |
|---|---|
| Model Name | AD407 |
| Brand | Andonstar |
| Light Source Type | LED |
| Material | Metal |
| Color | Silver, Black |
| Product Dimensions | 7.48"L x 4.72"W x 7.87"H |
| Real Angle of View | 45 Degrees |
| Magnification Maximum | 270.00X |
| Voltage | 5 Volts (DC) |
| Compatible Devices | Television (via HDMI) |
8. Warranty and Support
For information regarding product warranty, technical support, or service, please refer to the documentation included with your purchase or visit the official Andonstar website. Contact details for customer service are typically provided in the product packaging or on the manufacturer's support page.


