Hricane H669
Hricane 61-Key Electronic Piano H669 User Manual
1. Introduction
This manual provides essential information for the safe and effective use of your Hricane 61-Key Electronic Piano, model H669. Please read it thoroughly before operating the instrument and retain it for future reference.
Safety Precautions
- Do not expose the instrument to extreme temperatures, direct sunlight, or high humidity.
- Avoid placing the instrument near heat sources or in dusty environments.
- Do not drop or subject the instrument to strong impacts.
- Use only the specified power adapter or batteries.
- Keep out of reach of small children to prevent accidental ingestion of small parts.
2. Package Contents
Verify that all items listed below are included in your package:
- Hricane 61-Key Electronic Piano H669
- Microphone
- Music Stand
- USB Cable
- Key Stickers
- Audio Cable
- Japanese Instruction Manual (English translation provided in this document)

Image: Hricane 61-Key Electronic Piano with all included accessories and dimensions. Note: Accessories are located inside the foam on both sides of the product packaging.
3. Product Overview
Familiarize yourself with the main components and controls of your electronic piano.
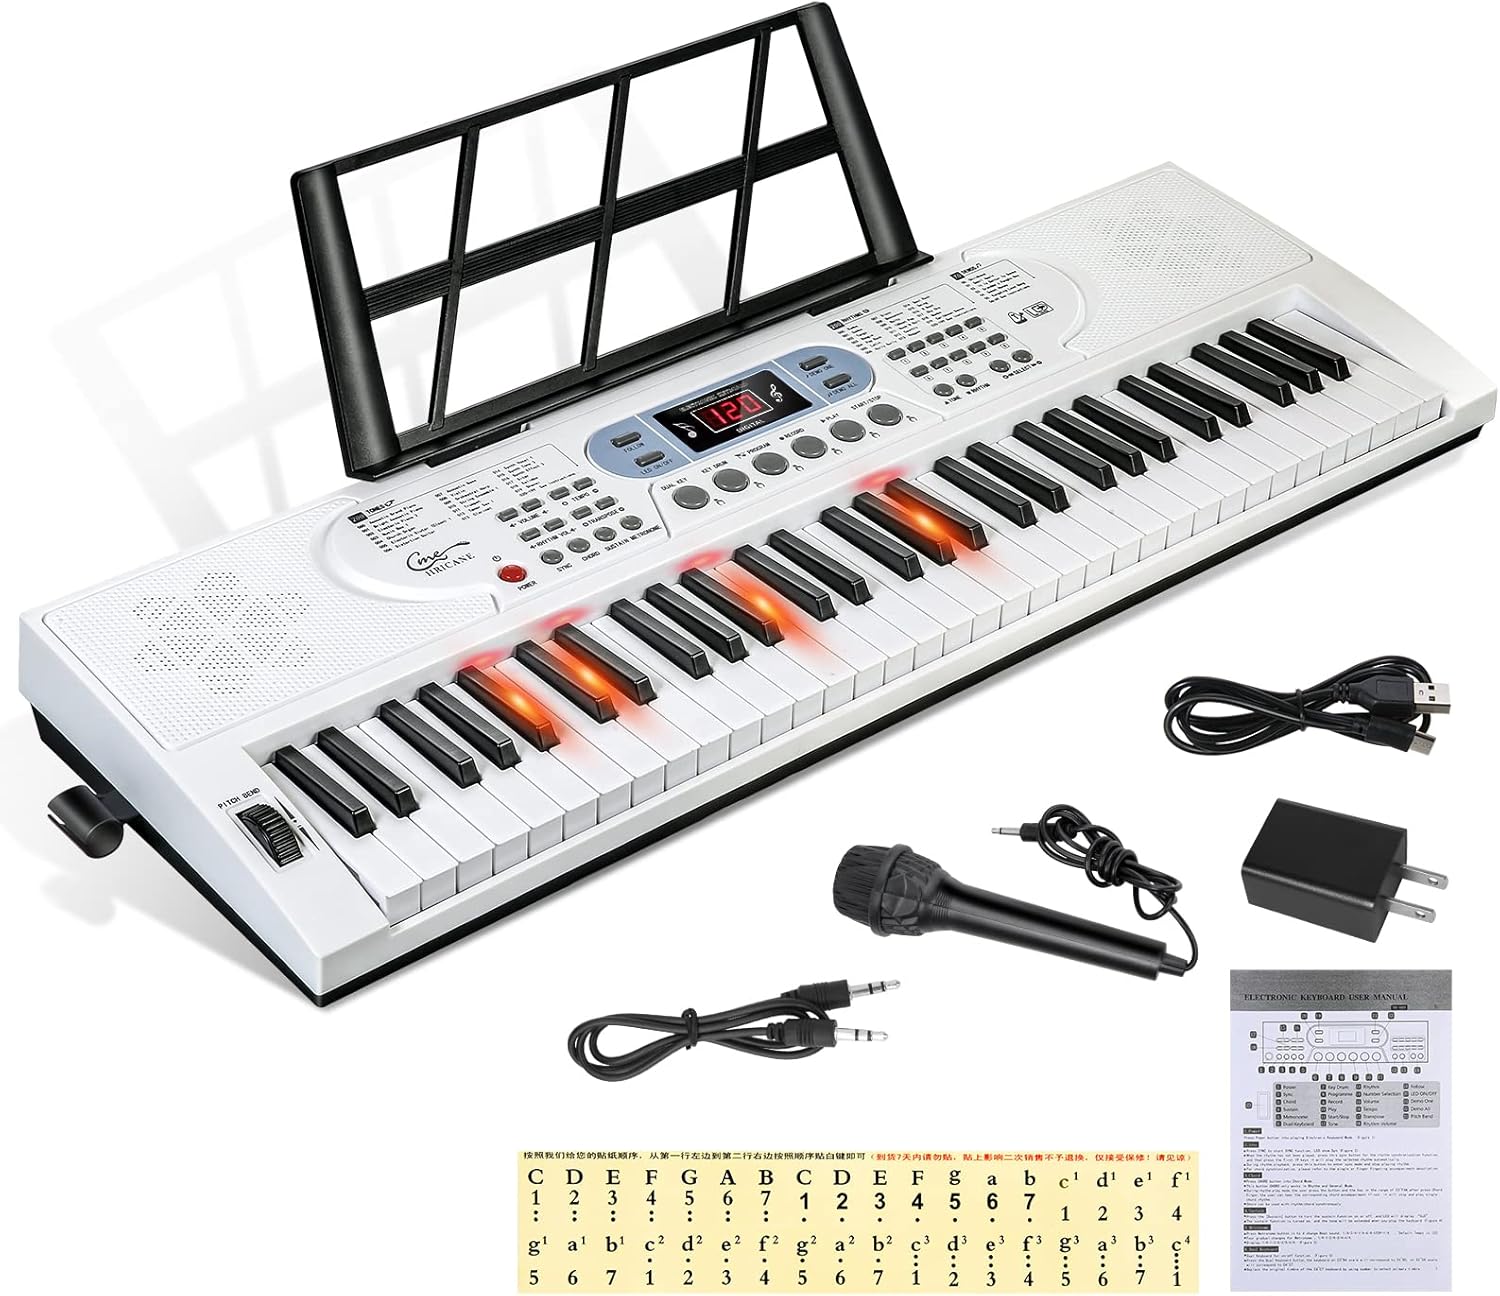
Image: Top-down view of the Hricane 61-Key Electronic Piano showing keys, control panel, and music stand.

Image: Detailed view of the control panel with labeled functions like Pitch Bend, Sustain, Chord, Metronome, and Record.

Image: Rear panel ports for power, headphones/speaker, audio input, microphone, and USB.
4. Setup
4.1 Powering the Instrument
Your electronic piano can be powered via USB or batteries.
- USB Power: Connect the included USB cable to the DC 5V port on the rear panel and to a compatible USB power adapter (not included) or a computer.
- Battery Power: For portable use, insert four (4) 1.5V AAA batteries (sold separately) into the battery compartment on the underside of the piano. Ensure correct polarity. Do not use rechargeable batteries.
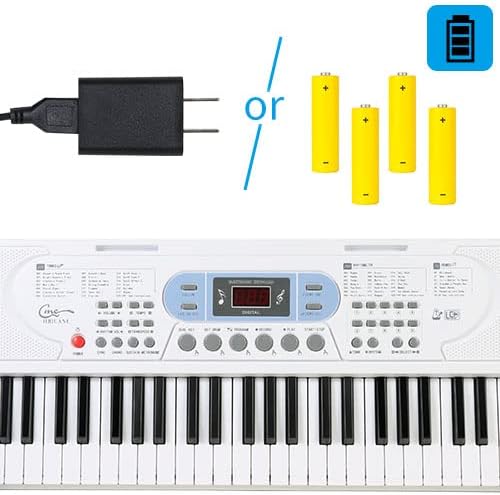
Image: Power options: USB adapter or 4 AAA batteries.
4.2 Attaching the Music Stand
Insert the music stand into the designated slots on the top panel of the keyboard.
4.3 Connecting the Microphone
Plug the included microphone into the MIC input port on the rear panel.
Video: This video demonstrates the setup of the electronic piano, including connecting power and the music stand, and shows a user playing the instrument.
5. Operating Instructions
5.1 Basic Operation
- Power On/Off: Press the 'POWER' button to turn the instrument on or off.
- Volume Adjustment: Use the 'VOLUME' knob or buttons to adjust the overall sound level.
5.2 Tones (Voices)
The keyboard features 200 different tones. Use the 'TONE' button and number keys (0-9) or the '+' and '-' buttons to select a desired tone. The LCD display will show the current tone number.
5.3 Rhythms
Access 200 built-in rhythms. Press the 'RHYTHM' button and use the number keys (0-9) or '+' and '-' buttons to select a rhythm. Press 'START/STOP' to begin or end the rhythm playback.
5.4 Demo Songs
The instrument includes 60 demo songs. Press 'DEMO SONG' and use the number keys or '+' and '-' buttons to select a song. Press 'PLAY' to start playback.

Image: Close-up of the control panel showing tone, rhythm, and demo song selection buttons and LCD display.
5.5 Recording and Playback
To record your performance, press the 'RECORD' button. Play your desired melody. Press 'RECORD' again to stop. To play back your recording, press 'PLAY'.
5.6 Transpose Function
Use the 'TRANSPOSE' buttons to shift the pitch of the entire keyboard up or down in semitone steps.
5.7 Sustain Function
Press the 'SUSTAIN' button to add a sustain effect to the notes played.
5.8 Keyboard Percussion
Activate keyboard percussion mode to assign drum sounds to the keys. Refer to the manual for specific key assignments.
5.9 Keyboard Split
The keyboard can be split into two sections, allowing two different tones to be played simultaneously or for two players to use different sections.
5.10 Light-Up Keys
The light-up key feature assists beginners by illuminating the keys to be played during lesson mode or demo songs.

Image: Electronic piano keys lighting up to guide the user during lesson mode.
5.11 Tempo Adjustment
Adjust the tempo of rhythms and demo songs using the 'TEMPO' buttons.
5.12 Harmony Function
The harmony function adds harmonic accompaniment to your melodies. Refer to the detailed product description for specific usage.
5.13 Headphone Use
Connect headphones to the 'OUT' port on the rear panel for private practice. This will mute the built-in speakers.
5.14 USB Connectivity
The USB port allows connection to a computer for MIDI functionality, enabling use with music software for learning or recording.
Video: This video showcases the various features of the electronic piano, such as different tones, rhythms, and demo songs, along with its portability and teaching functions.
Video: This video features a user playing the electronic piano, highlighting its sound quality and responsiveness.
Video: This video demonstrates the sound and playability of the electronic piano, showing a user performing a piece.
6. Maintenance
6.1 Cleaning
Wipe the instrument with a soft, dry cloth. Do not use abrasive cleaners, waxes, or solvents as they may damage the finish.
6.2 Storage
When not in use, store the electronic piano in a cool, dry place away from direct sunlight and extreme temperatures. If storing for an extended period, remove the batteries to prevent leakage.
7. Troubleshooting
| Problem | Possible Cause | Solution |
|---|---|---|
| No sound | Power not connected, volume too low, headphones connected. | Check power connection/batteries, increase volume, disconnect headphones. |
| Keys not lighting up | Lesson mode not active, feature disabled. | Ensure lesson mode is selected or light-up key feature is enabled. |
| Distorted sound | Volume too high, low battery. | Reduce volume, replace batteries or use USB power. |
| MIDI not working | Incorrect USB connection, software issues. | Ensure USB cable is properly connected, check computer's MIDI settings and software compatibility. |
8. Specifications
- Model: H669
- Keys: 61
- Tones: 200
- Rhythms: 200
- Demo Songs: 60
- Display: LCD
- Power: USB DC 5V or 4 x 1.5V AAA batteries (not included)
- Dimensions: 80 cm x 26.5 cm x 7.6 cm (33.2 in x 10.4 in x 3 in)
- Weight: Approximately 3 kg
- Connectivity: USB, Headphone Out, Audio In, Microphone In
- Features: Recording, Playback, Transpose, Sustain, Keyboard Percussion, Keyboard Split, Light-up Keys, Tempo Adjustment, Harmony Function.

Image: Key dimensions, indicating a size close to standard piano keys, suitable for both adults and children.

Image: Dual speakers for clear sound output.
9. Warranty and Support
This product comes with a one-year warranty. In case of product defects or incorrect delivery, please contact customer support for assistance with returns or exchanges. Please refer to your purchase documentation for specific warranty terms and contact information.
Ask a question about this manual
Ask about setup, troubleshooting, compatibility, parts, safety, or missing instructions. Manuals+ will review the question and use this page’s manual context to help answer it.