1. Introduction
This manual provides essential information for the safe and efficient operation of your Y&H MPPT 40A Solar Charge Controller. This device is designed to manage the power flow from your solar panel to your battery, ensuring optimal charging and protecting your battery from overcharge and over-discharge. It features automatic focus tracking for enhanced efficiency and includes dual USB ports for convenience.

Image 1: Y&H MPPT 40A Solar Charge Controller (Front View)
2. Safety Instructions
- Ensure the battery has sufficient voltage for the controller to recognize the battery type before first installation.
- The battery cable should be as short as possible to minimize loss.
- The regulator is suitable for lead-acid batteries (OPEN, AGM, GEL) and also for Ni-MH, Li-ion, or other battery types.
- The charge regulator is only suitable for regulating solar modules. Never connect another charging source to the charge regulator.
- Always connect the battery first, then the solar panel, and finally the load. When disconnecting, reverse this order: disconnect the load first, then the solar panel, and finally the battery. Incorrect connection order can damage the controller and other components.
3. Product Features
- Advanced MPPT Technology: Detects the maximum charging current, increasing efficiency by 10%-30% compared to normal solar charge controllers.
- Battery Compatibility: Supports lead-acid batteries (OPEN, AGM, GEL), Ni-MH, Li-ion, and other battery types.
- Automatic Voltage Recognition: Automatically identifies 12V/24V battery systems.
- Comprehensive Protection: Includes reverse polarity protection for battery and solar panels, over-charging, over-discharging, short-circuit, open-circuit, and thunder protection.
- Low Voltage Disconnect: Automatically cuts off the load when battery voltage is low and reconnects when voltage returns to normal.
- Dual USB Ports: Provides two 5V/2A USB outputs for charging mobile devices.
- LCD Display: Clear LCD display shows charging and discharging current, battery voltage, temperature, and load status.
- Temperature Compensation: Automatically adjusts charging voltage based on ambient temperature.
4. Components Overview
The Y&H MPPT Solar Charge Controller features an intuitive layout for easy operation and monitoring.

Image 2: Labeled Components of the Solar Charge Controller
- LCD Display: Shows real-time system status, including voltage, current, battery charge level, and load status.
- Menu Button: Used to enter and exit the setting menu.
- Page Up Button: Navigates up through menu options or increases values.
- Page Down/Manual Button: Navigates down through menu options, decreases values, or manually controls the load.
- USB Ports (OUT DC5V 2A): Two USB ports for charging external devices.
- Solar Panel Terminals: Connect to your solar panel array. Ensure correct polarity (+ and -).
- Battery Terminals: Connect to your battery bank. Ensure correct polarity (+ and -).
- Load Terminals: Connect to your DC loads. Ensure correct polarity (+ and -).
5. Setup & Installation
5.1 Connection Procedure
Follow the connection order precisely to prevent damage to the controller or other components:
- Connect the Battery: First, connect the battery to the controller's battery terminals. Ensure correct polarity (+ to + and - to -). This step is crucial for the controller to recognize the system voltage.
- Connect the Solar Panel: Next, connect the solar panel to the controller's solar panel terminals. Ensure correct polarity.
- Connect the Load: Finally, connect your DC loads to the controller's load terminals. Ensure correct polarity.
Disconnection Procedure: When disassembling the system, reverse the connection order: disconnect the load first, then the solar panel, and finally the battery.
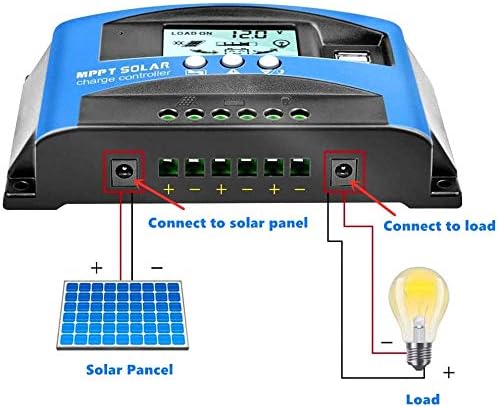
Image 3: System Connection Diagram
5.2 Inverter Connection
If using an inverter, connect it directly to the battery terminals, not to the load terminals of the controller. Connecting an inverter to the controller's load terminals can damage the controller due to high current draw.
5.3 Battery Capacity Considerations
While the controller does not have a strict requirement for battery capacity, it is recommended to match the battery capacity to the solar panel current for optimal performance and safety. For example, a 5A solar panel current is ideally paired with a 50AH battery, and a 10A solar panel current with a 100AH battery. Using a large solar panel with a small battery can be hazardous.
6. Operation
6.1 LCD Display and Indicators
The LCD displays various system parameters. The indicators show the status of solar charging, battery, and load.
- Battery Voltage: Displays the current battery voltage.
- Charging Indicator: Shows if the solar panel is actively charging the battery.
- Battery Level: Indicates the approximate charge level of the battery.
- Load Indicator: Shows if the load is currently active.
- Load ON/OFF: Indicates the status of the connected load.
6.2 Menu Navigation and Settings
To access and adjust settings:
- Enter Menu: Long press the Menu button for 3 seconds to enter the settings menu.
- Navigate: Use the Page Up and Page Down/Manual buttons to scroll through different parameters.
- Adjust Values: When a parameter is flashing, short press the Page Up or Page Down/Manual button to adjust its value.
- Confirm & Exit: Long press the Menu button again to save changes and exit the menu.
6.3 Load Working Modes
The controller offers three load working modes:
- [24H] Load output 24 hours: The load remains on continuously (except under battery low voltage protection).
- [1-19H] Load on after sunset and closed after setting hours: The load turns on automatically after sunset and stays on for the set number of hours (1 to 19 hours).
- [0H] Dusk to dawn: The load turns on automatically after sunset and stays on until dawn.
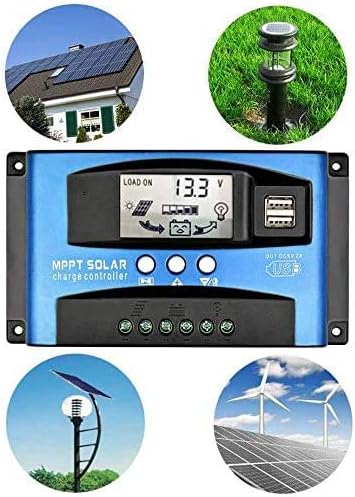
Image 4: Typical Applications of the Solar Charge Controller
7. Troubleshooting
Refer to the table below for common issues and their solutions.
| Situation | Possible Cause | Solution |
|---|---|---|
| Charge icon not on when sunny | Solar panel opened or reconnected | Reconnect |
| Load ON icon flashing | Mode setting wrong | Set again |
| Load icon slow flashing | Battery low / Overload | Recharge load / Reduce load watt |
| Power off | Battery too low / Reverse | Remove short-circuit, 1-3 minutes to auto recovery / Check battery/connection |
8. Specifications
Technical parameters for the Y&H MPPT 40A Solar Charge Controller (Model BL912D).
| Parameter | Value |
|---|---|
| Model | BL912D (40A) |
| Battery Voltage | 12V/24V Auto |
| Charge Current | 40A |
| Discharge Current | 20A |
| Max Solar Input Voltage | 12V battery: 23V; 24V battery: 46V |
| Equalization | 14.4V |
| Float Charge | 13.7V (default, adjustable) |
| Discharge Stop | 10.7V (default, adjustable) |
| Discharge Reconnect | 12.6V (default, adjustable) |
| USB Output | 2 way USB, 5V/2.5A (MAX) |
| Self-consume | <10mA |
| Operating Temperature | -35°C to +60°C |
| Size | 170 x 92 x 45 mm |
| Product Dimensions | 17 x 10 x 5 cm; 350 g |
Note: All red color voltage values are for 12V systems. Specifications are subject to change without prior notice.


