Opqpq ODM11
Opqpq ODM11 LCD Digital Biological Microscope User Manual
Model: ODM11 | Brand: Opqpq
1. Introduction
This manual provides detailed instructions for the setup, operation, and maintenance of your Opqpq ODM11 LCD Digital Biological Microscope. This device is designed for observing microscopic specimens with a 7-inch IPS display, dual lenses offering up to 2000X magnification, 10 LED lights, and a 12MP camera for capturing images and videos. It is compatible with Windows and Mac operating systems for extended viewing and data management.
2. Package Contents
Please verify that all items listed below are included in your package:
- Opqpq ODM11 Digital Microscope Unit with 7-inch IPS Display
- Adjustable Stand
- Lens 1 (500X magnification)
- Lens 2 (2000X magnification)
- USB Cables (for charging and PC connection)
- Cleaning Cloth
- Prepared Specimen Slides
- Remote Control
- 32GB Micro SD Card
- User Manual (this document)

Description: This image displays all the components typically found in the Opqpq ODM11 microscope package, including the main microscope unit with its display, the adjustable stand, two interchangeable lenses, USB cables, a cleaning cloth, prepared slides for immediate use, a remote control, and a 32GB Micro SD card.
3. Setup
- Assemble the Stand: Attach the microscope unit to the adjustable stand. Ensure it is securely fastened using the provided knobs.
- Install the Lens:
- Select either Lens 1 (500X) or Lens 2 (2000X) based on your observation needs.
- Align the lens with the microscope's lens mount. Ensure the lens label direction is facing you.
- Rotate the lens to the left or right until it is securely attached. For removal, rotate in the opposite direction.

Figure 3.1: Visual guide for attaching and detaching the microscope lenses. Description: This diagram illustrates the process of installing and removing the interchangeable lenses. To install, align the lens with the microscope body and twist until secure. To remove, twist in the opposite direction.
- Insert Micro SD Card: Locate the Micro SD card slot on the side of the display unit and insert the provided 32GB card. This is necessary for saving images and videos.
- Power On: Press and hold the power button on the display unit to turn on the microscope.
4. Operating Instructions
4.1 Focusing and Magnification
The Opqpq ODM11 features two interchangeable lenses for different observation needs:
- Lens 1 (500X): Ideal for observing larger objects like circuit boards, coins, insects, and plant surfaces.
- Lens 2 (2000X): Designed for microbial observation, tissue slices, and detailed cellular structures.

Description: This image illustrates the two distinct lenses: Lens 1 (500X) for larger objects like circuit boards and coins, and Lens 2 (2000X) for microscopic details such as cells and microorganisms.
- Place Specimen: Position your specimen on the stage. For slides, use the metal clips to secure them.
- Adjust Bracket Height: Use the large knob on the side of the stand to raise or lower the entire microscope unit relative to the stage. This provides coarse focus adjustment.
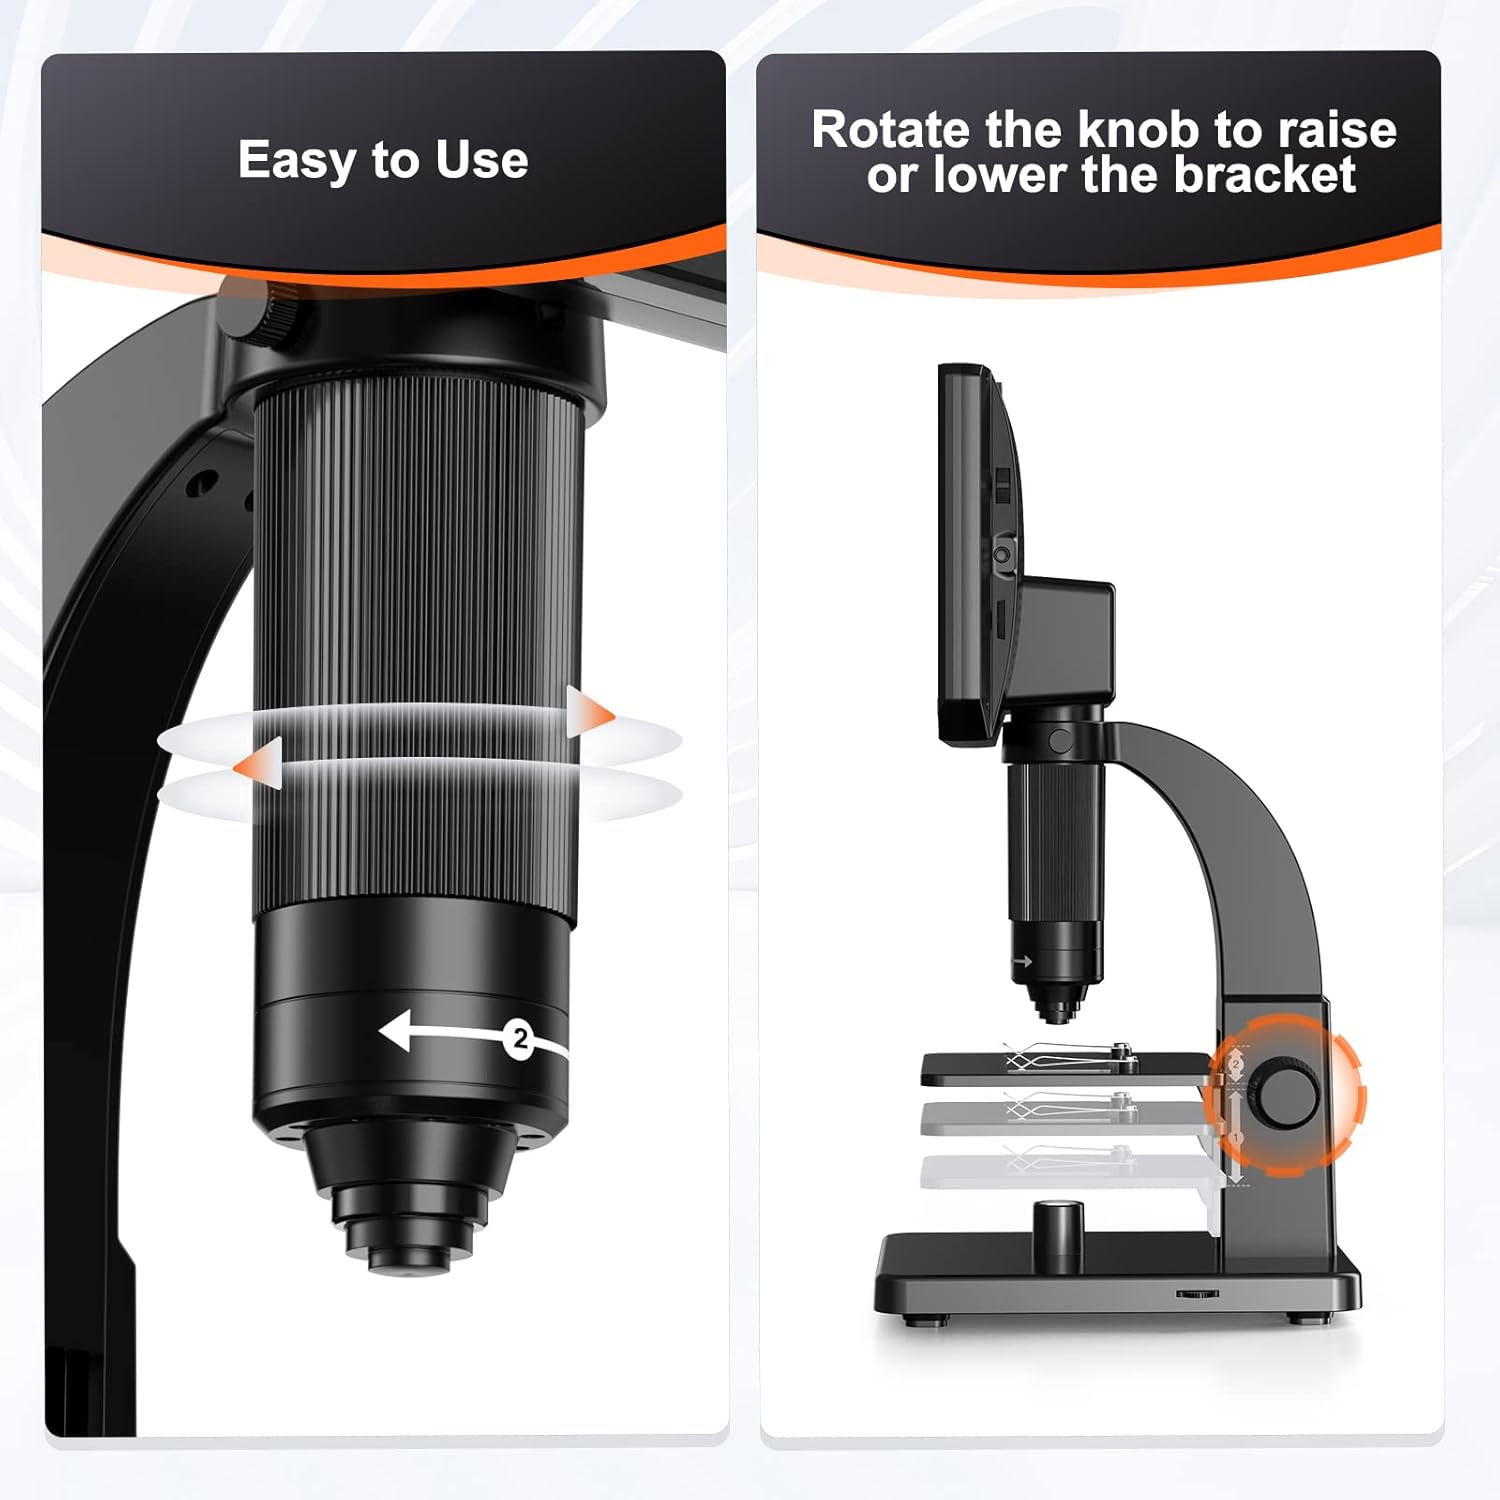
Figure 4.2: Instructions for adjusting the bracket using the side knob to achieve initial focus. Description: This image demonstrates how to use the side knob to move the microscope head up and down, which is crucial for coarse focusing, especially when switching between different types of specimens or lenses.
- Fine Focus: Rotate the focus roller on the lens barrel itself to achieve fine focus and sharpen the image on the display.
4.2 Lighting Adjustment
The microscope is equipped with multiple light sources for optimal illumination:
- 10 LED Lights: Located around the lens, providing direct illumination for opaque objects.
- 1 Base Light: Located beneath the stage, providing transmitted light for transparent specimens like slides.
Adjust the brightness of both light sources using the dedicated controls on the microscope unit to achieve clear and well-lit images.

Description: This image highlights the two primary lighting systems: the 10 LED lights for top illumination and the single base light for bottom illumination, essential for viewing different types of specimens.
4.3 Image and Video Capture
The microscope features a 12MP camera for capturing high-resolution images and videos directly to the inserted Micro SD card.
- Photo Button: Press the dedicated photo button on the display unit or remote control to capture a still image.
- Video Button: Press the dedicated video button to start and stop video recording.

Description: This image shows the microscope's display with icons for photo and video capture, emphasizing the integrated 12MP camera and the included 32GB SD card for media storage.
4.4 Display Settings
Navigate the display menu using the buttons below the screen to adjust various settings:
- Screen Brightness: Adjust the display's luminosity for comfortable viewing.
- Image Size/Resolution: Select desired resolution for captured images (e.g., 12MP, 8MP, 5MP).
- Date Stamp: Enable or disable the date and time overlay on captured media.
- Language: Change the display language.
- USB Mode: Configure connection mode when connected to a computer.
4.5 PC Connection
Connect the microscope to a Windows or Mac computer using a USB cable for a larger viewing experience and to transfer files.

Description: This image shows the Opqpq ODM11 microscope connected via USB to a desktop computer, allowing users to view specimens on a larger screen, compatible with both Windows and Mac operating systems.
4.6 Video Demonstration of Setup and Operation
Description: This video provides a comprehensive visual guide to unboxing, assembling the microscope, installing the dual lenses, adjusting focus for different magnifications, and navigating the display's settings for optimal use. It also showcases the microscope's capabilities with various specimens.
5. Maintenance
- Cleaning Lenses: Use the provided cleaning cloth or a specialized lens cleaning solution and cloth to gently wipe the lenses. Avoid abrasive materials that could scratch the lens surface.
- General Cleaning: Wipe the microscope body and display with a soft, dry cloth. Do not use harsh chemicals or solvents.
- Storage: Store the microscope in a dry, dust-free environment when not in use. Consider covering it to prevent dust accumulation.
6. Troubleshooting
- No Image on Display:
- Ensure the microscope is powered on and fully charged.
- Verify that a lens is correctly installed and securely attached.
- Check the lighting. Adjust the LED lights and base light brightness.
- Adjust the focus roller and bracket height.
- Blurry Image:
- Carefully adjust both the bracket height (coarse focus) and the lens focus roller (fine focus).
- Ensure the specimen is flat and properly positioned on the stage.
- Clean the lens if smudges or dust are visible.
- Cannot Save Images/Videos:
- Ensure the Micro SD card is correctly inserted.
- Check if the SD card has sufficient free space.
- Format the SD card through the microscope's settings menu if issues persist (this will erase all data).
- Difficulty Connecting to PC:
- Ensure the USB cable is securely connected to both the microscope and the computer.
- Check the USB mode setting on the microscope.
- Try a different USB port on your computer.
- Install any necessary drivers if prompted by your operating system.
7. Specifications
| Feature | Specification |
|---|---|
| Product Dimensions | 11 x 8.6 x 6.3 inches |
| Item Weight | 1.13 ounces |
| Item Model Number | ODM11 |
| Light Source Type | LED (10 top LEDs + 1 base light) |
| Magnification Maximum | 2000X (with dual lenses) |
| Display | 7-inch IPS HD Display |
| Camera Resolution | 12MP |
| Compatible Devices | Personal Computer, Laptop (Windows/Mac) |
| Objective Lens Description | Achromatic |
8. Warranty and Support
For warranty information, technical support, or any inquiries regarding your Opqpq ODM11 microscope, please refer to the contact information provided with your product packaging or visit the official Opqpq website. Keep your purchase receipt as proof of purchase for warranty claims.
Ask a question about this manual
Ask about setup, troubleshooting, compatibility, parts, safety, or missing instructions. Manuals+ will review the question and use this page’s manual context to help answer it.