
Introduction
This manual provides comprehensive instructions for the setup, operation, and maintenance of your Bolymic 8800 Professional Microphone Wireless System. This 8-channel UHF wireless system is designed for various applications, including churches, nightclubs, gymnasiums, concert halls, and stages, offering reliable performance with multiple headset microphones.
Please read this manual thoroughly before operating the system to ensure proper use and to maximize its performance and longevity.
Product Overview
Key Features
- 8-Channel UHF Wireless System: Supports simultaneous use of 8 microphones.
- 100 Selectable Frequencies per Channel: Allows for easy avoidance of interference and system expansion.
- Backlit LCD Display: Shows RF level, AF level, Channel Frequency, and mute status.
- Built-In Tone Lock Squelch Circuit: Provides protection from RF interference.
- Automatic Transmitter Setup: Simplifies synchronization between transmitter and receiver.
- Multiple Outputs: Features eight individual balanced XLR outputs and one 1/4" mixed output.
- Individual Volume Control: Each channel has its own volume adjustment.
- Rack Mountable: Designed to fit standard 19" equipment racks.
- Operating Range: Up to 80 meters (approximately 300 feet).
Package Contents
Verify that all items listed below are included in your package:
- (1) Eight-channel UHF receiver
- (8) Beige headset microphones (AA batteries not included)
- (8) Receiver Antennas
- (1) Cabinet installation L-type frame (for rack mounting)
- (1) 1/4" audio cable
- (1) AC-DC adapter
- (1) User Manual (this document)
Setup
1. Receiver Placement and Rack Mounting
Place the receiver unit in a stable location, away from potential sources of interference such as computers, motors, or other wireless devices. For professional installations, the receiver can be mounted into a standard 19-inch equipment rack using the provided L-type frame.
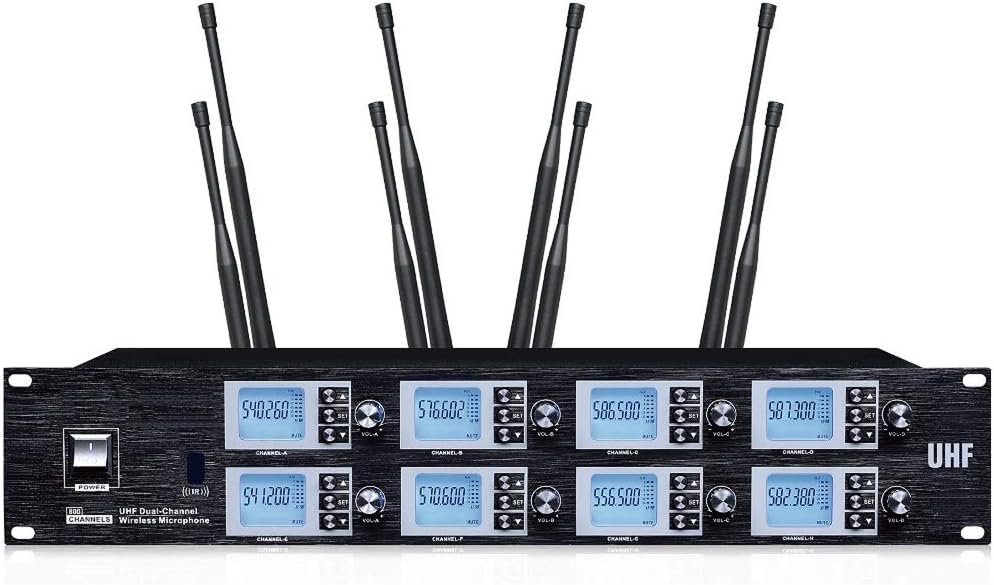
Image: Front view of the Bolymic 8800 wireless receiver, showing the eight channels with individual displays and controls, and eight antennas.
2. Antenna Connection
Connect the eight receiver antennas to the corresponding antenna inputs on the rear panel of the receiver. Ensure they are securely tightened. Position the antennas vertically for optimal signal reception.

Image: Rear view of the Bolymic 8800 wireless receiver, highlighting the antenna inputs, individual balanced XLR outputs (A, B, C, D, E, F, G, H), a 1/4" mixed output, and the power input.
3. Audio Output Connection
Connect the receiver to your audio mixer or amplifier. You have two options:
- Individual XLR Outputs: Use XLR cables to connect each of the eight balanced XLR outputs (labeled A through H) to individual channels on your mixer for separate control of each microphone.
- Mixed 1/4" Output: Use the provided 1/4" audio cable to connect the mixed output to a single input on your mixer. This combines all eight microphone signals into one output.
4. Power Connection
Connect the AC-DC adapter to the receiver's power input and then plug it into a suitable power outlet. Do not power on the unit yet.
5. Transmitter Battery Installation
Each headset microphone connects to a belt-pack transmitter. Open the battery cover on each belt-pack transmitter and insert two AA batteries, observing the correct polarity. Close the battery cover securely.

Image: Close-up view of a Bolymic wireless belt-pack transmitter, showing the headset input, power switch, battery cover, display, and antenna.
6. Headset Microphone Connection
Connect each headset microphone to its corresponding belt-pack transmitter's headset input. Ensure the connection is firm.
Operating Instructions
1. Powering On
First, power on your audio mixer/amplifier. Then, press the power button on the receiver unit. The LCD display will illuminate. Finally, switch on each belt-pack transmitter.
2. Frequency Selection and Synchronization
Each channel on the receiver and each transmitter has 100 selectable frequencies. To ensure optimal performance and avoid interference, it is crucial to synchronize the transmitter and receiver for each microphone.
- Manual Frequency Selection: On the receiver, use the channel selection buttons to choose a desired frequency for each channel. Observe the RF level indicator to select a clear frequency with minimal interference.
- Automatic Transmitter Setup (Synchronization): Once a frequency is selected on the receiver, activate the automatic synchronization function (refer to the receiver's specific button/menu for "SYNC" or "IR"). Hold the corresponding belt-pack transmitter close to the receiver's IR sensor. The receiver will automatically transmit the selected frequency to the transmitter, synchronizing them. Repeat this process for all 8 channels.
The backlit LCD display on the receiver will show the RF (Radio Frequency) level, AF (Audio Frequency) level, selected Channel Frequency, and mute status, allowing you to monitor the system's performance.
3. Adjusting Volume
Each channel on the receiver has an individual volume control knob. Adjust these knobs to set the desired output level for each microphone. Further fine-tuning can be done on your audio mixer.
4. Operating Range
The system has an operating range of up to 80 meters (approximately 300 feet) under ideal conditions. Obstacles, walls, and other RF interference sources can reduce this range. Maintain a clear line of sight between the transmitters and the receiver antennas whenever possible.
5. Powering Off
When finished, first switch off all belt-pack transmitters. Then, power off the receiver unit. Finally, power off your audio mixer/amplifier.
Maintenance
- Cleaning: Use a soft, dry cloth to clean the receiver and transmitters. Do not use liquid cleaners or solvents.
- Battery Replacement: Replace AA batteries in the belt-pack transmitters when the low battery indicator appears on the transmitter or receiver display, or when audio quality degrades. Always use fresh, high-quality batteries.
- Storage: When not in use for extended periods, remove batteries from transmitters and store the system in a cool, dry place, away from direct sunlight and extreme temperatures.
- Antennas: Handle antennas carefully to avoid bending or breaking.
Troubleshooting
| Problem | Possible Cause | Solution |
|---|---|---|
| No sound from microphone. |
|
|
| Interference or static. |
|
|
| Short operating range. |
|
|
Specifications
| Feature | Detail |
|---|---|
| Model Number | BL-8800SB-4GM |
| Brand | Bolymic |
| Frequency Range | UHF 530-580MHz |
| Frequency Response | 50Hz~18KHz |
| Number of Channels | 8 simultaneous channels, each with 100 selectable frequencies |
| Operating Range | Up to 80 meters (approx. 300 feet) |
| Transmitter Battery Life | Approximately 12 Hours (with AA batteries) |
| Outputs | 8 x XLR individual balanced outputs, 1 x 1/4" mixed output |
| Connectivity Technology | XLR |
| Connector Type | XLR |
| Special Feature | Individual Volume Control |
| Polar Pattern | Unidirectional |
| Microphone Form Factor | Microphone System (Headset) |
| Power Source | Corded Electric (Receiver), AA Batteries (Transmitters) |
| Item Weight | 26.4 pounds (Receiver unit and accessories) |
| Package Dimensions | 21.65 x 17.72 x 11.81 inches |
| UPC | 699929758613 |
Warranty and Support
For warranty information, technical support, or service inquiries, please contact your retailer or the manufacturer directly. Keep your purchase receipt as proof of purchase.
Manufacturer: Bolymic