AUTOKAY WT-992
AUTOKAY WT-992 Carburetor Kit User Manual
Model: WT-992 | Brand: AUTOKAY
1. Introduction
This user manual provides essential information for the installation, operation, and maintenance of your AUTOKAY WT-992 Carburetor Kit. This kit is designed as a replacement part for specific chainsaw models, aiming to restore optimal engine performance. Please read this manual thoroughly before proceeding with any installation or maintenance to ensure safe and correct usage.
2. Compatibility
The AUTOKAY WT-992 Carburetor Kit is compatible with the following chainsaw models:
- Echo CS-352
- Echo CS352
- Echo CS-353
- Echo CS-352ES
- Shindaiwa 340s Gasoline Chainsaws (C37214001001-C37214999999, C37313001001-C37313999999, C68215001001-C68215999999, C70515001001-C70515999999)
This carburetor replaces part number A021003330.

Figure 2.1: Status and Compatibility Overview of the Carburetor Kit.
3. Package Contents
Your AUTOKAY WT-992 Carburetor Kit includes the following components:
- 1x Carburetor (WT-992 Clone)
- 2x Gaskets
- 1x Fuel Line
- 1x Spark Plug (L7T)
- 1x Primer Bulb
- 1x Adjustment Tool
- 1x Fuel Filter
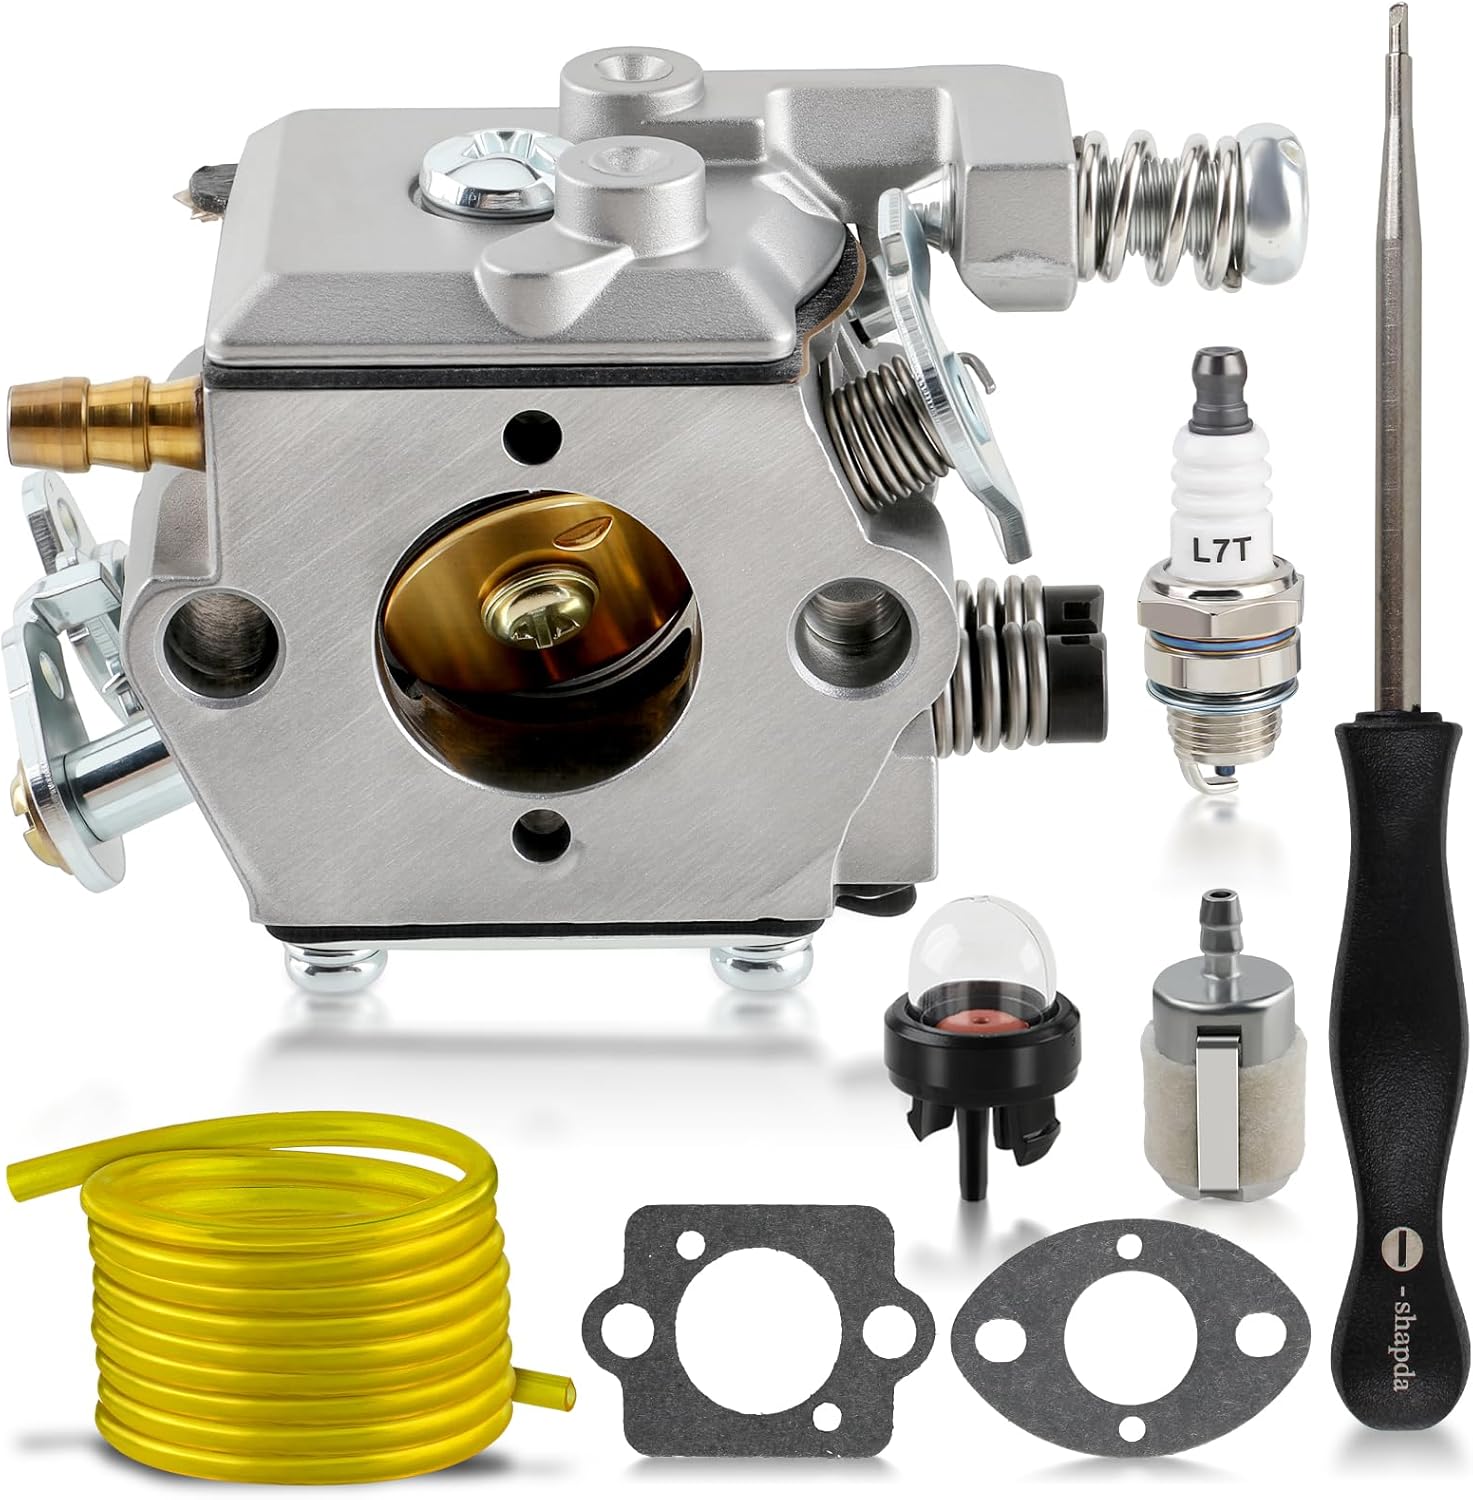
Figure 3.1: Complete contents of the AUTOKAY WT-992 Carburetor Kit.

Figure 3.2: The all-in-one kit, designed to provide all necessary components for replacement.
4. Product Features
The AUTOKAY WT-992 Carburetor Kit offers several key features:
- Durable Construction: Manufactured for longevity and reliable performance.
- High Quality: Designed to meet or exceed original equipment specifications.
- Easy to Install: Engineered for straightforward replacement, minimizing installation time.
- Comprehensive Kit: Includes all necessary components for a complete tune-up.
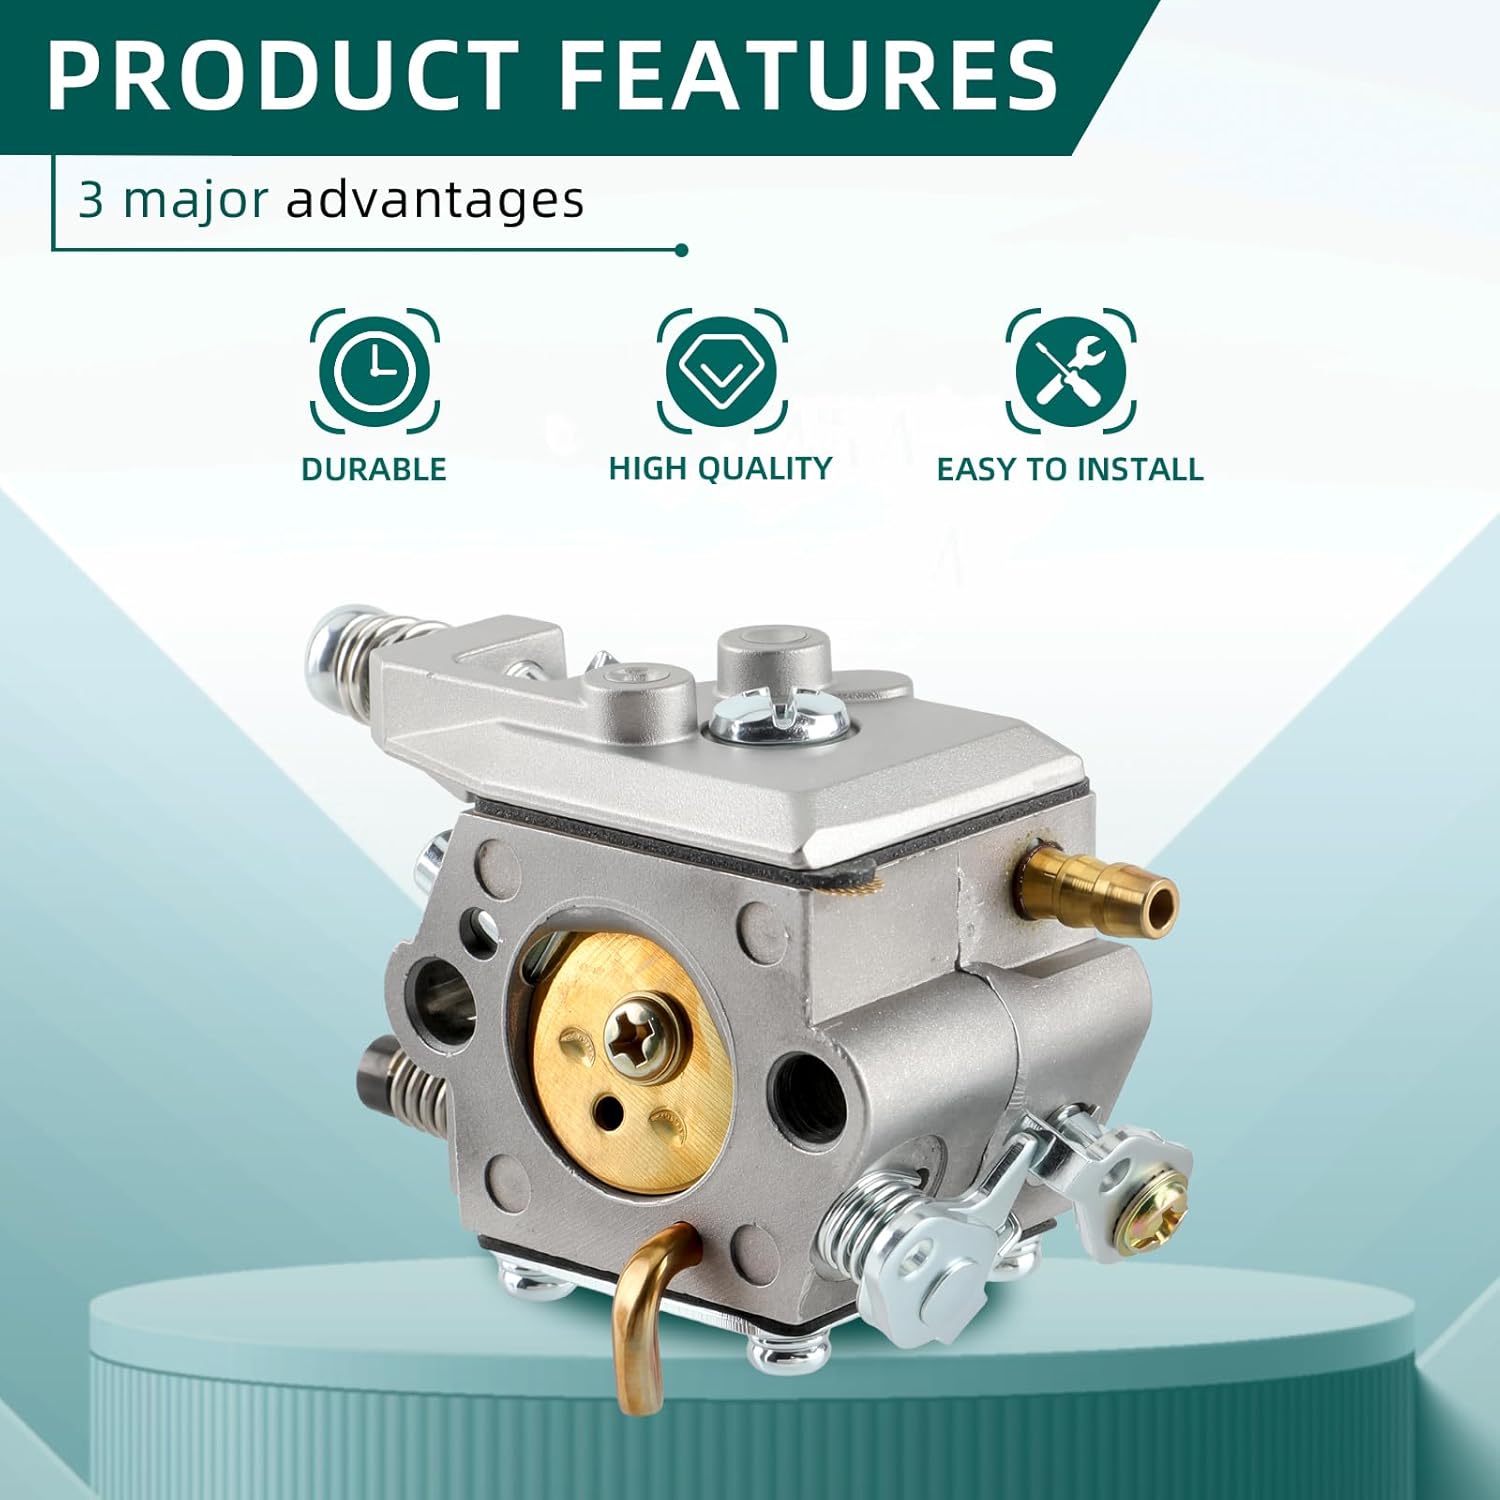
Figure 4.1: Key features highlighting the durability, quality, and ease of installation.

Figure 4.2: Detailed views of the carburetor's construction, emphasizing quality.
5. Setup and Installation
Replacing a carburetor requires mechanical aptitude. If you are unsure about any step, it is recommended to seek professional assistance. Always ensure the chainsaw is turned off, cooled down, and the spark plug wire is disconnected before beginning any work.
General Installation Steps:
- Preparation: Gather necessary tools, including the provided adjustment tool. Ensure a clean workspace.
- Access the Carburetor: Remove the air filter cover and air filter. Locate the existing carburetor.
- Disconnect Components: Carefully disconnect the fuel lines, throttle linkage, and choke linkage from the old carburetor. Note their positions for reassembly.
- Remove Old Carburetor: Unbolt the old carburetor from the engine manifold.
- Install New Gaskets: Place the new gaskets provided in the kit in their correct positions between the engine, carburetor, and air filter housing. Ensure they align properly.
- Mount New Carburetor: Secure the new AUTOKAY WT-992 carburetor in place, ensuring all mounting bolts are tightened appropriately.
- Reconnect Components: Reattach the fuel lines, throttle linkage, and choke linkage to the new carburetor. Pay close attention to the correct routing of fuel lines (inlet and return).
- Install Fuel Filter and Primer Bulb: If replacing, install the new fuel filter into the fuel tank and connect the new primer bulb.
- Final Assembly: Reinstall the air filter and air filter cover.
Installation Video Guide:
For a visual guide on the components and general handling of the carburetor, please refer to the video below:
Video 5.1: Overview of the WT-992 Carburetor and its components, demonstrating various angles and features of the unit.
6. Operating Instructions (Post-Installation)
After installing the new carburetor, proper tuning is essential for optimal performance. The carburetor comes pre-adjusted, but minor adjustments may be necessary depending on your specific chainsaw and environmental conditions.
Initial Start-up and Tuning:
- Fueling: Fill the chainsaw with the correct fuel mixture as specified by your chainsaw manufacturer.
- Priming: Press the primer bulb several times until fuel is visible in the bulb.
- Choke: Engage the choke as per your chainsaw's starting procedure.
- Start Engine: Pull the starter cord until the engine attempts to start or fires once.
- Disengage Choke: Disengage the choke and pull the starter cord again until the engine starts.
- Warm-up: Allow the engine to warm up for a few minutes.
- Idle Adjustment: Use the provided adjustment tool to fine-tune the idle speed screw (T-screw) if the engine idles too fast or too slow.
- High/Low Speed Adjustment: For advanced tuning, adjust the high (H) and low (L) speed mixture screws. Turn them clockwise until lightly seated, then back them out 1 to 1.5 turns as a starting point. Adjust in small increments (1/8 turn) to achieve smooth acceleration and maximum power without bogging down or over-revving. Refer to your chainsaw's specific service manual for precise tuning procedures.
7. Maintenance
Regular maintenance of your carburetor and associated components will extend the life of your chainsaw and ensure consistent performance.
- Fuel Quality: Always use fresh, clean fuel mixed according to your chainsaw manufacturer's specifications. Stale or improperly mixed fuel can cause carburetor issues.
- Fuel Filter: Inspect and replace the fuel filter regularly (e.g., annually or every 50 hours of use) to prevent contaminants from reaching the carburetor.
- Air Filter: Clean or replace the air filter frequently to ensure proper air-fuel mixture and prevent dirt from entering the engine and carburetor.
- Spark Plug: Check and replace the spark plug as needed. A fouled spark plug can affect engine starting and running.
- Storage: Before long-term storage, drain the fuel tank and run the engine until it stops to clear the carburetor of fuel. Alternatively, use a fuel stabilizer to prevent gum and varnish buildup.
8. Troubleshooting
This section addresses common issues you might encounter after carburetor replacement.
| Problem | Possible Cause | Solution |
|---|---|---|
| Engine won't start or is hard to start | Incorrect fuel mixture; clogged fuel filter; improper choke usage; spark plug issue; carburetor not primed. | Ensure correct fuel mixture. Replace fuel filter. Follow starting procedure correctly. Check/replace spark plug. Prime carburetor until fuel is visible. |
| Engine starts but dies quickly or bogs down | Carburetor not tuned correctly (idle, high/low speed screws); air leak; fuel delivery issue. | Adjust idle and mixture screws. Check for loose connections or damaged gaskets causing air leaks. Ensure fuel lines are clear and not kinked. |
| Engine runs rough or inconsistently | Improper carburetor tuning; dirty air filter; old/stale fuel; spark plug issue. | Fine-tune carburetor adjustments. Clean or replace air filter. Use fresh fuel. Inspect and replace spark plug if necessary. |
| Fuel leaks from carburetor | Damaged gaskets; loose connections; float needle issue. | Check and replace gaskets if damaged. Ensure all fuel line connections are secure. If issue persists, the float needle inside the carburetor may be stuck or worn. |
9. Specifications
Key specifications for the AUTOKAY WT-992 Carburetor Kit:
- Manufacturer: AUTOKAY
- Model Number: AU0104 (WT-992 Clone)
- Item Weight: Approximately 8.4 ounces
- Package Dimensions: Approximately 5.35 x 4.76 x 2.13 inches
- Replaces Part Number: A021003330

Figure 9.1: Product dimensions of the carburetor.
10. Warranty and Support
AUTOKAY is committed to providing high-quality products and responsive customer service. While specific warranty details are not provided in this manual, please retain your proof of purchase for any potential warranty claims.
For technical support, troubleshooting assistance, or inquiries regarding your AUTOKAY product, please contact AUTOKAY customer service through the retailer where you purchased the product or visit the official AUTOKAY store online. You can find more information and contact options at the AUTOKAY Store.