1. Introduction
This manual provides detailed instructions for the operation and maintenance of your AIRUISI Malahit DSP SDR Receiver. This device is a versatile Software Defined Radio (SDR) receiver designed for a wide range of frequencies and modulation types, featuring a 3.5-inch touch screen for intuitive control.
2. Package Contents
Please verify that all items listed below are present in your package:
- AIRUISI Malahit DSP SDR Receiver
- Telescopic Antenna
- USB Type-C Cable
3. Product Overview
The Malahit DSP SDR Receiver features a compact design with a 3.5-inch touch screen and two rotary encoders for navigation and control. The device includes an antenna input, USB Type-C port for charging and data transfer, and an audio output.

Figure 3.1: Front view of the AIRUISI Malahit DSP SDR Receiver with the telescopic antenna extended. The 3.5-inch LCD touch screen displays frequency, signal strength, and various settings. Two rotary encoders are visible on the right side for frequency and volume control, along with an ON/OFF button at the bottom right.

Figure 3.2: Side view of the receiver, highlighting the USB Type-C port for charging and data connection, and the two rotary control knobs for frequency and volume adjustments.

Figure 3.3: Another side view of the receiver, showing a small recessed button labeled 'Dfu'. This button is typically used for Device Firmware Update mode.
4. Setup
4.1 Charging the Battery
The receiver is powered by a built-in 3.7V 3800mAh Lithium-Ion battery. To charge the device, connect the supplied USB Type-C cable to the receiver's USB port and plug the other end into a compatible USB power source (e.g., computer, wall adapter). The charging indicator will typically show the charging status.
4.2 Connecting the Antenna
Screw the provided telescopic antenna into the 'ANT' connector on the top of the receiver. For optimal reception, especially for AM or LSB radio, an external antenna suitable for the desired frequency range may be required. The included telescopic antenna is primarily optimized for 433MHz WFM reception.
4.3 Powering On/Off
Locate the 'OFF/ON' button on the front panel, typically below the right rotary encoder. Press and hold this button for a few seconds to power the device on or off. A quick tap on the small black recessed button on the bottom of the receiver can turn the screen off, and another quick tap will turn it back on. A long press on this button may also power off the unit.
5. Operating Instructions
5.1 Frequency Range and Modulation Types
The receiver operates within a frequency range of 50 kHz to 2.0 GHz (registered version). It supports various analog modulation types:
- AM: Amplitude Modulation
- LSB: Lower Sideband
- NFM: Narrowband Frequency Modulation
- WFM: Wideband Frequency Modulation
- CW: Continuous Wave (Morse Code)
5.2 Using the Touch Screen and Encoders
The 3.5-inch touch screen is the primary interface for selecting modes, adjusting settings, and entering frequencies. The two rotary encoders on the right side provide tactile control for frequency tuning and volume adjustment. The top encoder typically controls frequency, while the bottom one controls volume.
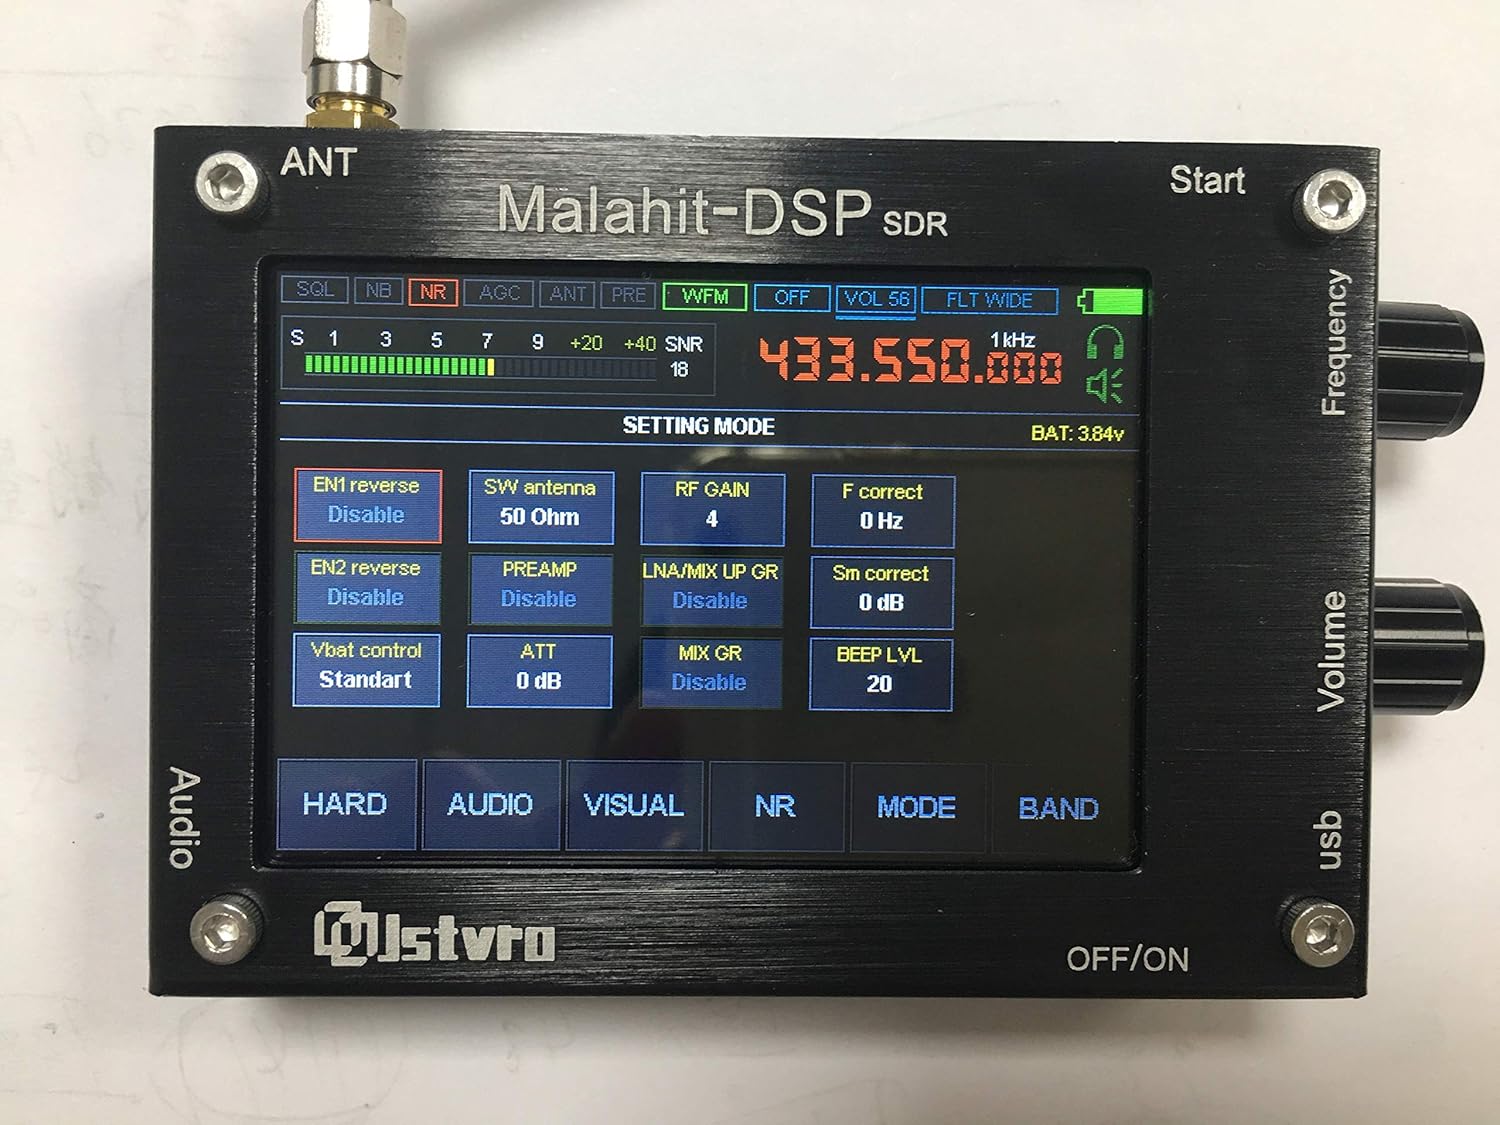
Figure 5.1: The receiver's screen showing the 'SETTING MODE' interface. This mode allows adjustment of various parameters such as antenna type, RF gain, and preamplifier settings.

Figure 5.2: A composite image illustrating different screen interfaces: 'SELECT MODE' for choosing modulation types (USB, LSB, AM, NFM, WFM), 'AUDIO SETTING' for adjusting audio parameters like AGC and noise reduction, 'VISUAL SETTING' for display preferences, and 'SETTING MODE' for general hardware configurations.
5.3 Key Functions
The receiver includes several functions to enhance reception quality:
- Variable Filter Width: Adjust the bandwidth of the received signal.
- Adaptive Noise Suppressor (NR): Reduces background noise for clearer audio.
- Threshold Noise Suppressor: Another noise reduction method.
- Noise Blanker (NB): Helps eliminate pulse-type noise.
- Automatic Gain Control (AGC): Automatically adjusts receiver gain to maintain a consistent audio output level.
- Equalizer (EQ): Adjusts audio frequency response.
5.4 Connecting to a Computer
The receiver can connect to a computer via its USB Type-C port. This connection allows for:
- CAT Control: Computer Aided Transceiver control for remote operation.
- IQ Output: Raw I/Q data stream for advanced SDR software analysis.
- Audio Output: Digital audio transfer to the computer.
Drivers may be required for your computer to recognize the device. Refer to online resources or community forums for specific driver information.
5.5 Antenna Considerations
The included telescopic antenna is suitable for general listening, particularly for WFM at 433MHz. For optimal reception of AM or LSB signals, especially in the HF bands, an external antenna is highly recommended. When using an external antenna, ensure it is properly matched to the receiver's impedance. In the settings, you can adjust the antenna impedance to 'Hi Z' for long wire antennas.
6. Settings
The receiver offers various customizable settings accessible via the touch screen. Navigate through the menus using the touch interface and rotary encoders.

Figure 6.1: The 'VISUAL SETTING' screen, allowing users to adjust display parameters such as brightness, sleep time, FFT scale, and color settings for the spectrum display.
6.1 Audio Settings
Access the 'AUDIO SETTING' menu to configure parameters such as AGC gain, noise reduction thresholds, and equalizer settings. Adjust these to optimize audio clarity for different signal conditions.
6.2 Visual Settings
The 'VISUAL SETTING' menu allows customization of the display, including screen brightness, sleep timer, FFT (Fast Fourier Transform) display scale, and color schemes.
6.3 RF Settings
In the 'SETTING MODE' or similar RF-related menus, you can adjust parameters like RF gain, preamplifier (PREAMP) status, and antenna impedance (e.g., 50 Ohm or Hi Z). Proper RF settings are crucial for maximizing reception performance.
7. Maintenance
7.1 General Care
Keep the receiver clean and free from dust. Use a soft, dry cloth for cleaning. Avoid exposing the device to extreme temperatures, humidity, or direct sunlight. Do not use harsh chemicals or abrasive cleaners.
7.2 Battery Care
To prolong battery life, avoid fully discharging the battery frequently. If storing the device for an extended period, charge it to approximately 50-70% and store it in a cool, dry place. Recharge periodically if stored for very long durations.
8. Troubleshooting
This section addresses common issues you might encounter with your Malahit DSP SDR Receiver.
- No Power / Device Not Turning On:
Ensure the battery is charged. Connect the receiver to a USB power source using the Type-C cable. If the device still does not power on, try disconnecting and reconnecting the internal battery (if you are comfortable and capable of safely opening the unit, otherwise seek professional assistance). - Poor Reception:
The included telescopic antenna is primarily for 433MHz WFM. For other frequencies, especially HF bands (AM, LSB), an external antenna is highly recommended. Check antenna connections. Adjust RF gain and preamplifier settings. Ensure the correct antenna impedance is selected in the settings (e.g., 'Hi Z' for long wire antennas). - Poor Audio Quality from Internal Speaker:
The internal speaker may have limited fidelity. For clearer audio, use headphones or an amplified external speaker. - Unit Stops Receiving Signals After Extended Use:
This can sometimes occur. Perform a complete power cycle (turn off and then on again) to reset the unit. - Touch Screen Unresponsive or Difficult to Use:
Ensure the screen is clean. For precise input, especially on small icons, a stylus can be used. - Difficulty Connecting to Computer via USB:
Ensure the correct USB drivers are installed on your computer. These drivers are often specific to the SDR chipset and may need to be sourced from online communities or the manufacturer's support page.
9. Specifications
| Feature | Specification |
|---|---|
| Frequency Range | 50 kHz to 2.0 GHz (Registered Version) |
| Modulation Types | AM, LSB, NFM, WFM, CW |
| Processor | STM32H743VIT6 (480 MHz) |
| Display | 3.5-inch Capacitive Touch Screen |
| Controls | 2 Rotary Encoders with Buttons, Touch Screen |
| Power Source | External TYPE-C interface or Built-in 3.7V 3800mAh Battery |
| Consumption (Headphones) | 300mA |
| Connectivity | USB (CAT, IQ, Audio transfer) |
| Span | 160 kHz (scalable) |
| Item Weight | 9.9 ounces (approx. 280g) |
| Package Dimensions | 7.87 x 4.72 x 1.3 inches (approx. 20 x 12 x 3.3 cm) |
10. Warranty and Support
For warranty information and technical support, please refer to the documentation provided at the time of purchase or contact your seller directly. Keep your proof of purchase for warranty claims.


