Introduction
This manual provides comprehensive instructions for the safe and efficient operation, maintenance, and troubleshooting of your Hyuduo PFS-300 Manual Heat Sealer. Please read this manual thoroughly before using the device to ensure proper function and longevity.
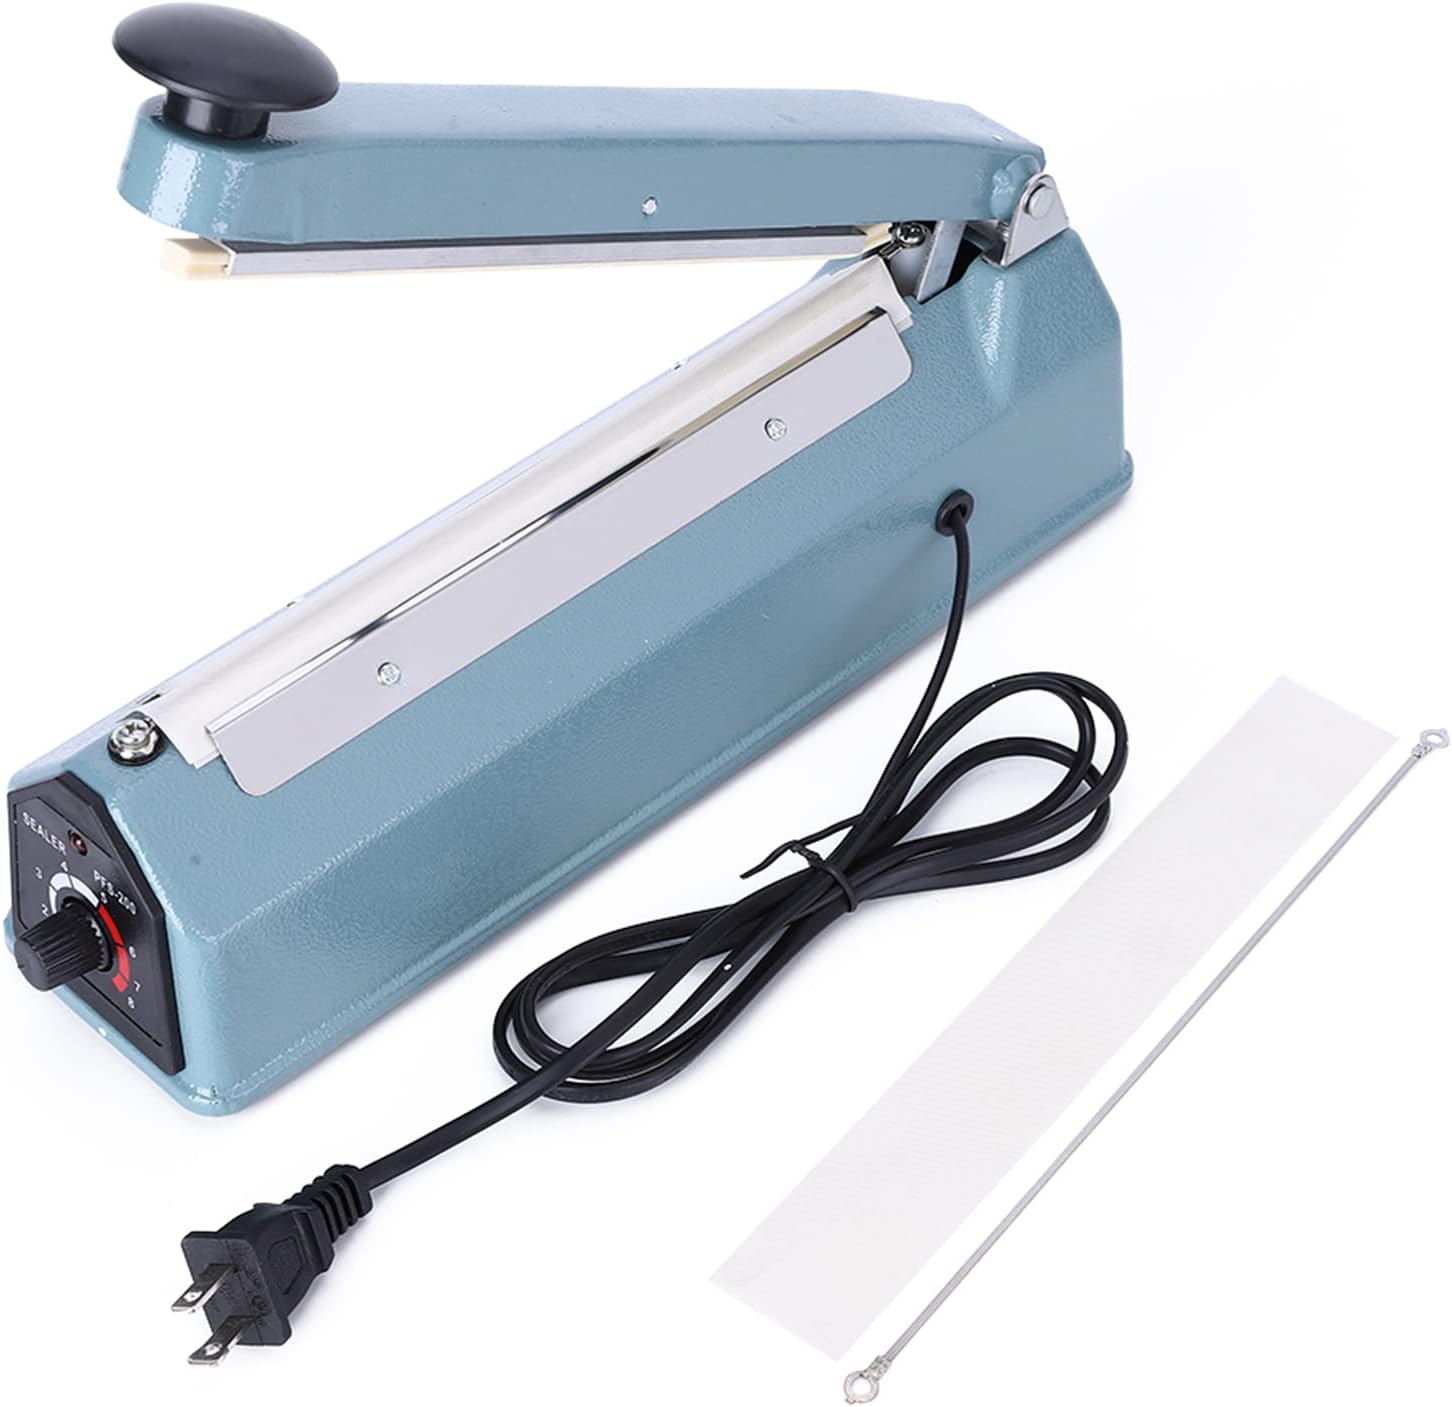
The Hyuduo PFS-300 is an impulse heat sealing machine designed for sealing various plastic films and bags. It is ideal for packaging items in homes, warehouses, pharmacies, small factories, supermarkets, and candy stores.
Safety Information
- Always ensure the power cord is securely plugged into a grounded outlet.
- Do not operate the sealer with wet hands or in damp environments.
- Keep the sealing area clear of foreign objects during operation.
- Avoid touching the heating element immediately after use, as it may still be hot.
- Unplug the device when not in use or before cleaning.
- Do not attempt to disassemble or repair the unit yourself. Contact qualified personnel for service.
- Keep out of reach of children.
Product Overview
Familiarize yourself with the components of your heat sealer:

Main Components:
- Handle: Used to press down and activate the sealing process.
- Sealing Bar: Contains the heating element and pressure bar for sealing.
- Temperature Adjustment Knob: Allows adjustment of the heating time/temperature for different material thicknesses (Levels 1-8).
- LED Indicator Light: Illuminates during the heating process and turns off when sealing is complete.
- Power Cord: For connecting the device to an electrical outlet.
Specifications
| Feature | Specification |
|---|---|
| Brand | Hyuduo |
| Model | PFS-300 (THCzavbnckg03i1d011) |
| Housing Material | Iron |
| Impulse Power | 210W |
| Heating Time | 0.2-1.5 seconds |
| Temperature Adjustment | 8 Levels |
| Sealing Length | 200mm / 8 inches |
| Sealing Width | 2mm / 0.1 inches |
| Sealing Thickness | 0.1-0.4mm |
| Product Dimensions (L x W x H) | Approx. 32 x 8 x 15 cm / 12.6 x 3.15 x 5.9 inches |
| Voltage | 110V (US Plug) |
| Operation Mode | Manual |

Setup
- Unpack: Carefully remove the heat sealer and all accessories from the packaging.
- Placement: Place the sealer on a stable, flat, and dry surface. Ensure there is adequate space around the unit for operation and ventilation.
- Power Connection: Insert the power cord into a standard 110V AC grounded electrical outlet. The sealer is designed for "plug and play" operation and does not require preheating.
Operating Instructions
Follow these steps to effectively seal your bags:

- Plug In: Ensure the AC cord is plugged into a suitable socket.
- Adjust Temperature: According to the thickness of the bag material, regulate the sealing time using the temperature adjustment knob (Levels 1-8). Thicker bags require a higher setting.
- Position Bag: Put the top edge of the bag on the sealing workplace, ensuring it is flat and centered.
- Press Handle: Press down the handle firmly. The LED indicator light will illuminate, indicating the heating element is active.
- Wait for Light: Keep the handle pressed until the LED light turns off. This indicates the sealing process is complete.
- Release Handle: After the LED light turns off, continue to hold the handle down for an additional 1-2 seconds to allow the seal to cool and set properly, preventing deformation. Then, release the handle.
- Verify Seal: Carefully remove the sealed bag and inspect the seal for completeness and strength.


Important Sealing Tips:
- For a more aesthetically pleasing seal, gently pull the bag away from the sealing bar while holding the handle down as the LED indicator turns off.
- Experiment with different temperature settings to find the optimal level for your specific bag material and thickness.
Maintenance
Proper maintenance ensures the longevity and optimal performance of your heat sealer:
- Cleaning: Disconnect the power cord before cleaning. Use a soft, dry cloth to wipe down the exterior of the unit. Do not use abrasive cleaners or immerse the unit in water.
- Heating Element and Cloth Replacement: Over time, the heating element and the anti-scald cloth may wear out. Replace them with the provided spare parts when necessary. Refer to the diagram below for general location.
Figure 7: The included spare heating element (wire) and anti-scald cloth (white strip) for replacement. - Storage: Store the sealer in a cool, dry place away from direct sunlight and moisture.
Troubleshooting
If you encounter issues with your heat sealer, refer to the following common problems and solutions:
| Problem | Possible Cause | Solution |
|---|---|---|
| No Seal / Weak Seal | Temperature setting too low for bag thickness. Insufficient pressure on handle. Worn heating element or anti-scald cloth. | Increase temperature setting. Apply firm, consistent pressure. Inspect and replace heating element or anti-scald cloth if damaged. |
| Melted / Burned Seal | Temperature setting too high for bag thickness. Handle held down for too long. | Decrease temperature setting. Release handle immediately after LED light turns off, then hold for 1-2 seconds for cooling. |
| LED Indicator Not Lighting Up | Unit not plugged in. Faulty power outlet. Internal malfunction. | Check power connection. Try a different outlet. If problem persists, contact customer support. |
| Uneven Seal | Bag not placed flat on sealing surface. Uneven pressure applied. | Ensure bag is flat and smooth before pressing. Apply even pressure across the handle. |
Warranty and Support
For warranty information or technical support, please contact Hyuduo customer service. Keep your purchase receipt as proof of purchase.
You can visit the official Hyuduo store on Amazon for more information and contact options: Hyuduo Amazon Store.